Translate

Showing posts with label Nora. Show all posts

Friday, January 28, 2022

A Sad Goodbye and A Get Well Card

Happy Friday everyone!! 

Nora here on the blog today from A Creative Touch with a farewell post with a get well card created with some of my FAVORITE CAS-ual Fridays supplies.


I started off this card by ink blending pink and peach on opposite sides of an A2 white, card front. I then used the retiring
Modern Petals Stencil over the top, switching the colors so that the peach was over the pink and the pink over the peach color.


To complete the card front, I spritzed some pink spray stain over the stenciling. I cut the front down to a 4" by 5 1/4" and adhered to a white, A2, top folding card.


I set this aside and stamped the large flower, two medium flowers and three leaves from
Pretty Posies  stamp set with Versamark ink on white cardstock. 


I heat embossed these botanicals with gold embossing powder. I used pink, peach and green ink to color my stamped images in and die cut them with the matching
Posies Dies.


I adhered the flowers over my card front. I then heat embossed a sentiment from the same stamp set on a white strip of cardstock. I cut the sentiment up into pieces and adhered it over the card as shown.


My last step was to use the
Swirls Stencil and some Nuvo Crystal Drops in green to make some swirls over the card front.


My card was complete!!


If you want any of these products, hop on over to the CLEARANCE section at the CAS-Fridays Shop. These are going fast and will not be there for much longer!!

I will miss all of you and my fellow DT members. I want to thank Michele for a wonderful experience!!! 

I will still be blogging over at A Creative Touch. Hop on over from time to time to see what new endeavors I will be delving in. 

I thank you for taking the time to stop by!! Have a FABULOUS day!!


Tuesday, January 18, 2022

Something to Make You Smile

Hello!! Nora here from A Creative Touch. I created a simple card using ink blending and embossing with the Everyday Dragonflies stamp set.


I started off this card by stamping the dragonflies in Versamark ink and heat embossing them with clear embossing powder.


I then used four types of blue ink and blended it over the card front.


The darker the blend, the more the dragonflies stood out.


I then watered down the ink and used a paintbrush to splatter over the card front.


When the splatters were dry, I cut down the card into a 4" by 5 1/4" piece. I then stamped the sentiment from Everyday Dragonflies in black ink. 


I adhered the panel over the white, A2, top folding card front. To complete the card, I adhered the blue gems randomly over my card and it was finished.


This stamp set is in the CLEARANCE section right now. Use my code NORASENTME to get an extra 15% off your total order!!!


I want to thank you for taking the time to stop by today. Please pop back in later this week to see some more awesome goodness from the other Design Team members. 

Have a FABULOUS day!!


Saturday, January 8, 2022

There is No Limit to Your Awesomeness

Hello everyone!! Nora here from A Creative Touch with a fun card using a color scheme that I love. I chose to mix the colors aqua and red to create a card that could be sent for any occasion.


I used the CAS-Fridays Mon Ami Stamp and Mon Ami Fleur Die set for my flowers and leaves.


I started off my card with an aqua, A2, top folding card. I stamped leaves from Mon Ami in the same colored ink as the card base in the bottom right side. I then used a score board to score my card front at each inch.


I stamped and heat embossed more leaves on white cardstock and vellum. On the vellum, I heat embossed  the leaves in white. I shaded the white leaves in with Copic Markers and cut all of the bunch out by hand. I then stamped one of the flowers from the Mon Ami Stamp Set in black and colored it in with some Copic Markers. 

I used foam adhesive to layer a red, pinked circle that I die cut using the Pinked Slimline Dies over the stamped leaves. 


I tucked some of the vellum and shaded blades under and over the red die cut. I adhered the flower over the circle, as well as a sentiment from the same stamp set that I had stamped on black cardstock and heat embossed with white. 


My last step was to adhere some red sequins randomly around the card and fill in the top of the flower with some red Nuvo Crystal Drops. 

 All the links in this post are Affiliate Links you can use, at no extra cost to you. You can also use my code NORASENTME to get an extra 15% off your entire order-including the CLEARANCE section at the CAS-Fridays Shop.


I want to thank you for taking the time to stop by today. Be sure to stop by this week to see other fabulous projects the Design Team has created!!!


Wednesday, December 15, 2021

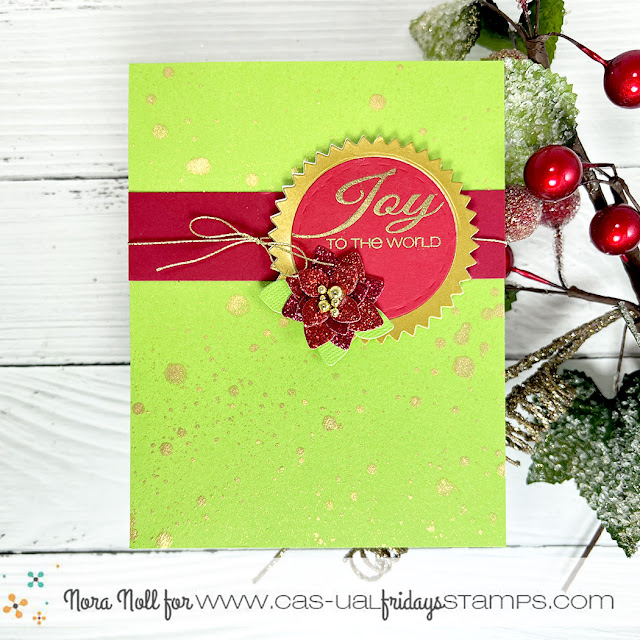
Joy to the World

Hello Crafty Friends!! It is Nora here from A Creative Touch with a Christmas card.


I began my card by flicking gold watercolor over a bright green card base. While that was drying, I used the Pinked Slimline dies to die cut a large pinked circle out of white and gold cardstock. 


I used the large stitched circle die from the same die set to die cut a red circle and a circle out of the middle of the gold, pinked circle.


I stamped and heat embossed a sentiment in gold from the Snowy Sayings stamp set onto the red cardstock circle. 


I then adhered both the gold frame and the red sentiment circle over the white pinked die cut.


I adhered a strip of red cardstock with some gold twine that I had tied into a bow over the card front. I used foam adhesive to adhere the sentiment over the cardfront.

On my November post, I had created poinsettia flowers out of the 4 Petal Die Cuts and I had extra. 


I used one of these poinsettias over the bottom left of my sentiment circle and my card was done. 


Have you gotten all your Christmas cards completed? I have to admit, I haven't even started to send them out yet. I have SO MUCH TO DO!!!

If you are interested in any of the products I used today, you can clink on this link or any of the links in this post. Use my code NORASENTME to get an extra 15% your total order!!!


I want to thank you for taking the time to stop by today!! Have a FABULOUS day!!


Saturday, December 4, 2021

A Happy Hanukkah Card

Happy Hanukah my friends!! It is Nora, here from A Creative Touch on the blog today with a festive card to celebrate this holiday of lights.


I started off my card by blending blue ink through the large star on the CAS-Fridays Jewish Star Stencil. I masked it off with tape so that I would only get the ink inside the part of the stencil I wanted. 


I then masked off the star and applied blue texture paste over the top. I utilized the same stencil but used the star strip on the left. I wanted a tone on tone effect that I could get using both the ink and the texture paste together. The texture paste was just a tad bit lighter so that it can be seen over the dark blue of the ink blending.


While my star was drying, I prepared my background. I used my FAVORITE CAS-Fridays stencil, Swirls Stencil, and blue glitter glue to make all the sparkly dots on a die cut, white rectangle. I have used this stencil on SO MANY cards and out of all the stencils I own, I have played with this stencil the most.


I set this panel aside to dry, and die cut the sentiment using the Happy Hanukkah dies. 


I decided to use a silver glitter cardstock to give the sentiment some visual weight because I was using so much blue on this card. I first tried a white glitter die cut but it blended into the background too much.

 
When all the pieces were dry, I put the card together. I adhered the swirls background over an A2, white, top folding card base. I then used foam adhesive to adhere the Jewish Star to my card front. My last step was to adhere the glitter sentiment over the star and my card was complete.


I was not sure where I was going when I started my card but I love the way it came out. I hope this inspires you to use your stencils and dies together.

The two stencils and the die cut for the sentiment are available in the CAS-Fridays Shop. Please use my code NORASENTME to get an extra 15% off your total order!!!


I thank you for taking the time to stop by. Please be sure to check in to the blog this week for some more fabulous creations from the Design Team.