Translate

Showing posts with label Handmade Cards. Show all posts

Wednesday, December 15, 2021

Joy to the World

Hello Crafty Friends!! It is Nora here from A Creative Touch with a Christmas card.
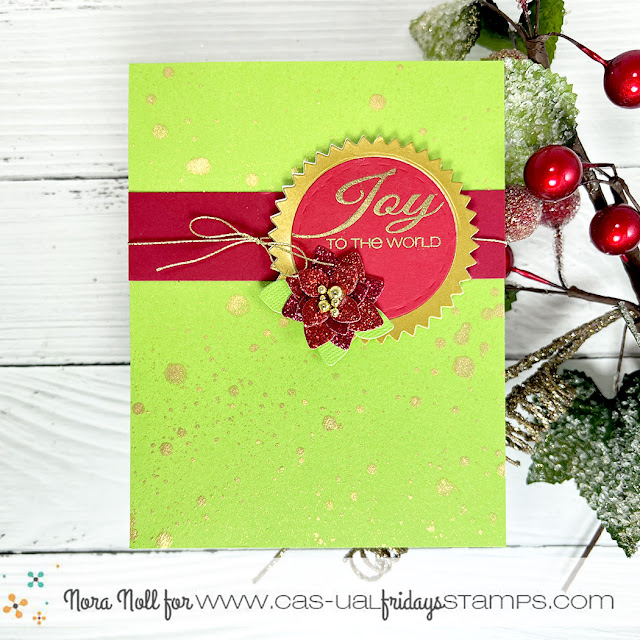

I began my card by flicking gold watercolor over a bright green card base. While that was drying, I used the Pinked Slimline dies to die cut a large pinked circle out of white and gold cardstock. 


I used the large stitched circle die from the same die set to die cut a red circle and a circle out of the middle of the gold, pinked circle.


I stamped and heat embossed a sentiment in gold from the Snowy Sayings stamp set onto the red cardstock circle. 


I then adhered both the gold frame and the red sentiment circle over the white pinked die cut.


I adhered a strip of red cardstock with some gold twine that I had tied into a bow over the card front. I used foam adhesive to adhere the sentiment over the cardfront.

On my November post, I had created poinsettia flowers out of the 4 Petal Die Cuts and I had extra. 


I used one of these poinsettias over the bottom left of my sentiment circle and my card was done. 


Have you gotten all your Christmas cards completed? I have to admit, I haven't even started to send them out yet. I have SO MUCH TO DO!!!

If you are interested in any of the products I used today, you can clink on this link or any of the links in this post. Use my code NORASENTME to get an extra 15% your total order!!!


I want to thank you for taking the time to stop by today!! Have a FABULOUS day!!


Monday, May 4, 2020

Rainbow Bridge Card


I hope you're all doing well and creating a lot of cards and other D.I.Y. projects while on lockdown.  I am honestly so thankful we have this hobby.  This is what keeps me going whilst not being able to travel and see my family.  Let us all pray together that this pandemic goes away so we can all get back to our normal routine.


My project today showcases the Rainbow Bridge stamp set.

To make my card, I stamped the rainbow image on some Bristol smooth white card stock using versamark ink.  I put some white embossing powder and heat-set with my heating tool.


I ink-blended the stamp image with various distress oxide inks in rainbow colors.  Using my precision snips, I fussy-cut the image.  I also die-cut a few elements that I needed to create my scene.

I used a stencil from my stash to create the clouds on a panel of Neenah solar white card stock.  I adhered the rainbow onto the card with liquid glue, and foam-mounted the clouds.

The sentiment was stamped with versamark ink and embossed with my heating tool.  Here's a closer look:


To finish my design, I added the red enamel heart in the middle of the rainbow.  I really LOVE how this card turned out.  


Here's what the Rainbow Bridge stamp set  look like:


Please don't forget to use my coupon code below to get an additional 15% off your order.  Have an amazing day and happy stamping!


Sunday, February 2, 2020

Hope Is Stronger Than Fear

Hello and happy Sunday!  Maria here on the blog with you today with another CAS card, showcasing the Hope Ribbon stamp set, the Big Hope Fri-Die and the Ruffled Ribbon Fri-Die.


To make the card, I stamped the image on some Bristol smooth white card stock with Versamark ink and sprinkled some white embossing powder on top.  I heat-set this image using my heating tool.

I ink-blended this piece with some Worn Lipstick distress oxide ink and use the Ruffled Ribbon Fri-Die to die-cut the piece.

I cut a rainbow patterned paper and adhered this piece on some A2 size card base.  I foam-mounted the focal image in the middle of the card.

I die-cut the word "hope" on some white and black card stock.  I slightly offset the white die-cut on the black to create some dimension.  I adhered this piece on top of the focal image.

Lastly, I stamped the sentiment using versamark ink and heat-embossed this again with my heating tool.  I added some sparkling clear jewels to finish my design.  Here's my card:


I don't know what it is but I have been into some rainbow-backgrounds lately.  It honestly makes me happy to see the rainbow colors.  Here's a closer look:


I hope you like my card today.  The supplies I used can be found on the Cas-ual Fridays online store.  Please don't forget to use my coupon code below for 15% off your order.


Thanks for stopping by and have an amazing day!


Saturday, January 11, 2020

Happy Valentine's Day Shaker Card


Hello CFS fans! Maria here on the blog with you today, sharing a Valentine's Day shaker card, showcasing the Hearts A2 Panel Fri-die and the sentiment is from the Love Notes stamp set.


To begin, I started off ink-blending a rainbow background on Bristol smooth white card stock with Distress Oxide inks in Mustard Seed, Ripe Persimmon, Worn Lipstick, Peacock Feathers and Seedless Preserves.

I die-cut my ink-blended panel with the Hearts A2 Panel Fri-die.  I adhered some acetate sheet on this piece and added foam adhesive to create my shaker panel.

I added some rainbow confetti dots as my shaker element and adhered the panel on top of an A2-size black card base.

I stamped the sentiment on a black strip with versamark ink and sprinkled some white embossing powder.  I used my heating tool to heat emboss the sentiment and adhered this piece on my card with my tape runner.  Here's what it looks like:


The black background just made the rainbow panel pop.  Here's a closer look:


For full details about this card, please visit my blog - Maria Russell Designs.  

I hope you like my project today.  Please use my coupon code below for an additional 15% off your order.  Thanks for stopping by and happy stamping!


Tuesday, December 31, 2019

Just Keep Soaring

Hello Cas-ual Fridays fans! Maria here on the blog with you.  HAPPY New Year's Eve!  Is everyone gearing up for midnight with a little bit of fireworks and some great food?  I am so lucky that I am back home in Florida and will get to celebrate tonight with my husband and children, and some close friends!  

I have a little "cheer-me-up" card today, showcasing the Floating stamp set, with the Hearts A2 Panel Fri-Die.


I started by ink-blending my background with some distress oxide inks on Bristol smooth white card stock.  I set this aside to dry.

I stamped my image on some Neenah solar white card stock and colored the images in with my Copic markers.  I fussy-cut the image with my cutter-bee scissors.

I die-cut some Neenah solar white card stock using the Hearts A2 panel fri-die.  I foam-mounted this piece on an A2 size card base.  I also adhered my main focal point on the card.

I used a die from my stash to die-cut a banner and stamped my sentiment using versamark ink.  I sprinkled some white embossing powder and heat-set using my heating tool.  I adhered this piece on my card.  Here's what it looks like:


I love that this card is very simple, and easy to make.  I don't think it even took me 5 minutes to finish this card.  Here's a closer look:


I hope you like my card today.  Please don't forget to use my coupon code below to get 15% off your order.  Have an amazing day and happy stamping!  See you next year!


Tuesday, July 30, 2019

Little Birdies with Maria


Hello CAS-ual Fridays fans!  Maria here on the blog with you today with this cute card, showcasing the Little Birdies stamp set and Birdies Fri-Dies.  


Before I tell you how I made my project, I just wanted you all to know that there is a Christmas in July sale going on and the last day is tomorrow.   The Christmas items are already 40% off but if you use my coupon code below (MARIASENTME), you will get an additional 15% off.


To start, I die-cut the image on Neenah solar white card stock using the Birdies Fri-dies.  I did this because the die is a solid piece.  I used my stamping tool to stamp the image on the die-cut and colored my images in with my Spectrum Noir Alcohol markers.


I use a clouds stencil to add color on a piece of some Bristol smooth white card stock with two shades of blue distress oxide ink - Tumbled Glass and Salty Ocean.  I used a die to die-cut the colored background and foam mounted the frame onto an A2 size card base.

I die-cut the branch and leaves using some dies from my stash and adhered the pieces on my foreground.


I finished my design by adding some Bubblegum Bliss Crystal Drops.  Here's a closer look:


I hope you like my project today.  Please visit CAS-ual Fridays Stamps  to purchase the stamp and dies that I featured today.  You can also visit my blog for further details including a full list of the supplies I used.  Don't forget to use my coupon code "MARIASENTME" for 15% off your order at CAS-ual Fridays.  Happy stamping!


Thursday, June 27, 2019

More Little Huggables by Maria

Hello CAS-ual Fridays fans! It's Maria back on the blog with you today with another card, showcasing the Little Huggables stamp set and Little Critter Fri-Dies.


Here's my card:


I started with an A2 size Neenah solar white panel and used a circle die from my stash to die-cut the middle.  

The inner circle was ink blended with distress oxide inks, using a clouds stencil for some pop of color.

I stamped and colored the images with alcohol markers. I used the coordinating dies to die-cut them all out.

I added some fun foam to the card panel for stability and adhered the little critters.  I glued this panel on my card base.

I positioned the sentiments on my acrylic block and stamped them under each little critter.  I also stamped the little paw prints using some ballet slippers ink.


I finished my design by using my black gel pen to add some interest and texture to their noses and eyes.  Here's a closer look:


I hope you like my project today.  Please visit CAS-ual Fridays Stamps  to purchase the stamp and dies that I featured today.  Don't forget to use my coupon code "MARIASENTME" for 15% off your order.  Happy stamping!