Translate

Showing posts with label Margarita Glass die. Show all posts

Monday, November 8, 2021

Fall Cheers!!

Hello Crafty Friends!! 
 
Today I'm sharing a Card using the Salty Stamp Set Margarita Glass Die Set!! I LOVE these Sets and ALL of the Possibilities with mixing them with other CAS-ual Fridays Stamp Products!! 
SUPER FUN Right!!?? The Sentiments are PERFECT for either the Outside or the Inside of your Cards!! 
Here's what I've created for today!!
I Started by Stamping and Embossing the Margarita Glass Image from the Salty Stamp Set using Versa Fine Black Onyx Ink and WoW Embossing Powder in Clear Gloss!! 
I personally LOVE me a Blended Strawberry Margarita so that was the Look I was going for!! I Colored the Image with Copic Markers!! Margarita Glass: C00, C1 & C3   Blended Margarita: R000, R00, R11 & R32   Lime: G20, YG11 & YG17
Then I used the Margarita Glass Die Set to Die Cut the Image out!! 
For my Background I Inked with Tumbled Glass Distress Oxide Ink and just behind where the Margarita Glass was going to go!! I added some Water Splatters and some Black Soot Distress Paint Splatters for some Texture!! Then I Masked off the Table with some Therm O Web Purple Tape and Inked with Hickory Smoke Distress Oxide Ink!! Then I used the Falling Leaves Stencil
and Inked with Tumbled Glass Distress Oxide Ink for a Tone on Tone Design!! I Stamped and Embossed the "Cheers" Sentiment from the Pop Fizz Clink Stamp Set!!
I wanted to add some Sparkle to my Card, so I added some SSS Unicorn Confetti Glitter after I applied some Therm O Web Ultra Bond Adhesive to each of the Sugar Cubes on the Edges of the Margarita Glass!! I LOVE the FUN and SPARKLE touch it adds to the Blended Strawberry Margarita Image!! 
I set it aside to dry and then I added some Tonic Studios Opal Quartz Shimmer Pen Splatters and Black Soot Distress Paint Splatters to the Background of the Card Panel!! I LOVE the Iridescent Shimmer and it coordinates well with the Iridescent Shimmer of the SSS Unicorn Confetti Glitter I added to the Sugar Cubes on the Edge of the Glass!! 
A few Trinity Stamps Fairy Rocks Rhinestones finishes off the Design of the Card Panel!! I paired it with a Taylored Expressions Salt Water Taffy Envelope and its ready to send to a Dear Friend for her Birthday!! 

If you feel like Shopping please use my CODE: LARISSASENTME for 15% off your Order!! 
THANKS SO MUCH for stopping by today and I hope you have a FABULOUS Week!!  

LARISSA 🍹


Thursday, June 3, 2021

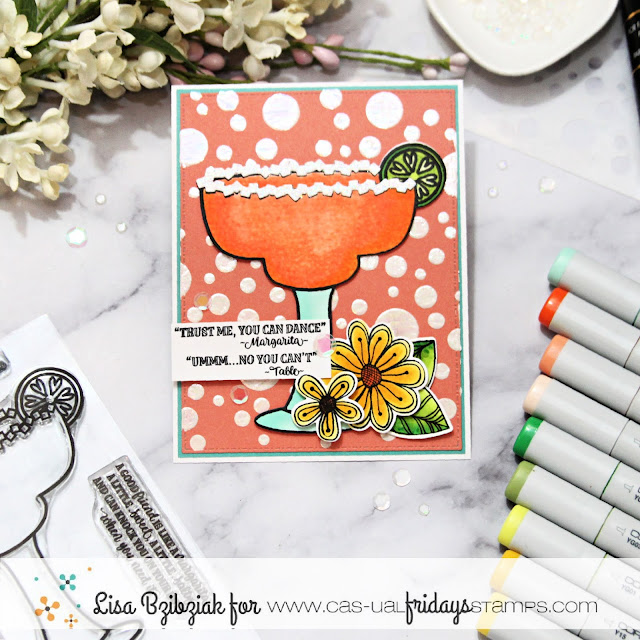
Trust Me


Welcome back!  Today I'm sharing a fun foiled background.


I used the Bubbly stencil for the background.  Normally with clear transfer gel, the opal foil has a translucent effect, but this time I decided to try it on a colored cardstock with the Blanco transfer gel.


The gel goes on and dries opaque so it's great for using lighter colors on a darker background!


And you can still see the cool shimmer and colors that the opal finish leaves.


And the fun Salty stamp and Margarita Glass die sets make even more fun!  I made this a frozen margarita... I used my blender to add tiny circles for a crushed ice feel.  I cut the salt from white cardstock and added some glitter.


And the sentiments on the Salty set... so fun and sassy!


And I added flowers from the Pretty Posies stamps and die set.. because ... why wouldn't I?


These are the colors I used...


And I have this for you!

Thanks so much for stopping and hope you come again soon!


Sunday, May 16, 2021

A Tropical Cocktail.

Hello, it’s Michelle here today with a fun tropical margarita card for you!

The "Salty" stamp set and the "Margarita Glass Die" is so much fun to use and is perfect for any occasion in my opinion!  I decided to add a little tropical feel to my card by adding some flowers along  the rim of the glass.  I used the "4 Petals" dies and sponged some yellow ink along the edge to make them look like a frangipani.


I started by die cutting the margarita glass and then placed it in my MISTI to stamp it.  You could also stamp it first and then die cut.

Next I sponged some Catherine Pooler inks and used the Bubbly Stencil over the top using the same ink colors.


Then I die cut some flowers using the 4 Petals die and ink blended some of the yellow ink around the edges and added them to the rim of the margarita glass.


I added some gold glitter pen in the middle of the petals and adhered the glass to my card panel with dimensional foam tape.  I stamped the sentiment, fussy it cut it out and added it over the stem of the glass.


Thanks for looking and if you're interested in purchasing any of the products I've used you can click the "let's go shopping" link below to take you over to the shop!
I have used my affiliate link which means at no extra cost to you I can make a small commission on any purchase you make.
Don't forget you can use my special discount code when you check out.


Monday, February 8, 2021

Strawberry Margareta CAS Card!!

Hello Crafty Friends!! 
Larissa here today with a FUN CAS Card using the NEW Salty Stamp Set & Margarita Glass Die Set that's just back in Stock!! 
LOVE these Sets and ALL of the Possibilities!! 

 Here's what I've created for today!!
I Started by Stamping and Embossing the Margarita Glass Image from the NEW Salty Stamp Set using Versa Fine Black Onyx Ink and WoW Embossing Powder in Clear Gloss!! Then I Heat Set it with a WoW Embossing Dual Speed Tool!! 
I personally LOVE me a Blended Strawberry Margarita so that was the Look I was going for!! I Colored the Image with Copic Markers!! Margarita Glass: BG70, B72 & BG75   Blended Margarita: R000, R00, R11 & R32   Lime: G20, YG11 & YG17
Then I used the NEW Margarita Glass Die Set to Die Cut the Image out!! 
Then I added some Simon Says Stamp Unicorn Glitter to the Sugar Cubes using some Ultra Bond Adhesive!! SWOON!! The addition of the Glitter just makes me HAPPY and adds some MUCH need Texture!! 
I wanted to create a CAS Design for this Card so I decided the Stamp the Card Panel with the "I think you need a Hug, Margarita" Sentiment!! I Stamped with TE Sea Salt Ink and then Stamped the Bottom 1/3 of my Card Panel with the Help of my MISTI Stamping Tool and some Therm O Web Purple Tape to mask off the Border of the Card Panel!! Then I added some Black Soot Distress Paint Splatters and a few Trinity Stamps Fairy Rock Rhinestones finish off the Design!! I LOVE how this turned out and would make the PERFECT Card for almost any occasion!! 
THANKS SO MUCH for stopping by today!! I hope I've INSPIRED you using the NEW Salty Stamp Set & Margarita Glass Die Set!! 

For TONS of AMAZING Inspiration make sure to visit the CAS-ual Fridays Stamps Blog and shop the NEW, Old and Sale Products in the CFS Shop!! You can also use my discount code LARISSASENTME to SAVE 15% off anything in the Shop!! WHOOP WHOOP!! 

Have a FABULOUS Weekend!! 
Larissa Heskett 💗

Saturday, January 16, 2021

Happy Birthday Card with Maria

Hello my crafty friends!  Maria here with you today sharing a fun birthday card, showcasing one of my favorite stamp set from the latest release, called Salty Stamp Set along with the Margarita Glass Die and Chunky Chevron 6x6 Stencil.


I started by stamping the Margarita glass image on some Bristol smooth white card stock with Versamark ink.  I sprinkled some white embossing powder and heat-set with my heating tool.  I colored the image in using my Zig Clean Real Brush Markers then used the coordinating die to die-cut it out.

For added texture, the background was made by using the Chunky Chevron 6x6 stencil on some Bristol smooth A2-size panel with Worn Lipstick distress oxide ink.  I used my distress sprayer to add more depth and texture to the background.  I foam-mounted the focal image onto the colored panel and added some white dots to the image using my gel pen.


I adhered my focal panel on some A2-size notecard with my tape runner.  I put this panel back to my Misti stamping tool and stamped the sentiment with Versafine Onyx black ink.  For more texture, I used some Stardust stickles to add some glittery shine on the "salt".

I finished my design by adding some iridescent sequins to the background.  Here's another look:


This stamp set is so versatile and definitely a must-have for any stamper, like me!  The supplies I use are listed and linked below.


Please don't forget to use my coupon code for 15% off your order.  Thanks for stopping by!