Translate

Showing posts with label WoW Embossing Powder. Show all posts

Sunday, March 6, 2022

Thanks So Much!!

HELLO CRAFTY FRIENDS!! 

 Larissa here today sharing this Card using the Everyday Dragonflies Stamp Set & Dragonflies Fri-Dies Set!! This Set is on SALE!! I'm SAD to see it GO as I LOVE this Set and have create SEVERAL of my FAVORITE Designs using it!! 
SWOON!! I LOVE how Elegant this Set is and that it's so versatile!! Here's what I've created for today!! 
I Started by Stamping and Embossing the Dragonfly Image onto my Card Panel using some WoW Embossing Powder in British Summer with my WoW Dual Speed Heat Tool!! !! Then I heat set it and Colored it in using Copic Markers!! I used: R11, R22 & R17 
Next I created a Mask to place over the Image and I Inked with some Tumbled Glass & Broken China Ink to match the Blue that is in the MFT Plaid Patterned Paper I used for the NND Scalloped Frame!! 
I finished the Design by Stamping and Embossing the Sentiment in WoW Bright White Embossing Powder and then I added some White Gel Pen Details to the Butterfly to help add some Highlights!! I also added a Few Studio Katia Pearls to add some Sparkle and finishes off the Card!! 

I mentioned other Cards I've created using this Set and here's a look at them!!


GET THIS SET Before it GONE, I PROMISE you'll LOVE Creating with it!! 

For TONS of AMAZING Inspiration make sure to visit the CAS-ual Fridays Stamps Blog and shop the NEW, Old and Sale Products in the CFS Shop!! You can also use my discount code LARISSASENTME to SAVE 15% off anything in the Shop!! WHOOP WHOOP!! 

THANKS SO MUCH for stopping by today and I hope you have a FABULOUS WEEK!! 

COUNTRY HUGS-N-KISSES
LARISSA ðŸ’—


Friday, August 20, 2021

Feel Better Soon!!

Hello Crafty Friends!! 

Larissa here today to share this SWEET Feel Better Soon Card using the NEW Stars and Stripes Stencil along with the Flower Duo Set and the Pretty Posies Stamp Set!! 
SWOON!! I LOVE the combination of the Plaid with the Flowers!! 
Let's get Started!!
 

I Started by Inking up the NEW Stars and Stripes Stencil with Picked Raspberry Distress Oxide Ink to create a FUN Plaid Design!! I think this Technique would also be FUN with Different Colored Inks!! I can't wait to try it for another Card!! 
I Stamped and Embossed the Flower Duo Image with Versa Fine Black Onyx Ink and Embossed with WoW Clear Gloss Embossing Powder!! 
Then I Colored with Copic Markers!! 
Flower: RV00, RV52 & RV55   N0 & N3     Leaves: YG61, YG63 & YG67
Then I used the coordinating Dies to Die Cut them out!! I Adhered them to a Circle Die Cut that I inked with Salvaged Patina Distress Oxide Ink using Foam Tape for some Dimension!!  
I Stamped and Embossed the "Feel Better Soon" Sentiment and then added the Circle to the Card using Foam Tape!! I adhered some Trinity Stamps Fairy Rock Rhinestones for an extra touch of Sparkle!! I LOVE the way this Card turned out and I hope I've INSPIRED you on a FUN way to use the NEW Stars and Stripes Stencil!! 

THANKS SO MUCH for stopping by today!! I hope you have a FABULOUS WEEKEND!! 

Larissa Heskett


Thursday, June 17, 2021

BEAUTIFUL CAS Birthday Card!!

HELLO CRAFTY FRIENDS!! 

Larissa here today sharing a BEAUTIFUL CAS Birthday Card!! I LOVE being able to combine Stenciling with WoW Embossing Powder for a POP of Texture and Shine!! Today I'm using the NEW Flowerburst Stencil and the Happy Birthday Stamp Set!! 

I Started by Spraying the back side of my Stencil with Pixie Spray!! Then I placed it over the Card Panel and pressed it firmly into place!! I inked with Tumbled Glass Distress Oxide Ink and removed the Stencil!! 
Then I Stamped and Embossed the Happy Birthday Sentiment with WoW Embossing Ink and Embossed with Navy WoW Embossing Powder onto a Circle Die Cut!! I Inked with Tumbled Glass Distress Oxide Ink and then adhered it the Card Panel with Foam Tape!! 

I adhered some Fairy Rock Rhinestones for some Sparkle and my Card is ready to Mail!! 

For TONS of AMAZING Inspiration make sure to visit the CAS-ual Fridays Stamps Blog and shop the NEW, Old and Sale Products in the CFS Shop!! You can also use my discount code LARISSASENTME to SAVE 15% off anything in the Shop!! WHOOP WHOOP!! 

SHOP the Retirement SALE and HUGE SALE!! There's LOTS of AMAZING Deals and you're WELCOME to use my CODE to SAVE even MORE!! WHOOP WHOOP!! 

THANKS SO MUCH for stopping by today!! I hope you have a FABULOUS WEEK!!  

Larissa Heskett ðŸ’—

Shop using my LINK HERE!! Then use my CODE at CHECK OUT to SAVE!! 


Monday, February 8, 2021

Strawberry Margareta CAS Card!!

Hello Crafty Friends!! 
Larissa here today with a FUN CAS Card using the NEW Salty Stamp Set & Margarita Glass Die Set that's just back in Stock!! 
I LOVE these Sets and ALL of the Possibilities!! 

 Here's what I've created for today!!
I Started by Stamping and Embossing the Margarita Glass Image from the NEW Salty Stamp Set using Versa Fine Black Onyx Ink and WoW Embossing Powder in Clear Gloss!! Then I Heat Set it with a WoW Embossing Dual Speed Tool!! 
I personally LOVE me a Blended Strawberry Margarita so that was the Look I was going for!! I Colored the Image with Copic Markers!! Margarita Glass: BG70, B72 & BG75   Blended Margarita: R000, R00, R11 & R32   Lime: G20, YG11 & YG17
Then I used the NEW Margarita Glass Die Set to Die Cut the Image out!! 
Then I added some Simon Says Stamp Unicorn Glitter to the Sugar Cubes using some Ultra Bond Adhesive!! SWOON!! The addition of the Glitter just makes me HAPPY and adds some MUCH need Texture!! 
I wanted to create a CAS Design for this Card so I decided the Stamp the Card Panel with the "I think you need a Hug, Margarita" Sentiment!! I Stamped with TE Sea Salt Ink and then Stamped the Bottom 1/3 of my Card Panel with the Help of my MISTI Stamping Tool and some Therm O Web Purple Tape to mask off the Border of the Card Panel!! Then I added some Black Soot Distress Paint Splatters and a few Trinity Stamps Fairy Rock Rhinestones finish off the Design!! I LOVE how this turned out and would make the PERFECT Card for almost any occasion!! 
THANKS SO MUCH for stopping by today!! I hope I've INSPIRED you using the NEW Salty Stamp Set & Margarita Glass Die Set!! 

For TONS of AMAZING Inspiration make sure to visit the CAS-ual Fridays Stamps Blog and shop the NEW, Old and Sale Products in the CFS Shop!! You can also use my discount code LARISSASENTME to SAVE 15% off anything in the Shop!! WHOOP WHOOP!! 

Have a FABULOUS Weekend!! 
Larissa Heskett ðŸ’—

Friday, January 15, 2021

Margarita Shaped Gift Tags for ANY Occasion Gifts!!

Hello Crafty Friends!! 
Larissa here today with a FUN idea for some Shaped Gift Tags using the NEW Salty Stamp Set & Margarita Glass Die Set!! I LOVE these Sets and ALL of the Possibilities!! 
Here's a look at the NEW Sets, just incase you've MISSED them!!??

SUPER FUN Right!!?? I LOVE the Sentiments that are PERFECT for either the Outside or the Inside of your Cards/Tags too!! Here's what I've created for today!!
I Started by Stamping and Embossing the Margarita Glass Image from the NEW Salty Stamp Set using Versa Fine Black Onyx Ink and WoW Embossing Powder in Clear Gloss!! Then I Heat Set it with a WoW Embossing Dual Speed Tool!! 
I personally LOVE me a Blended Strawberry Margarita so that was the Look I was going for!! I Colored the Image with Copic Markers!! Margarita Glass: BG70, B72 & BG75   Blended Margarita: R000, R00, R11 & R32   Lime: G20, YG11 & YG17
Then I used the NEW Margarita Glass Die Set to Die Cut the Image out!! 
Then in order to create the FUN Shaped Tags, I cut some Cardstock in Half making sure that there was enough room to Die Cut the Margarita Glass Die with the Fold at the Top in order to create the Margarita Tag Shape!! SWOON!! I LOVE how this turned out and would make the PERFECT Gift for a Birthday, Anniversary, House Warming Gift, Wedding Shower, Thinking or Missing You Gift!! The possibilities are ENDLESS here!! 

THANKS SO MUCH for stopping by today!! I hope I've INSPIRED you on a NEW way to use the NEW Salty Stamp Set & Margarita Glass Die Set!! 

For TONS of AMAZING Inspiration make sure to visit the CAS-ual Fridays Stamps Blog and shop the NEW, Old and Sale Products in the CFS Shop!! You can also use my discount code LARISSASENTME to SAVE 15% off anything in the Shop!! WHOOP WHOOP!! 

Have a FABULOUS Weekend!! 
Larissa Heskett ðŸ’—

Monday, July 27, 2020

A Background With A Bang!


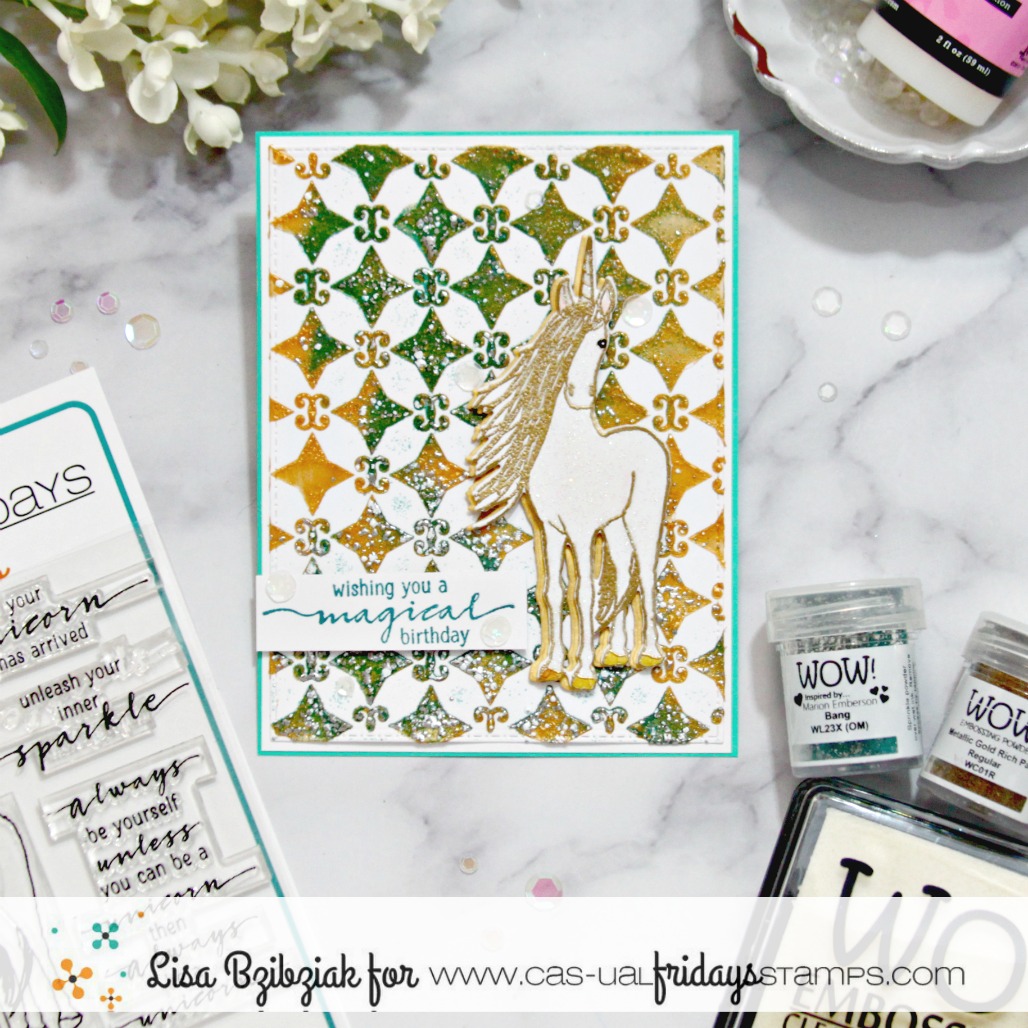
Hi all!  Lisa here and today I'm sharing a project with some of my very favorite things!

I started with my favorite stencil... the Starlequin Stencil!  I am not sure what it is about this stencil but it's my go to... if I had it in the picture you'd be able to tell it's my most used...lol!  (Which is why it's not in the picture...lol!)  I applied some gold texture paste through the stencil and while it was wet, I sprinkled on some of my favorite Wow Embossing Powder, Bang Colour Blend.  I didn't cover the entire texture paste area but instead randomly sprinkled it on.  I heated it up... when you use texture paste to emboss you are looking for the "bubble"... it is so cool and fun to watch the powders transform!


I set that aside to be sure the texture paste that was exposed was completely dry and worked on the unicorn from the Be A Unicorn stamp set.  I stamped it using the Wow Clear Ultra Slow Drying Embossing Pad and then heat embossed it using another favorite, Metallic Gold Rich Pale.  I die cut it with the coordinating die and then I mixed up some white glitter and Glossy Accents and painted the unicorn inside the lines with the glitter mixture.  I darkened his eye using a black alcohol marker and colored in his hooves with a gold gel pen.  I die cut another unicorn in gold and popped up my glittery embossed unicorn onto the solid gold die cut piece, but offset it for a shadow effect.


Finally I stamped one of the sentiments from the Be A Unicorn set in a coordinating color and trimmed it down and popped it up and then scattered a few sequins around.

Should you see something that you need to purchase, I have this for you:


That's me for today!   Thanks so much for stopping and I hope you enjoyed it!  Come again soon for more CAS-ual Fridays inspiration!