Translate

Showing posts with label CAS-ual Fridays Stamps. Show all posts

Sunday, March 20, 2022

Thinking of You!!


HELLO CRAFTY FRIENDS!! 

Larissa here today to share this Bright and Cheerful Thinking of You Card using the BEAUTIFUL Flower Duo Stamp Set!!  
Here's what I've created!! 
I Started by Cutting my Card Panel!! Then Inking the top portion of my Panel with Tumbled Glass Distress Oxide Ink!! 
Next I Stamped and Embossed the NEW Flower Duo Stamp Set Images!! I Stamped with Versa Fine Black Onyx Ink and Embossed with WoW Clear Gloss Embossing Powder!! Then I used Copic Markers to Color the Images in!! 
I used: Flowers: RV00, RV52 & RV55  N0 & N2 
Greenery: YG61, YG63 & YG67 
Then I Die Cut the Images out using the coordinating Die Set!! I added some White Gel Pen Details for some added Highlights!! 
Next I Stamped and Embossed the Sentiment onto my Card Panel using Versa Fine Black Onyx Ink and WoW Clear Gloss Embossing Powder!! I adhered the Images to the Top part of my Card and used a combination of Ultra Bond Liquid Adhesive and Gina K Designs Foam Squares for some variation in dimension!! 
I added some Trinity Stamps Fairy Rocks Rhinestones to finish off the Card Card with a little SPARKLE and I just LOVE the way it turned out!! I paired it with a TE Salt Water Taffy A2 Envelope and it's ready to be Mailed to someone SPECIAL!! 

For TONS of AMAZING Inspiration make sure to visit the CAS-ual Fridays Stamps Blog and shop the NEW, Old and Sale Products in the CFS Shop!! You can also use my discount code LARISSASENTME to SAVE 15% off anything in the Shop!! WHOOP WHOOP!! 
THANKS SO MUCH for stopping by and I hope you have a FABULOUS WEEK!! 

COUNTRY HUGS-N-KISSES
LARISSA 💗


Sunday, March 6, 2022

Thanks So Much!!

HELLO CRAFTY FRIENDS!! 

 Larissa here today sharing this Card using the Everyday Dragonflies Stamp Set & Dragonflies Fri-Dies Set!! This Set is on SALE!! I'm SAD to see it GO as I LOVE this Set and have create SEVERAL of my FAVORITE Designs using it!! 
SWOON!! I LOVE how Elegant this Set is and that it's so versatile!! Here's what I've created for today!! 
I Started by Stamping and Embossing the Dragonfly Image onto my Card Panel using some WoW Embossing Powder in British Summer with my WoW Dual Speed Heat Tool!! !! Then I heat set it and Colored it in using Copic Markers!! I used: R11, R22 & R17 
Next I created a Mask to place over the Image and I Inked with some Tumbled Glass & Broken China Ink to match the Blue that is in the MFT Plaid Patterned Paper I used for the NND Scalloped Frame!! 
I finished the Design by Stamping and Embossing the Sentiment in WoW Bright White Embossing Powder and then I added some White Gel Pen Details to the Butterfly to help add some Highlights!! I also added a Few Studio Katia Pearls to add some Sparkle and finishes off the Card!! 

I mentioned other Cards I've created using this Set and here's a look at them!!


GET THIS SET Before it GONE, I PROMISE you'll LOVE Creating with it!! 

For TONS of AMAZING Inspiration make sure to visit the CAS-ual Fridays Stamps Blog and shop the NEWOld and Sale Products in the CFS Shop!! You can also use my discount code LARISSASENTME to SAVE 15% off anything in the Shop!! WHOOP WHOOP!! 

THANKS SO MUCH for stopping by today and I hope you have a FABULOUS WEEK!! 

COUNTRY HUGS-N-KISSES
LARISSA 💗


Saturday, February 26, 2022

Thinking of You.......

Hello Crafty Friends!!

Today I'm showcasing this SWEET "Thinking of You Makes my Heart...Smile" Card!! I'm using the Swirls Stencil along with the Flower Duo Set and the Sassy Smiles Duo Stamp Set!! 
I Started by Spraying the back side of the Swirls Stencil with Pixie Spray and then adhered it over a Grey Brick Patterned Paper Card Panel and and Inked with Kitsch Flamingo Distress Oxide Ink!! I LOVE the way it surrounds the Focal Image and Sentiment!! 
I wanted to add a Sentiment and a Beautiful Flower Image in the center of the Swirls Stencil Design!! So I Embossed the Flower Image from Flower Duo Set using WoW Ultra Shimmer Embossing Powder!! I Colored with Copic Markers C0, C2  & RV00, R81 & R85!! Then Die Cut the Flower Image out using the coordinating Die!! Then I Stamped and Embossed the Sentient using the Sassy Smiles Duo Stamp Set and Embossing with the same WoW Ultra Shimmer Embossing Powder!!
For the Inside of the Card to finish off the Sentiment, I Stamped the "Smile" Sentiment!! I Stamped with Kitsch Flamingo Distress Oxide Ink and then Embossed with WoW Ultra Shimmer Embossing Powder!! Then I also Stamped and Embossed the Tiny Heart Also included in the Set with Versa Fine Black Onyx Ink and WoW Ultra Shimmer Embossing Powder!! I LOVE how the Iridescent Sparkle carries into the inside of the card and keeps everything cohesive and SPARKLY!! It REALLY does make me SMILE!! 
 I adhered the Flower to the Card Panel with a thin strip of Foam Adhesive!! Then finished off the design by adding some Trinity Stamps Fairy Rocks Rhinestone Embellishments for even more Iridescent Sparkle!! SWOON!! This Card is Simple in its Design, but it sure does pack a PUNCH and I KNOW it'll make the Recipient SMILE!! 

For TONS of AMAZING Inspiration make sure to visit the CAS-ual Fridays Stamps Blog and shop the NEW, Old and Sale Products in the CFS Shop!! You can also use my discount code LARISSASENTME to SAVE 15% off anything in the Shop!! WHOOP WHOOP!! 

SHOP the Retirement SALE and HUGE SALE!! There's LOTS of AMAZING Deals and you're WELCOME to use my CODE to SAVE even MORE!! WHOOP WHOOP!! 


THANKS SO MUCH for stopping by today!! 
I hope you have a FABULOUS WEEKEND!!  

Larissa Heskett 💗


Sunday, December 12, 2021

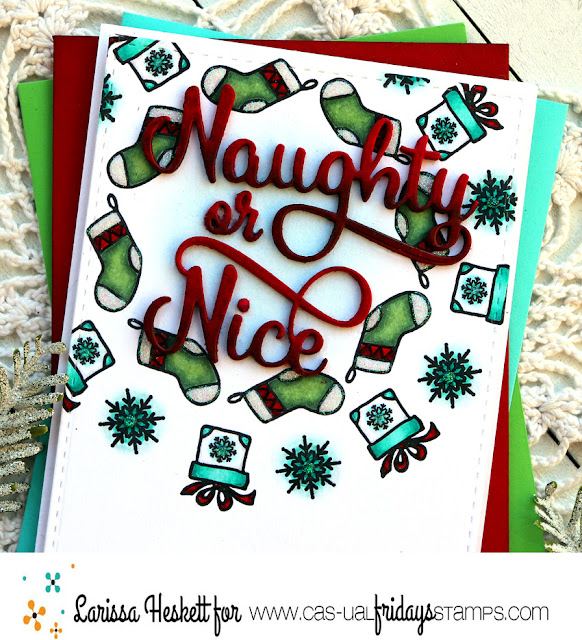
Naughty or Nice!!??


HELLO CRAFTY FRIENDS!! 
Larissa here today with a FESTIVE CAS Card using the Naughty'isms Naughty'isms Stamp Set & coordinating Naughty Fri-Dies!! 
SQUEAL!! This card makes me HAPPY!! I'm not the BEST when it comes to one Layer Cards!! In fact, I hardly ever make them but lately I've been ENJOYING the Process and can't wait to share how I created this card!! 
I wanted to create a "Wreath" Design with the Images and add the Layered 3D Sentiment in the middle!! I used the Gina K Designs Wreath Building Template Stencil to create my Stamped Images "Wreath" using my MISTI Stamping Tool!! I Stamped the Images with Versa Fine Black Onyx Ink and Embossed with WoW Clear Gloss Embossing Powder!! The Snowflake image is from the Merry Stamp Set!! 
After Stamping and Embossing all of the images, I used Copic Markers to Color them!! Red: R14, R32 & R39   Green: G03, G11 & G18    Turquoise: BG00, BG10 & BG45

Then I added some Blizzard Tonic Studios Glitter Nuvo Drops to add some Sparkle and Dimension!! For the Sentiment I Die Cut the Naughty Fri-Dies, layering 4 together to create a 3-D Sentiment and used Copic Markers to Color them with an Ombre` look!! 
Red: R14, R32 & R39
I adhered them to the center of the Wreath after I added some Tumbled Glass Distress Ink to the Center of the Wreath to help make the Sentiment POP a little more off the Card Front!! I LOVE LOVE LOVE the way it turned out and hope you do too!!?? 
THANKS SO MUCH for stopping by today and I hope you'll give this FUN Wreath Design a try with your Smaller Images!! I ASSURE you, you'll LOVE it too!! 
Have a FABULOUS WEEKEND!! 
LARISSA 🎁

 Use my discount code LARISSASENTME, to save 15% off on all of the goodies in the 
CFS Shop!!


Monday, November 22, 2021

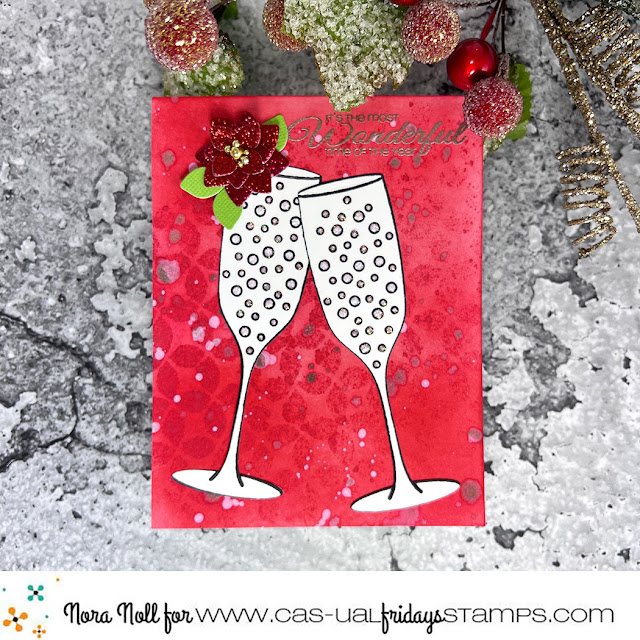
The Most Wonderful Time of the Year

Hello my Crafty Friends!!! Nora here today from A Creative Touch with a simple Christmas card created with CAS-Fridays Modern Petals Stencil, Snowy Sayings Stamp, Pop Fizz Clink Stamp Set and Champagne Flute dies.


I started off this card by inking up an A2 sized, white card front with two different colors of red ink. I then used the Modern Petals Stencil with red ink across the front.


Next I used a variety of spray stains and mica mists over the stenciled background.


While my card front was drying, I used the Pop Fizz Clink Stamp Set to stamp two champagne glasses with black ink. I then die cut them out using the Champagne Flute dies. 


To give the card some sparkle,  I used glitter glue inside the champagne bubbles.


While the bubbles were drying, I adhered my dried card front to an A2, white card base. I stamped and  heat embossed a sentiment from the Snowy Sayings stamp set in the top, right hand corner. I then added my champagne flutes as shown. 

I was going to stop here but my card was missing something. I pulled out the CAS-Fridays 4 Petal Die Set. I decided that I was going to try to make a poinsettia using these flower dies.

 I die cut two large flowers and two small flowers out of red glitter paper. I then die cut a large flower out of green paper.


To create my poinsettia, I adhered the two large flower die cuts together first. Then I adhered one of the small glitter flowers on top. For the last small flower, I used foam adhesive with some liquid glue to adhere it over the top flower. The glue helps to keep the foam adhered as I had trouble getting it to stick to the glitter paper without it. I then cut apart the green flower and adhered my "leaves" under the poinsettia. To complete the flower, I adhered gold gems to the center.


When my flower was completed, I adhered it to the top left of my card.


I hope you like my card as it was a lot of fun to create. CAS-ual Fridays is having a HUGE sale!!!! Please hop on over to the CAS-Fridays Shop.


Use my code NORASENTME to get an extra 15% off your total order-including sale items!!!


I want to thank you for taking the time to stop by today. Please be sure to check back to the blog this week to see some other FABULOUS projects by the CAS-Fridays Design Team.

Have a FABULOUS day!!


Saturday, October 30, 2021

Hang in There!!


Hello Crafty Friends!! 

Larissa here today to share a FUN "Hang In There" Card today using a Combination of CAS-ual Fridays Products!! 
SQUEAL!! I LOVE how this Card turned out!! PERFECT for sending someone some a CHEERFUL Pick me up, even if you're not a Spider Lover!! How can you not SMILE when you see that Sparkly Purple Spider with Wiggly Eyes!! 
I Started by Inking with Faded Jeans Distress Oxide Ink and Black Soot Distress Ink on the retired Tag Buddies Die Cut Tag!! Then I Stamped and Embossed the Spider Web Image from the "Spooky" Stamp Set onto the Inked Tag, using Versa Fine Black Onyx Ink and WoW Ultra Shimmer Embossing Glitter!! Then I Stamped the CUTE Spider Image using Wilted Violet Distress Oxide Ink and Embossed with WoW Shrinking Violet Embossing Glitter!! Then I added the 3mm Wiggly Eyes to the Spider and some Trinity Stamps Fairy Rocks Rhinestones and a Black Seam Binding Ribbon Bow!! 
For the Card Panel, I Inked the Top of the Panel with some Faded Jeans Distress Oxide Ink and Black Soot Distress Ink!! Then I added some Water Splatters!! Next I inked with some Milled Lavender Distress Oxide Ink and then placed the Stars and Stripes Stencil over the Milled Lavender Ink and Inked the Stars with Wilted Violet Distress Oxide Ink!! Then I Embossed the Stars with WoW Shrinking Violet Embossing Glitter!! I Stamped and Embossed the Sentiment from the "Doing Great" Stamp Set!! I Stamped with Versa Fine Black Onyx Ink and Embossed with WoW Ultra Shimmer Embossing Glitter!! I adhered the Tag to the center of the Card Panel with some Foam Tape and then adhered some more Trinity Stamps Fairy Rocks Rhinestones!! 
For TONS of AMAZING Inspiration make sure to visit the CAS-ual Fridays Stamps Blog and shop the NEW, Old and Sale Products in the CFS Shop!! You can also use my discount code LARISSASENTME to SAVE 15% off anything in the Shop!! 

THANKS SO MUCH for stopping by today and I hope you have a FABULOUS HALLOWEEN WEEKEND!!  

COUNTRY HUGS-N-KISSES
LARISSA  🕷