Translate

Showing posts with label Distress Ink. Show all posts

Sunday, December 12, 2021

Naughty or Nice!!??


HELLO CRAFTY FRIENDS!! 
Larissa here today with a FESTIVE CAS Card using the Naughty'isms Naughty'isms Stamp Set & coordinating Naughty Fri-Dies!! 
SQUEAL!! This card makes me HAPPY!! I'm not the BEST when it comes to one Layer Cards!! In fact, I hardly ever make them but lately I've been ENJOYING the Process and can't wait to share how I created this card!! 
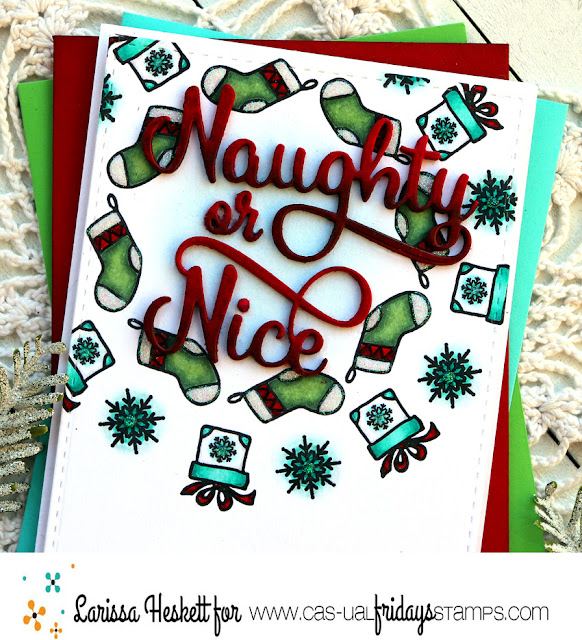
I wanted to create a "Wreath" Design with the Images and add the Layered 3D Sentiment in the middle!! I used the Gina K Designs Wreath Building Template Stencil to create my Stamped Images "Wreath" using my MISTI Stamping Tool!! I Stamped the Images with Versa Fine Black Onyx Ink and Embossed with WoW Clear Gloss Embossing Powder!! The Snowflake image is from the Merry Stamp Set!! 
After Stamping and Embossing all of the images, I used Copic Markers to Color them!! Red: R14, R32 & R39   Green: G03, G11 & G18    Turquoise: BG00, BG10 & BG45

Then I added some Blizzard Tonic Studios Glitter Nuvo Drops to add some Sparkle and Dimension!! For the Sentiment I Die Cut the Naughty Fri-Dies, layering 4 together to create a 3-D Sentiment and used Copic Markers to Color them with an Ombre` look!! 
Red: R14, R32 & R39
I adhered them to the center of the Wreath after I added some Tumbled Glass Distress Ink to the Center of the Wreath to help make the Sentiment POP a little more off the Card Front!! I LOVE LOVE LOVE the way it turned out and hope you do too!!?? 
THANKS SO MUCH for stopping by today and I hope you'll give this FUN Wreath Design a try with your Smaller Images!! I ASSURE you, you'll LOVE it too!! 
Have a FABULOUS WEEKEND!! 
LARISSA 🎁

 Use my discount code LARISSASENTME, to save 15% off on all of the goodies in the 
CFS Shop!!


Thursday, February 27, 2020

This Sucks "well that didn't go as planned" ~ Life!!

Hello Crafty Friends!! 
Larissa here today to share an Encouragement Card!! I LOVE creating Cards like this, to send when I KNOW someone Special needs a Pick me up!! 
I Started by creating the Stenciled and Inked Background using the Tin Roof Stencil!! I Sprayed the back of my Stencil with some Therm O Web Pixie Spray!! If you've NEVER used this on your detailed Stencils, it's a game changer!! I then placed the Stencil over my Card Panel and Inked with some Picked Raspberry Distress Ink using an Ink Blending Brush!! I then removed the Stencil and Inked over the entire Card Panel using the same Picked Raspberry Ink, just applying a lighter coat!! 
Next I Die Cut the Tin Roof Cover Fri-Die from some coordinating Glitter Cardstock!! I layered it over the Stenciled Card Panel and adhered it with some iCraft Ultra Bond Adhesive!! I only adhered the main lines and the center of the Flower so that I could POP up the Flower Ends for some FUN dimension!! 
Next I wanted to Stamp and Emboss the Sentiment from the This Sucks Stamp Set using some Versa Mark Ink and some WoW Embossing Black Puff Embossing Powder!! SWOON!! I think the Puffy Sentiment will bring a SMILE all on its own!!?? Seriously though, little details shouldn't be over looked when you're creating a Card to BRIGHTEN someones Day!! They not only make the sentiment POP, but they provoke sensory feelings that we ALL NEED when we're feeling down or stressed!!
To finish off the Card I Stamped and Embossed the "well that didn't go as planned"  ~Life  Sentiment on the inside of the card and my Design was finished!! I also created a coordinating Envelope to go with the Card!! I'm trying to do more of this, so I have NO excuses when it comes to sending out the Cards that I create!! Sending MORE "Happy Mail" was one of my Goals this year and so far I'm off to a GREAT start!! Let's hope I can continue to Send Handmade Kindness through out the Year, and INSPIRE you to do the same!!

Feel Free to use my special discount code LARISSASENTME, to save 15% off on all of the NEW, OLD and SALE goodies in the CFS Shop!!

THANKS SO MUCH for stopping by and I hope you have a FABULOUS WEEKEND!!

LARISSA  💖

Saturday, February 9, 2019

Unleash Your Sparkle

Hello lovelies! I am so over winter and ready for a little bit of sunshine and warmer weather; and I think I unconsciously used some light, bright colours when I made my card for today! 

Stamp Set: Be A Unicorn. Dies: Unicorn Fri-Die.


I started with a white C6 card blank and blended three Distress Ink colours onto the front, varying the intensity of the colours a little.

With black ink, I stamped one of the sentiments from Be A Unicorn, directly into the left hand corner of the card. The sentiments stamp so well, with a nice juicy ink, that there's no need to use a Precision Press (but feel free if it makes you feel a little better about stamping directly onto the card!)

With the same ink, I stamped the unicorn onto some spare white card, then used the co-ordinating Unicorn Fri-Die to cut it out. It does this so much better than I could ever cut it by hand (so it's well worth investing in if you have the stamp set!)

I adhered the die-cut directly onto the card blank, leaving a little bit of the hair free from adhesive, so it looks like it's blowing in a soft, spring breeze! (See where my mind takes me?) 

Then, to finish the card, I added a selection of little sparkles, to echo the sentiment and add a bit of dimension. 


Friday, October 12, 2018

Foxy Thinking of You Card!!

HELLO CRAFTY FRIENDS!! 
Larissa here today to share a BEAUTIFUL and Simple Card!! 
I LOVE to Color, but some times I just want the image to be the MAIN Focus!! 
Here's what I've created for today!! 
I Stamped and Embossed the Fox Image from the Foxy Stamp Set onto some Distress Watercolor Paper!! I've used Copic Markers to color my Fox Image!! 
(W00, YR27, E97 and E99) 
Then I added some details with a White Gel Pen!! 
I Fussy Cut the Fox out leaving a slight border!! 

I Stamped and Embossed the entire Image again onto another piece of Distress Watercolor Paper!! Then Inked the background just behind the Fox using Tumbled Distress Ink!! I wanted to keep the FOCUS on the FOX Image, so I left everything else alone, except I added some Pretty Pink Posh Crystals to the Center of the Flowers!! Then added it to an Orange Cardstock Frame and a Kraft A2 Cardbase!! 


I LOVE the way it turned out and think this design would be PERFECT for a Set of Cards to give as a Gift!! THANKS SO MUCH for stopping by and I hope you have a FABULOUS WEEKEND!! 

If you just can't wait to go shopping, please visit the Store RIGHT NOW, PLUS there's several Sets that are RETIRING!! So you can stock up on some of those Products that you might have had on your WISH LIST before they're GONE for Good and at a SALE Price!! You can also use my discount code,LARISSASENTME, to save 15% off on all of the goodies in the CFS Shop!!
Image may contain: text