Translate

Showing posts with label Christmas card. Show all posts

Monday, November 22, 2021

The Most Wonderful Time of the Year

Hello my Crafty Friends!!! Nora here today from A Creative Touch with a simple Christmas card created with CAS-Fridays Modern Petals Stencil, Snowy Sayings Stamp, Pop Fizz Clink Stamp Set and Champagne Flute dies.
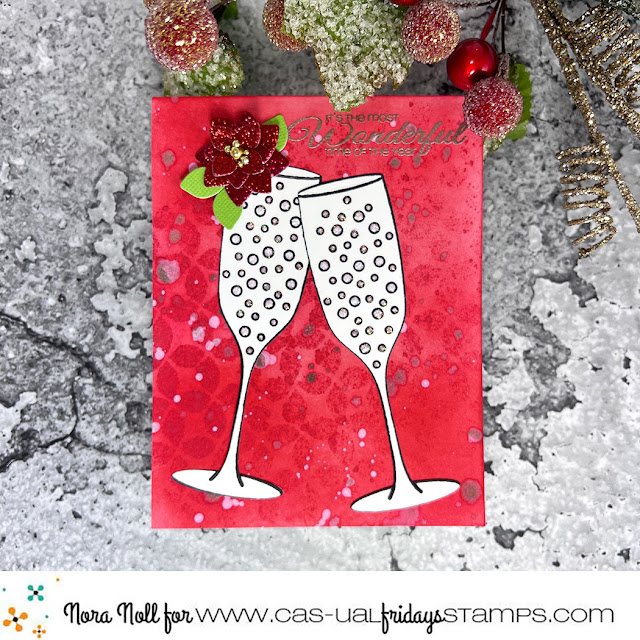

I started off this card by inking up an A2 sized, white card front with two different colors of red ink. I then used the Modern Petals Stencil with red ink across the front.


Next I used a variety of spray stains and mica mists over the stenciled background.


While my card front was drying, I used the Pop Fizz Clink Stamp Set to stamp two champagne glasses with black ink. I then die cut them out using the Champagne Flute dies. 


To give the card some sparkle,  I used glitter glue inside the champagne bubbles.


While the bubbles were drying, I adhered my dried card front to an A2, white card base. I stamped and  heat embossed a sentiment from the Snowy Sayings stamp set in the top, right hand corner. I then added my champagne flutes as shown. 

I was going to stop here but my card was missing something. I pulled out the CAS-Fridays 4 Petal Die Set. I decided that I was going to try to make a poinsettia using these flower dies.

 I die cut two large flowers and two small flowers out of red glitter paper. I then die cut a large flower out of green paper.


To create my poinsettia, I adhered the two large flower die cuts together first. Then I adhered one of the small glitter flowers on top. For the last small flower, I used foam adhesive with some liquid glue to adhere it over the top flower. The glue helps to keep the foam adhered as I had trouble getting it to stick to the glitter paper without it. I then cut apart the green flower and adhered my "leaves" under the poinsettia. To complete the flower, I adhered gold gems to the center.


When my flower was completed, I adhered it to the top left of my card.


I hope you like my card as it was a lot of fun to create. CAS-ual Fridays is having a HUGE sale!!!! Please hop on over to the CAS-Fridays Shop.


Use my code NORASENTME to get an extra 15% off your total order-including sale items!!!


I want to thank you for taking the time to stop by today. Please be sure to check back to the blog this week to see some other FABULOUS projects by the CAS-Fridays Design Team.

Have a FABULOUS day!!


Monday, November 30, 2020

Merry Kiss-Mas


Maria here on the blog with you today sharing this clean & simple card, showcasing the Mistletoe & Holly stamp set.  Incidentally, this stamp set is on clearance so hurry up and grab it before it sells out!


On an A2 size Neenah solar white card stock, I stamped the image with Memento Rich Cocoa ink.  I colored the images in with my Spectrum Noir markers, then stamped the sentiment with Lobster ink.

Next, I used a border edge die to die-cut the scallop edge and also die-cut some red card stock, adhering them together.  I added some fun-foam at the back for added dimension.


Since this card is very simple, I wanted to add a touch of elegance with foil.  I used Gina K Designs Ornamental Holiday foil-mates with red static foil from Therm-O-Web.  I adhered my focal image on this panel, and added this to an A-2 size notecard. 

I finished my design by adding the bow die-cut using the coordinating die and some crystal drops to the berries for added texture and interest.  Easy, peasy!  Here's another look:


You can still use my coupon code below for an additional 15% off your order.


Thanks for stopping by!


Tuesday, November 17, 2020

May Your Christmas Be Filled With Love

Hello!  It's Maria Russell here with you and it's my turn to share some inspiration on the blog today.  My super simple Christmas card showcases the Partridge in A Pear Tree stamp set.


Sometimes, less is more.  If you are not into creating scenes, this is the stamp set for you.  It's simple yet classy and it is also on clearance at the shop!  So grab it before it sells out because it will never be restocked again!


Coloring this was super easy with my alcohol markers.  I finished my card design by stamping the sentiment and added a small pearl on the bird for more texture.  


Here's what the stamp set look like.


Don't forget that you can also use my coupon code below to get an additional 15% off.


Thursday, July 23, 2020

Christmas in July

Happy Thursday!! Nora here from A Creative Touch with a slimline Christmas card. This is only the second slimline card I ever created and it was so fun!!


I started off this card by stamping with Versamark ink onto a white card base sized 8 1/4" by 3 1/4" with Bringing on the Snowflakes and heat embossing the snowflakes in white.


Next I used Victorian Velvet as my first color to blend onto the front of my cardstock.


I followed this with Abandoned Coral.


Then I used Festive Berries.


Over that I used Candy Apple Distress Ink.


I did go back and forth with the color before to get this blend. The last color I used was Vintage Photo Ink. When I was done with the blending, I spritzed water over the top to give it some texture. 


I let the cardfront dry while I die cut the sentiment three times using the Merry Christmas Fri-dies. I stacked the die cuts together, adhering them for some dimension. I used some Nuvo White Blizzard Glitter Drops over the top and set it aside to dry.


I then stamped some small snowflakes using the Snowy Sayings stamp set and heat embossed them with gold embossing powder. 


I took the card front and sprinkled gold watercolor and watered down white acrylic paint on top. I then dried it using a heat gun and then adhered the panel over a red card base measuring 
8 1/2" by 3 1/2."


I adhered some vellum strips over the top of the card front and then the dried sentiment over that. 


My last step was to adhere some gold stars that I die cut using the Fun-Fetti Fri-dies.

This card was so fun to make!!! I encourage you to create a slim line card of your own.

I want to thank you for taking the time to stop by. If you like what I did, use my code NORASENTME to get 15% off your total order.


Have a FABULOUS day!!!


Friday, December 20, 2019

A Merry Shaker Ornament


Lisa here!  I hope your holiday season is full of love and peace in the midst of all of the hustle and bustle!  I have a card for you today using one of my fave dies in the shop, Ornament Tag Fri-Dies!


I love this die set because you can make it a shaker or not!  Usually I do because it's so easy and I love shakers!  I just place the two circles together, the smaller inside the larger, on my paper and use some washi tape to hold them still and then run them through my Gemini.


I just add a piece of acetate on the inside of the frame I've created and then add foam tape around the entire frame.   The small circle became my background to my ornament because I wanted the whole ornament to be gold this time.  I added my gold sequin mix within the smaller circle and then placed the windowed frame over the top.  I've used this ornament to create a fall ornament... it's good for any season!  It also comes with cool ornament holder and hanger dies that are hard to see in this pic, but I just love them... the curly delicate hanger is so pretty!


I embellished my ornament with the Mistletoe image from the Mistletoe and Holly stamp set cut with the coordinating Fri-Dies (I love how detailed the dies cut and they come with some cute little word dies too!).  I stamped, colored and cut two and the second one was cut apart and added underneath the first.


And that's me for today!  So happy you stopped by to spend a little of your busy season with us!  Hope you'll come again soon!  Hope whatever holiday you celebrate that you get a chance to enjoy it!  See you next year!