Translate

Showing posts with label Bring On The Snowflakes. Show all posts

Thursday, December 3, 2020

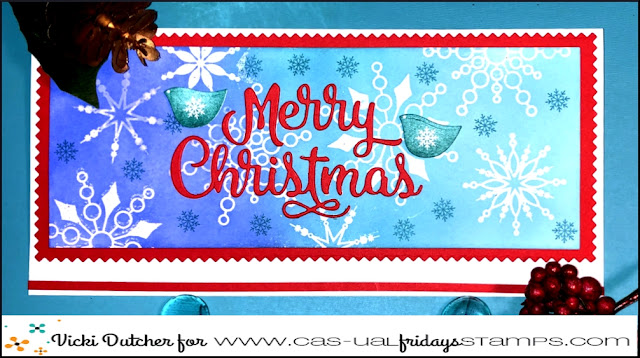
Merry Christmas

Hi all, it's Vicki from All I Do Is Stamp. 

Unfortunately, my card today uses a Fri-Die that is sold out.  Because I make these samples early, I didn't know it was sold out until today.  Whoops.  Since all the other supplies are available, I am going with it.

I started with the Pink Slimline Dies.  This set is amazing!  Lots of additional dies to make your slimline cards quite fabulous.

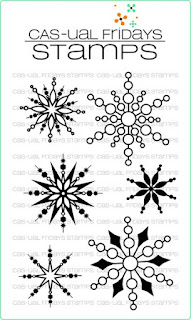
I stamped the flakes from Bring on the Snowflakes and sponged ink over the embossed images.  I die cut out the added birds from the Pear Tree Dies.


This is  the last of my Christmas cards.  They have been mailed out, and I'm done for Christmas 2020.  To be honest, I will miss making Christmas cards -- it gives me a theme :).  What about you?  Are you done?

Don't forget, you can use my code to save an additional 15% off your purchase, including the Clearance section


Thanks for stopping by~


Tuesday, November 24, 2020

An Inked Smooshed Christmas Card

Happy Tuesday everyone!! Nora here from A Creative Touch with a slimline Christmas card created with some snowflakes and Distress Ink.

Even though Thanksgiving is two days away, I have been concentrating on getting Christmas cards created to send out to some of my crafty friends. Ink smooshing is a GREAT technique that you can easily do in a streamline fashion.


To start off my card, I used the Pinked Slimline Dies to die cut a large panel out of watercolor cardstock. I then used a WOW! Clear Embossing Ink and WOW! White Embossing Powder to heat emboss snowflakes from Bringing on the Snowflakes onto the card front. 


Next I did the same technique and used the same stamp set on a slightly smaller panel.


For my first ink smooshing pass, I used Crackling Campfire Distress Ink and water. I made sure to coat both my panels by picking them up and then placing different areas over the wet ink.


I used a heat tool to dry the ink on the panels and ink smooshed the panels a second time in a combination of watered down gold acrylic paint and Candied Apple Distress Ink. Combining the gold with the red gave a yellowish tint to some of the background, which I loved.


While the two panels were air drying, I die cut some snowflakes using the Funky Flakes Fri-dies out of white cardstock. When the panels were completely dry, I adhered the snowflakes to the slimline card front as shown.


I then adhered the smaller inked panel over the larger panel.


My last step was use the Merry Christmas Fri-dies to die cut some gold cardstock. I adhered the sentiment across the front of the card. 


I adore how this card came out and I LOVE the colors.


I hope this card inspires YOU to create your own festive Christmas cards!!!

Want to get yourself some early Christmas gifts? Come shop the CAS-ual Fridays store. Use my code NORASENTME to get 15% off your total order!!!


I want to thank you for taking the time to stop by and please be sure to check in for some BEAUTIFUL projects by the other design team members!!!

Have a FABULOUS day!!


Wednesday, September 16, 2020

Merry Christmas!

Hi all it's Vicki here today.  This month I will only have 1 CFS post.  However, there will be a fabulous release at the end of the month!  So, you can look forward to that :).

Meanwhile, I actually "saw" my idea for today's card!  [By that I mean in my mind - that doesn't happen often, and when it does I am thrilled. Usually, I need to physically see to be inspired].

I am starting with my Christmas cards.  We all know how fast time flies, and I don't want the "pressure" to get my cards completed.  I bet you can relate, right?

 I really am happy with this card!  I started out by stamping the snowflakes from Bring on the Snowflakes with versamark ink, and using the [now in the store!] WOW Metallic Silver Sparkle Embossing Powder, I heat embossed the images on a card panel.  Then using a shade darker ink, I stamped the snowflakes from Merry.  I then cut out the framing, and turned it into a shaker card!

See the tiny snowflakes within the shaker stuff? Those are the Jacks Chipboards that I embossed with the Opaque Bright White Superfine  Embossing Powder.  A fun addition to the sequins I also added.  Once all that was put together, I die cut the Merry Christmas Fri-Die 3 times - once in black for shading, and embossed with the WOW Metallic Super Fine Silver Embossing Powder.  I also used one of the larger Jacks, and also embossed that with the same powder.  


While I won't be mass producing this card, it will go to a special person :).  How about you?  Have you started your Christmas cards yet?

Don't forget, if you use my code below, you can save 15% off your CFS purchase! 


See you at the end of this month~


Thursday, July 23, 2020

Christmas in July

Happy Thursday!! Nora here from A Creative Touch with a slimline Christmas card. This is only the second slimline card I ever created and it was so fun!!


I started off this card by stamping with Versamark ink onto a white card base sized 8 1/4" by 3 1/4" with Bringing on the Snowflakes and heat embossing the snowflakes in white.


Next I used Victorian Velvet as my first color to blend onto the front of my cardstock.


I followed this with Abandoned Coral.


Then I used Festive Berries.


Over that I used Candy Apple Distress Ink.


I did go back and forth with the color before to get this blend. The last color I used was Vintage Photo Ink. When I was done with the blending, I spritzed water over the top to give it some texture. 


I let the cardfront dry while I die cut the sentiment three times using the Merry Christmas Fri-dies. I stacked the die cuts together, adhering them for some dimension. I used some Nuvo White Blizzard Glitter Drops over the top and set it aside to dry.


I then stamped some small snowflakes using the Snowy Sayings stamp set and heat embossed them with gold embossing powder. 


I took the card front and sprinkled gold watercolor and watered down white acrylic paint on top. I then dried it using a heat gun and then adhered the panel over a red card base measuring 
8 1/2" by 3 1/2."


I adhered some vellum strips over the top of the card front and then the dried sentiment over that. 


My last step was to adhere some gold stars that I die cut using the Fun-Fetti Fri-dies.

This card was so fun to make!!! I encourage you to create a slim line card of your own.

I want to thank you for taking the time to stop by. If you like what I did, use my code NORASENTME to get 15% off your total order.


Have a FABULOUS day!!!