Translate

Showing posts with label Glitter. Show all posts

Monday, July 27, 2020

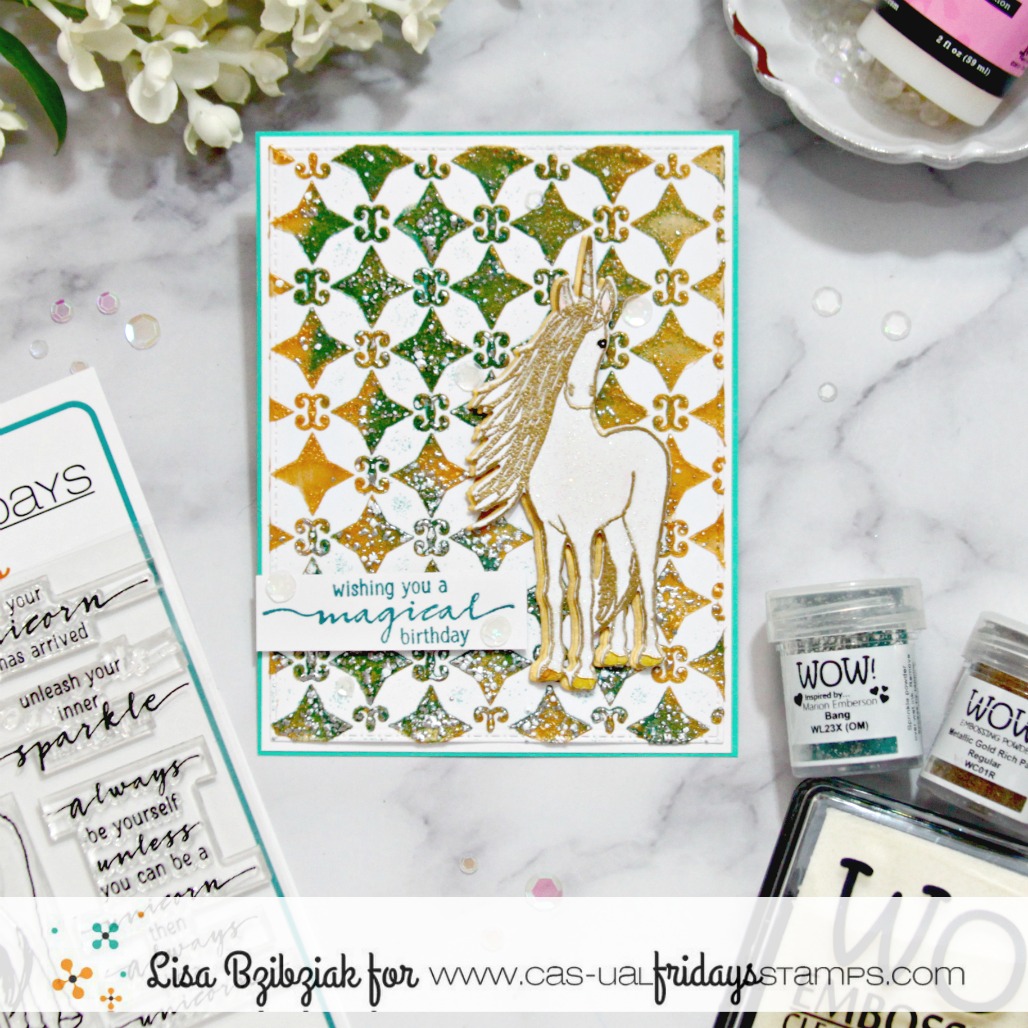
A Background With A Bang!


Hi all!  Lisa here and today I'm sharing a project with some of my very favorite things!

I started with my favorite stencil... the Starlequin Stencil!  I am not sure what it is about this stencil but it's my go to... if I had it in the picture you'd be able to tell it's my most used...lol!  (Which is why it's not in the picture...lol!)  I applied some gold texture paste through the stencil and while it was wet, I sprinkled on some of my favorite Wow Embossing Powder, Bang Colour Blend.  I didn't cover the entire texture paste area but instead randomly sprinkled it on.  I heated it up... when you use texture paste to emboss you are looking for the "bubble"... it is so cool and fun to watch the powders transform!


I set that aside to be sure the texture paste that was exposed was completely dry and worked on the unicorn from the Be A Unicorn stamp set.  I stamped it using the Wow Clear Ultra Slow Drying Embossing Pad and then heat embossed it using another favorite, Metallic Gold Rich Pale.  I die cut it with the coordinating die and then I mixed up some white glitter and Glossy Accents and painted the unicorn inside the lines with the glitter mixture.  I darkened his eye using a black alcohol marker and colored in his hooves with a gold gel pen.  I die cut another unicorn in gold and popped up my glittery embossed unicorn onto the solid gold die cut piece, but offset it for a shadow effect.


Finally I stamped one of the sentiments from the Be A Unicorn set in a coordinating color and trimmed it down and popped it up and then scattered a few sequins around.

Should you see something that you need to purchase, I have this for you:


That's me for today!   Thanks so much for stopping and I hope you enjoyed it!  Come again soon for more CAS-ual Fridays inspiration!


Monday, July 13, 2020

What's Up Friend? - Painting With Glitter


Hello all!  Lisa here!  And today I'm sharing another card using the Bold Flower stencil along with the Somebunny stamp set and a few other things!  I did some painting with Glitter on this one because I'm playing with this technique this month and I love it!


I started by using Distress Oxides and the Bold Flowers stencil to add the two largest flowers to my slimline sized card.  I knew I wanted to use a few colors on the petals so I stuck with the largest flower on the stencil and added one off the left edge at the top and off of the right edge at the bottom.  Then I took a paint tray and added a little bit of anemone colored Eco Sparkles glitter from Wow and some Glossy Accents and mixed them together.  You don't need a lot and you can always add just a little water to the mix if you need to thin it out a bit while you paint.


After I got done "painting" the glitter onto the purple areas, I rinsed out my paint tray and grabbed pink, orange and yellow glitters from my stash and repeated the process with each.... rinsing out in between so that cleanup would be easy... and it was!  Before I set that aside to dry I sprayed some Distress Oxide Spray in purple over the panel and then set it aside.


I cut the Friend word die from the Sweet Friends word die set once from purple card stock and twice more from white and stacked and glued them together.  Then I decided it would be fun to paint the sentiment with glitter too, so I did!  I wanted even more dimension for this part of my sentiment so I decided to add additional Glossy Accents over the top of it and set it aside to dry.


I colored in my bunny and balloon and then decided the balloon could use a little sparkle too...lol!  So I broke out the chunky orange glitter and liquid glass and proceeded to paint that too... I can't get enough!


I absolutely love the shimmer of the glitter and glossy accents painted on!  It's much lighter than just adding glitter to your project.  The Glossy Accents is light enough that it doesn't buckle your paper, and there is no glitter to fall off of your project either at your house or your recipients!  It's all securely in place with the Glossy Accents... smooth and sparkly!

I used one of the short sentiment pieces from Somebunny along with the Friend word die to build my sentiment.


I just added some jewels and sequins and I was done!

So thanks for joining me today!  I hope you enjoyed it!  Should you see something that you must have today, I have this for you:


And you just might find some really great deals in the sale section too!

Come again soon for more CAS-ual Fridays Inspiration!


Tuesday, May 26, 2020

Love You A Latte - Coffee Chips Release and Coffee Lovers Blog Hop!


Lisa here!  Today I'm sharing a card for the Coffee Lovers Blog Hop and I've used the new Coffee Chips Chipboard along with a few other things!


I started by applying some Deco Foil Transfer Gel onto my base panel using the By The Beans stencil and a spatula.  When it was dry, I layed the rainbow foil over the top and ran it through my Minc.

 For this one, I added white glitter to the chipboard and thought I'd share with you how I like to glitter chipboard:


When I add glitter to brown chipboard I like to paint or color the chipboard first to make sure the glitter color is nice and solid without any spots that show through.  So for this one, I started by using some white acrylic paint and painted the pieces I wanted to use.


Once that was dry, I used my cleaned paint brush and painted on some glue... sometimes chipboard can bend or warp when you add glue so I like to apply it with a paintbrush so I can get nice even coverage, yet not over apply it.


While the glue was still wet, I poured the glitter over the top of the chipboard.  I find my fine tweezers from the shop really help with this whole process and to move the chipboard around without ruining anything with my fingers.  I do like to turn it over and press it into the glitter as well to be sure I get as much as possible to stick and then I tap it off and set it aside to dry.  Once it's dry, and before I add it to my project, I'll take a fine brush and brush off the excess onto a scrap piece of paper.


I love the sentiments on the Coffee'isms Stamp Set!  And they are perfect to use along with the Coffee Chips because you can easily substitute the chipboard version of the Coffee words instead of the stamp with some easy masking or with this sentiment, the Love You A is separate completely... so... easy peasy!  I just cut the pieces of the To Go Cup and heat embossed the Love You A onto the wrap and then once my Latte word was dry, I added that underneath it.  Then popped the whole thing onto the rainbow background!


Fun, right?

I'm linking this one up to the Coffee Lovers Blog Hop which has over 600 entries as I type.  There are close to 80 sponsors for the hops and CAS-ual Fridays is one of them.  You can check out the CAS-ual Fridays Day 1 post here for more information and lots of ideas for the new Coffee Chips Chip Board and the main Coffee Hop post here to link up!

And the Coffee/Tea section of the shop is on sale now!


And since there is no code needed, you can also use one of the DT codes... mine is below!  Each of the DT has one and be sure to use the code for who inspired you for an additional 15% off!


That's me for today!  I hope you enjoyed your stop and come again soon for more CAS-ual Fridays Inspiration!


Sunday, July 7, 2019

The Purrfect Amount of Sparkle!


Lisa here!  I know some of you hate glitter... and that's ok!  I'm not one of those people!  I love to keep my craftroom stocked with all sorts of glittery things.  I have a shelf full of jars of glitter; many sheets of glitter paper; and many glitter covered embellishments.  What can I say... I get mesmerized by the stuff and before I know it, it's in a cart.. real or virtual.  But I use it... so I'm good with that!

I wanted to use the new Hearts A2 Panel die over a glitter background, but just didn't have the right color of glitter paper that I wanted!  So I decided to create my own and it was easy!


I pulled out some sheets of double sided adhesive that I had and cut the Hearts panel from a sheet of purple cardstock.  I also cut an A2 size of the same purple cardstock and cut my adhesive sheet down to an A2 size.


Next I pulled off one side of the adhesive sheet exposing the adhesive.  To make it easier to handle, before I had the entire sheet off, I started lining up my solid piece of cardstock over it and then stuck it down as I peeled the rest of the backing off.


I pressed down firmly all over the back of the cardstock to be sure the adhesive transferred to it and then flipped it over and peeled back the second paper from the adhesive sheet leaving a piece of cardstock that was totally covered in adhesive.


Finally I positioned the Hearts A2 panel I'd cut over the solid piece of cardstock and pressed down.  It's ok that I was a little off on the edges.  The important spaces were covered (the insides of the Hearts panel).  It was easy to just trim off the sticky cardstock that was sticking out.


For the next bit, I laid out a piece of scrap paper for easy cleanup; sprinkled the glitter I'd chosen all over the top of it... be generous to be sure you have coverage.


Then I proceeded to just rub the glitter into the adhesive firmly all over the card where the sticky areas were, brushing the excess onto my scrap piece so I could see that I had the areas covered.  This process is called burnishing the glitter.  


I used a paint brush to remove any additional excess glitter sticking to the places I didn't want it because of static and was easily able to fold the paper in half and place that back into the container.  What you're left with is an almost smooth sparkly surface on your card!  These new A2 panels are just perfect for this kind of a technique!


I cut some plaid paper using the Heart Board Fri-Dies and intended to adhere them all together as a background layer for my kitty when I discovered that the hearts from this die fit perfectly over the hearts in the A2 Panel... BONUS!  So my plan changed a bit and I decided to accent some of the hearts using the plaid paper.

.
I ended up cutting another set of hearts to use in a couple more places on the background.  Isn't that sparkle so pretty??


If you follow me you may remember this little guy from the new Little Huggables stamp set on Instagram... I colored him for the 30 Day Coloring Challenge... he's been bugging me since to get him onto a card so he should be happy now!


I just added a few sequins to bring in the orange and green from the plaid and made my sentiment strip in the orange color as well.  Those punny sentiments from the Little Huggables set... SO cute!

So glad you could stop by today and hope I've either given you a new technique to try out or reminded you of one that you haven't used in a while!  And if you HATE glitter but love the sparkle... just get yourself some glitter paper and use that instead... so many of them are made so that you don't have to worry about little sparkly bits falling off of them everywhere... although I really don't see the problem!  (Except when my husband wants to know why there is glitter in the living room.. um... did I do that?)

Should you decide you need something from the CAS-ual Fridays shop, I have this for you:


And be sure to check us out at these places: