Translate

Showing posts with label Bold Flowers Stencil. Show all posts

Monday, January 10, 2022

Stenciled and Embossed Bold Flower Encouragement Card!!

Hello Crafty Friends!! 

Larissa here today to share a FUN Dry Embossed and Stenciled Encouragement Card using the Bold Flowers Stencil!! Something about Winter in January, especially after a Snow makes me MISS my Flowers!!
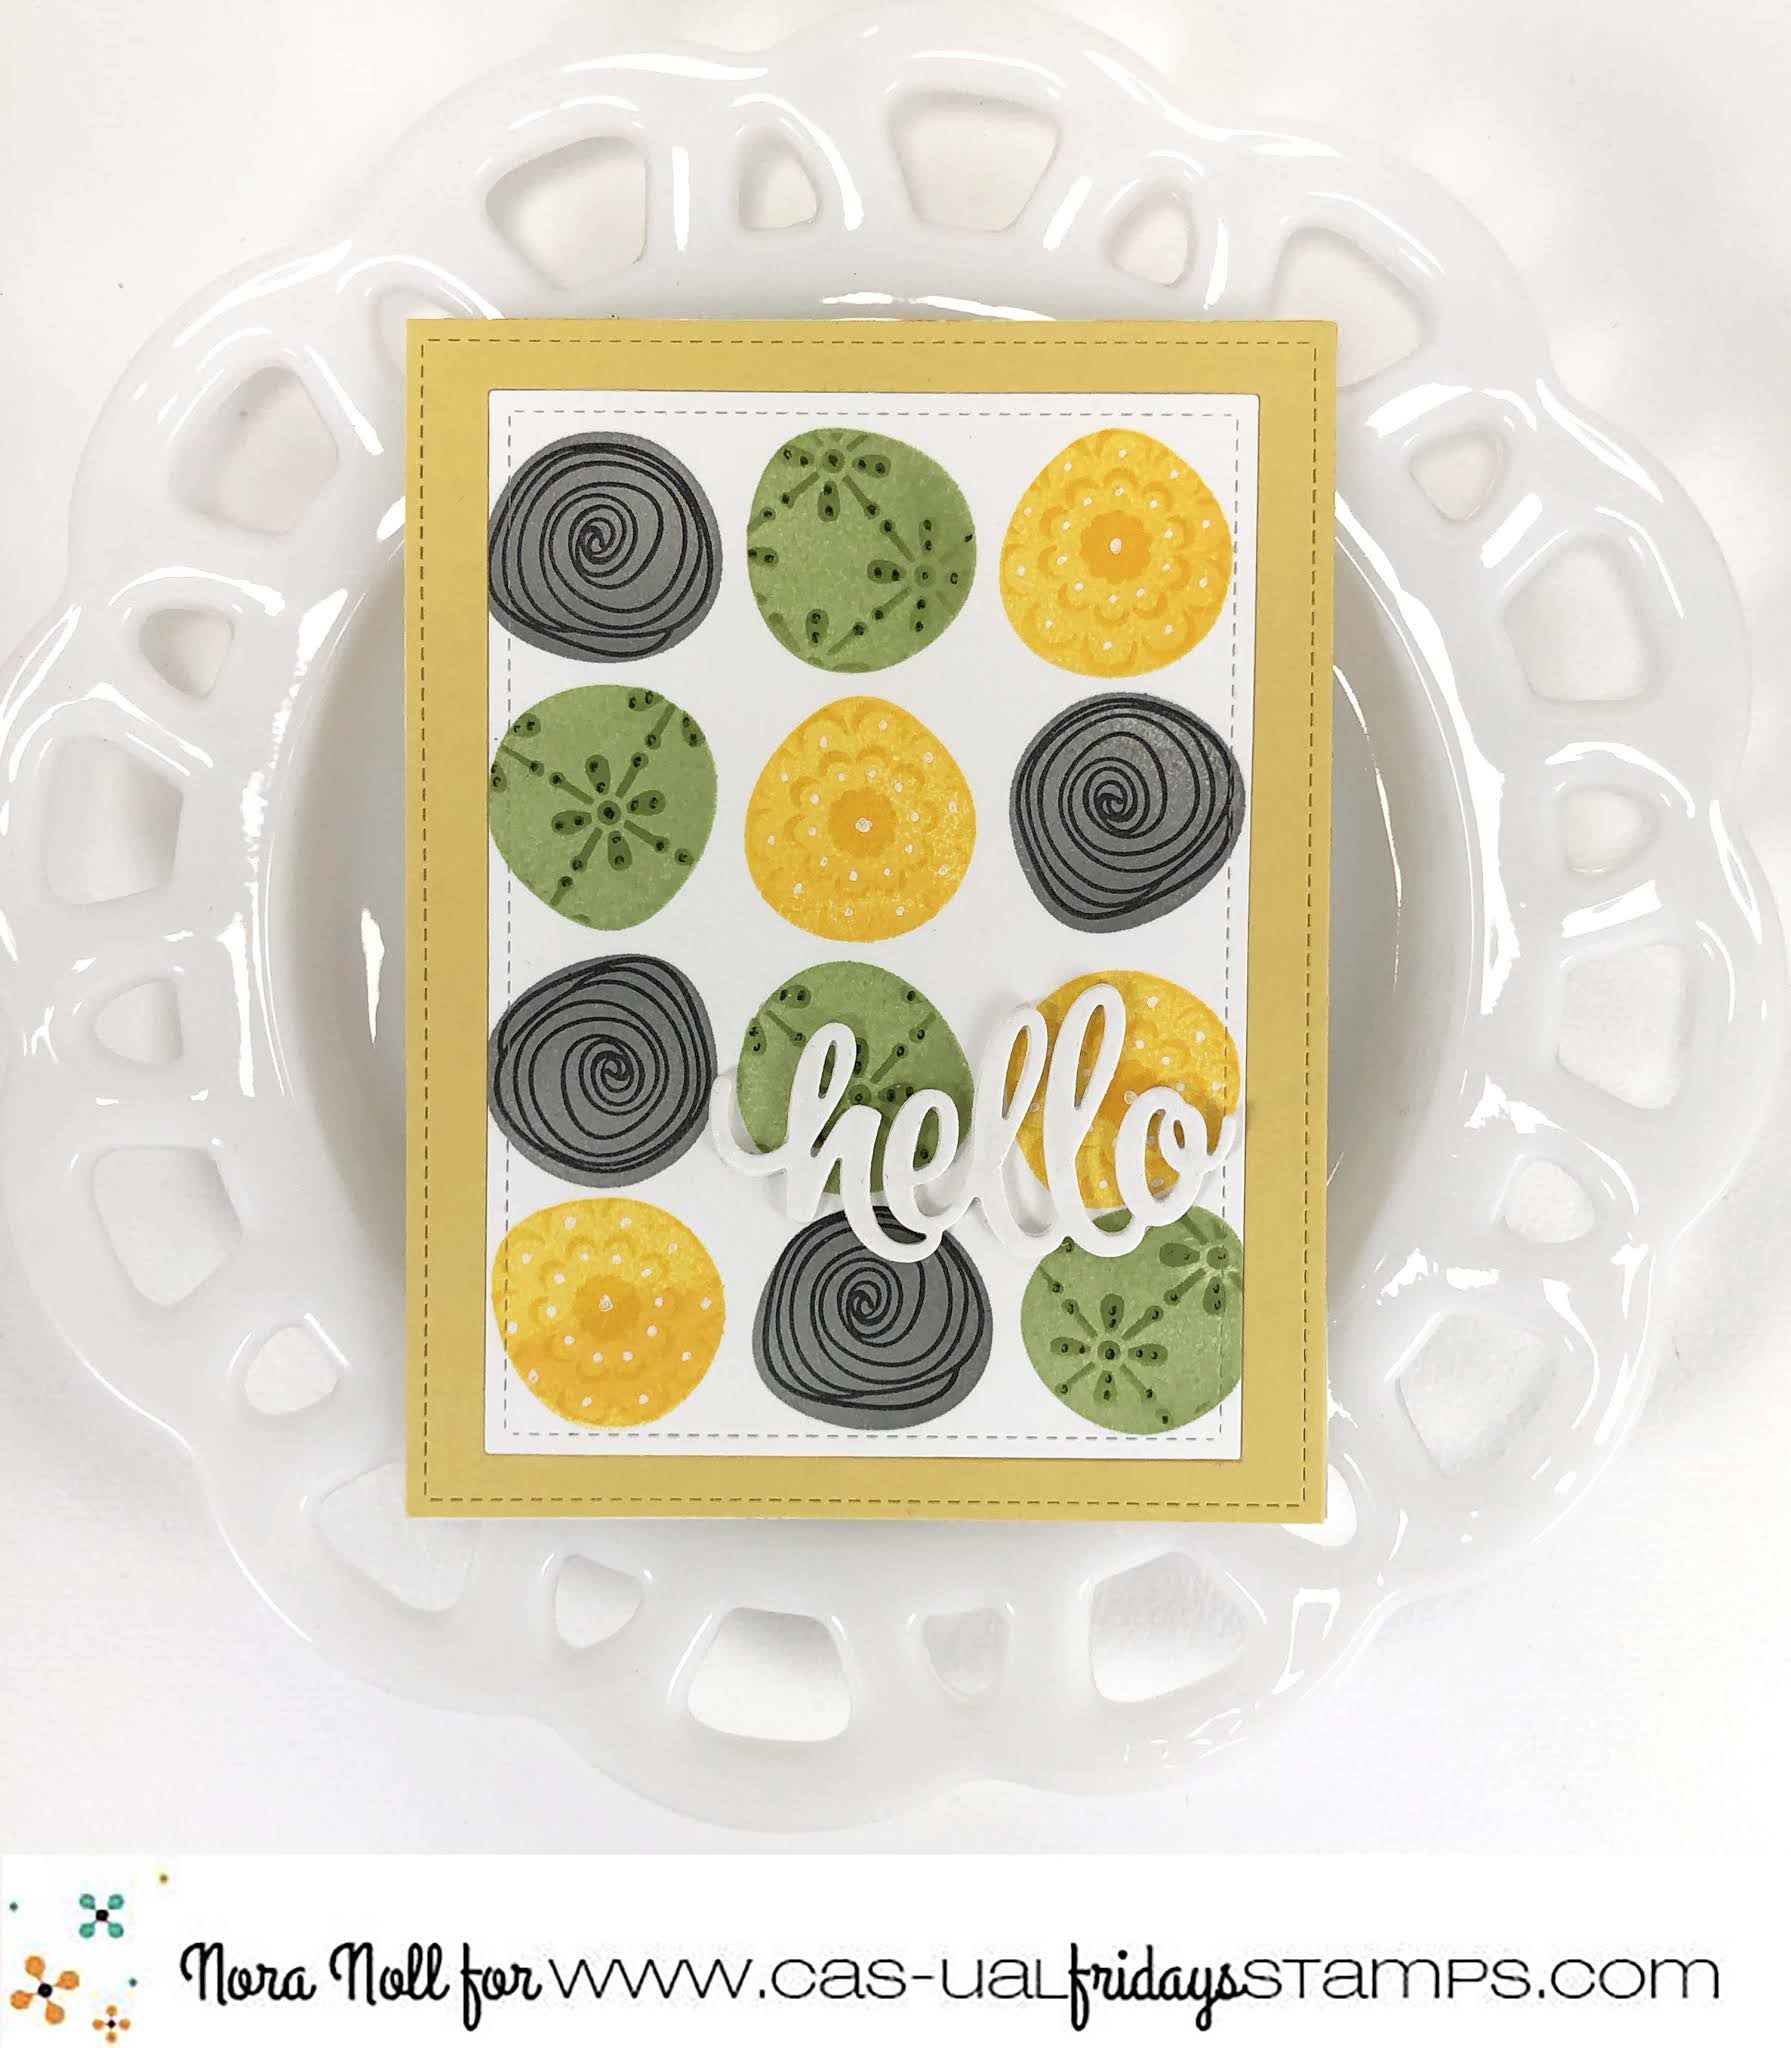
So this is a CHEERFUL Design meant to bring a SMILE to someone's Day!! 
I started by spraying the back of my Stencil with Pixie Spray and then adhering it to the Card Panel and then I placed it onto my Rubber Mat and Ran it through my Die Cutting Machine in order to Dry Embossed the Stenciled Design into the Card Panel!! Once it was Dry Embossed I Inked the Panel using Tumbled Glass Distress Oxide Ink for the Background, Milled Lavender and Spun Sugar for the main Flowers and Mustard Seed for the center of the Flowers using Distress Oxide Inks and Ink Daubers!! 
Then I replaced the Stenciled over the Card Panel making sure to line up the Dry Embossed Design and Inked with Wilted VioletPicked Raspberry and Dried Marigold Distress Oxide Inks and Ink Daubers!! I like that you can add dimension to the Flowers using the Stencil even though I embossed the Design!! 
Then I removed the Stencil and added some Water Splatters and some Wilted VioletSpun Sugar and Black Soot Distress Paint Splatters to add even more Dimension!!  I LOVE how it turned and the possibilities are ENDLESS with the technique!! You can simply change out the Sentiment to fit the Card that you need for the Occasion!! 

I stamped the Sentiment with from the Doing Great Stamp Set using Versa Fine Onyx Black Ink and Embossed it with WoW Clear Detail Embossing Powder and Heat Set it!! Then I inked over it with some Tumbled Glass Distress Oxide Ink and added some Water Splatters for some Texture!! I took a Dry Towel and buffed over the sentiment to make sure that there wasn't any residual Ink on top of the embossed sentiment!! Then I Die Cut another Circle from some coordinating Cardstock and adhered them together to create a Frame!! Then I adhered it to my Card Front using Foam Tape for some Dimension!! 

For TONS of AMAZING Inspiration make sure to visit the CAS-ual Fridays Stamps Blog and shop the NEW, Old and Sale Products in the CFS Shop!! You can also use my discount code LARISSASENTME to SAVE 15% off anything in the Shop!!  
 

THANKS SO MUCH for stopping by today and I hope you have a FABULOUS WEEK!! 

LARISSA  💗


Saturday, November 14, 2020

Celebrate with the Bold Flower Stencil

Hello, it's Michelle here today with a Celebration card.
Any time is a good time to celebrate in my opinion and I try to celebrate the small things in life!
Any excuse in my opinion!!


I've used the Bold Flower Stencil and the Celebrate from the  Hooray Dies on my card today.
I started by stenciling the flowers with Catherine Pooler inks in Something Borrowed, Suede Shoes and Juniper Mist.    I added some glitter to the petals with a glue pen.  Then I die cut the Celebrate using some blue glitter card stock.  It's so sparkly in real life!  I adhered the panel using some foam tape to a top folding card base.


Here's a close up of all the sparkle!


I hope I have inspired you to make a celebratory card and don't forget you can use my special discount code below in the shop.


Thursday, August 20, 2020

Happy Birthday Card w/ WoW Embossing Glitters!!

HELLO CRAFTY FRIENDS!! 

Larissa here today to share a BEAUTIFUL Birthday Card FULL of Sparkle!! 
Did you know that CAS-ual Friday's is now a WoW Embossing Retailer!!?? This makes me SO EXCITED as WoW Embossing Powder is my #1 FAVORITE!! Infact I use it on EVERY Card I make, as I like to Stamp and Emboss every image!! The WoW Embossing Glitters just make me HAPPY which is why I want to share a FUN way to use them on today's Card!! 
I Started by Spraying the back side of the Bold Flower Stencil with some Therm O Web Pixie Spray!! Then I adhered it over the Distress Watercolor Cardstock that I Die Cut and Inked with some Fossilized Amber Distress Oxide Ink!! I added some Water Splatters and then added some Black Soot Distress Paint Splatters!! Then I used an Ink Dauber to apply some of the WoW Embossing Ink over the Bold Flower Stencil!! I did two of the Flowers in the NEW Cupcake Heaven Embossing Glitter and two of the Flowers in the NEW Sugared Almond Embossing Glitter!! Then I Inked the center of the Flowers and applied the NEW Tangerine Dream Embossing Glitter!! I LOVE the way these colors compliment each other!! 
Then I Stamped and Embossed the Happy Birthday Sentiment from the Happy Birthday Stamp Set!! 
I inked with Versa Fine Black Onyx Ink and then Embossed with WoW Black Puff Embossing Powder!! This is such a NEAT Powder and works AWESOME with those BOLD sentiments!! 

Then I added it to a TE Lavender Glaze Card Panel and adhered it to a Cardbase!! I added a few Pearls to the center of the Flowers and my Card was done!! 
If you haven't tried using WoW Embossing Glitter with your Stencils, I hope this INSPIRES you to give them a try!! The results are STUNNING and are SURE to bring a SMILE to the face of the recipient!! 
For TONS of AMAZING Inspiration make sure to visit the CAS-ual Fridays Stamps Blog and shop the NEW, Old and Sale Products in the CFS Shop!! You can also use my discount code LARISSASENTME to SAVE 15% off anything in the Shop!! 
THANKS SO MUCH for stopping by today and I hope you have a FABULOUS WEEK!! 
LARISSA ðŸ’œ


Sunday, August 16, 2020

Playing With Pattern


Hello everyone!! 
Nora here from A Creative Touch with a fun hello card inspired by a print I saw on Pinterest. 


I don't know about you but I am OBSESSED with patterns. I have a great Pattern Board on Pinterest and I constantly pin ideas that I think I can use to create a card. The print that inspired this card is one that can be found here.

I began this card by using scrap paper and stamping the solid flower stamp from Peaceful Garden using the three colors I thought I might use. 


When I got the design down how I wanted it, I started on my final version of the card.  Again, I used the solid colored flower from Peaceful Garden and stamped twelve solid images-four in yellow, four in green and four in gray-on a white piece of cardstock.


When that was complete, I then stamped the rose image from the same stamp set over the top of the gray using black dye ink. I thought the stamp was perfect for what I had planned.


To decorate the green and yellow solid circles I used stencils. 
I die cut a mask out of a post it using the Garden Fri-dies and used the Bold Flower Stencil with yellow ink to stencil over the solid yellow image.


I then used the Tin Roof Stencil with green dye ink to decorate the solid 
green stamped images.


I die cut my finished panel with a rectangle die and used gel pens in white and green to give the stenciled images a little bit more emphasis.


I added the panel to an A2 sized, top folding card front and framed it with a yellow 
cardstock frame.

 
I added a hello sentiment using the Sweet Friend Fri-dies that I had die cut four times out of white cardstock and adhered together. Adhering die cuts together makes the sentiment sturdier. My last step was to cover the sentiment with clear sparkle pen.

This card was so fun to create and I love that I used a TON of products. I don't know about you, but I tend to buy more than I use so when I can combine my love of stamping, stenciling and die cutting on one card, I always have a fun time. 

Speaking of shopping, use my code NORASENTME to get 15% off your TOTAL ORDER. 


There are some fun, new products that CAS-ual Fridays is stocking so be sure to take a look.

I want to thank you for taking the time to stop by. Have a FABULOUS day!!


CAS-ual Fridays Products Used:


Monday, July 13, 2020

What's Up Friend? - Painting With Glitter


Hello all!  Lisa here!  And today I'm sharing another card using the Bold Flower stencil along with the Somebunny stamp set and a few other things!  I did some painting with Glitter on this one because I'm playing with this technique this month and I love it!


I started by using Distress Oxides and the Bold Flowers stencil to add the two largest flowers to my slimline sized card.  I knew I wanted to use a few colors on the petals so I stuck with the largest flower on the stencil and added one off the left edge at the top and off of the right edge at the bottom.  Then I took a paint tray and added a little bit of anemone colored Eco Sparkles glitter from Wow and some Glossy Accents and mixed them together.  You don't need a lot and you can always add just a little water to the mix if you need to thin it out a bit while you paint.


After I got done "painting" the glitter onto the purple areas, I rinsed out my paint tray and grabbed pink, orange and yellow glitters from my stash and repeated the process with each.... rinsing out in between so that cleanup would be easy... and it was!  Before I set that aside to dry I sprayed some Distress Oxide Spray in purple over the panel and then set it aside.


I cut the Friend word die from the Sweet Friends word die set once from purple card stock and twice more from white and stacked and glued them together.  Then I decided it would be fun to paint the sentiment with glitter too, so I did!  I wanted even more dimension for this part of my sentiment so I decided to add additional Glossy Accents over the top of it and set it aside to dry.


I colored in my bunny and balloon and then decided the balloon could use a little sparkle too...lol!  So I broke out the chunky orange glitter and liquid glass and proceeded to paint that too... I can't get enough!


I absolutely love the shimmer of the glitter and glossy accents painted on!  It's much lighter than just adding glitter to your project.  The Glossy Accents is light enough that it doesn't buckle your paper, and there is no glitter to fall off of your project either at your house or your recipients!  It's all securely in place with the Glossy Accents... smooth and sparkly!

I used one of the short sentiment pieces from Somebunny along with the Friend word die to build my sentiment.


I just added some jewels and sequins and I was done!

So thanks for joining me today!  I hope you enjoyed it!  Should you see something that you must have today, I have this for you:


And you just might find some really great deals in the sale section too!

Come again soon for more CAS-ual Fridays Inspiration!


Monday, June 1, 2020

A little note to lift your spirits

Hi everyone! Hope you had a good weekend or are still enjoying it. I have some very good news....my latest New Release products have finally arrived!! After the parcel spent a month in San Francisco, it took another month to arrive at my house, so I'm very grateful to the postal service!!

This means I've finally been able to play around with all the new stencils and chipboard pieces, so you'll be seeing them on a lot on my card designs. Just like today's card:


I had a blast creating this design! I was inspired by Jennifer McGuire while catching up on her YouTube videos. I've never thought to stencil over an image, so decided to give it a go. I used the new Bold Flower Stencil over the Full-On Floral Stamp which was heat embossed in the background. I also used the Sweet Friend Fri-dies and Floating Stamp Set for the sentiments. Pop on over to my blog post HERE for all the details.


Hopefully this has given you a few new ideas for using your stencils and you get a chance to craft this coming week. I'll be back here again soon with more projects using the New Release!!

Take care
Shona