Translate

Showing posts with label Full On Floral. Show all posts

Friday, November 5, 2021

Who Totally Forgot?-A Belated Birthday Card

Hello Crafty Friends!!! It is Nora here from A Creative Touch with a belated birthday card.


I started off this card by stenciling different purple inks onto a 4" by 5 1/4" white piece of cardstock. I then used the Chunky Chevron Stencil and stenciled over each circle with the same color ink. 


I then adhered the stenciled panel over the top of a top folding, A2 sized purple card base.


I stamped the Full on Floral Stamp in purple ink on an ink smooshed panel done in purples.


 I then used circle punches to punch out different kinds of circles. I adhered these circles randomly around the front of the card. Some I adhered with foam adhesive and others I used a tape runner. 


My last step was to stamp a sentiment using the WTF2, in purple, on a white strip of cardstock. 


I used foam adhesive to adhere it to my card front and it was DONE.


If you would like to go shopping for the products I used, or any of the other fun products from CAS-ual Fridays Stamps Shop, use my code to NORASENTME to get an extra 15% off your total order.


Please remember to stop by the CAS-ual Fridays Stamps Blog for more inspiration from the other DT members!!!

Thank you for stopping by. Have a FABULOUS day!!!


Sunday, February 28, 2021

Hugs and Happy Thoughts!


Welcome back!  I've been playing with alcohol inks and alcohol lift ink again!  In case you missed it, I used the same technique for this post here!  This time I added a little shine here and there with some foil like I did in this post here!


I used the Full On Floral again with some lift ink and I thought this background was perfect for these beautiful Everyday Dragonflies!


I stamped the dragonflies with Catherine Pooler Mardi Gras and All That Jazz inks and then colored them in with some glittery gel pens.


To me it feels like the dragonflies are flying over water... I love it!  That's me for today!  And in case you see anything you must have, I have this for you:


Thank you so much for stopping!  I hope you'll come again soon!


Tuesday, November 10, 2020

Better Latte than never!

Hello there!! Hope your all having a fantastic week and still celebrating after the amazing election results. I'm so excited for America and can't wait for Joe and Kamala to get in the White House!!
 

The 2020 Coffee Lovers Fall/Winter Blog Hop is happening right now and CAS-ual Fridays Stamps is one of the 'Super Sponsors'. So this week we have all 'coffee-themed' cards for the blog. For my card I wanted to use some Autumn colours:
 

I use pastel colours ALOT on my cards so it was really nice to use warmer, earthier tones for a change. And I even have a tutorial for you!!
 

I started off by blending Distress Ink over some white cardstock die-cut with the stitched edge die from the Pinked Slimline Dies, using the By the Beans Stencil.


I die-cut the cup from the To Go Cup Dies from Strathmore Watercolour CS and heat embossed the Full On Floral stamp over top with the WOW Metallic Gold Sparkle Embossing Glitter
 

I was then able to spend some time water colouring using Distress Inks, drying in-between layers to create more detail and darker colours.
 

Once the painting was dry I popped it up on a piece of black CS with some foam tape. I also heat embossed the sentiment from the Hot Coffee stamp set with the same embossing powder and put it on foam tape as well.
 

To finish off I adhered the stenciled panel to a white card base and put the black panel on some black foam. I also glued on some gold and Autumn colour sequins from Pretty Pink Posh.

I hope you enjoyed this tutorial and have a chance yourself to make a few cards for the blog hop. All of the 'coffee-themed' products in the store are on sale, no code needed. And if you use my special code you can save yourself another 15%!!


Thanks so much for stopping by and I'll be back here very soon with some more card ideas.

Take care
Shona


Monday, June 1, 2020

A little note to lift your spirits

Hi everyone! Hope you had a good weekend or are still enjoying it. I have some very good news....my latest New Release products have finally arrived!! After the parcel spent a month in San Francisco, it took another month to arrive at my house, so I'm very grateful to the postal service!!

This means I've finally been able to play around with all the new stencils and chipboard pieces, so you'll be seeing them on a lot on my card designs. Just like today's card:


I had a blast creating this design! I was inspired by Jennifer McGuire while catching up on her YouTube videos. I've never thought to stencil over an image, so decided to give it a go. I used the new Bold Flower Stencil over the Full-On Floral Stamp which was heat embossed in the background. I also used the Sweet Friend Fri-dies and Floating Stamp Set for the sentiments. Pop on over to my blog post HERE for all the details.


Hopefully this has given you a few new ideas for using your stencils and you get a chance to craft this coming week. I'll be back here again soon with more projects using the New Release!!

Take care
Shona

Thursday, January 23, 2020

Happy Birthday to You

Hi all it's Vicki here today from All I Do Is Stamp.  I needed a January birthday card and this one fit the bill.

 I just think of black and gold for the month of January.  I added in the fun kitten from Little Huggables with matching Huggable Critters Set Fri-Dies.
 
I gold embossed the Full On Foral background, along with a sentiment from Whole Shebang. I sure like the little critters.  I think they are just fun!


 Don't forget, my code is good for any purchase over at CAS-ual Fridays, including the 50% off retirement section!


Thanks for stopping by~


Monday, June 10, 2019

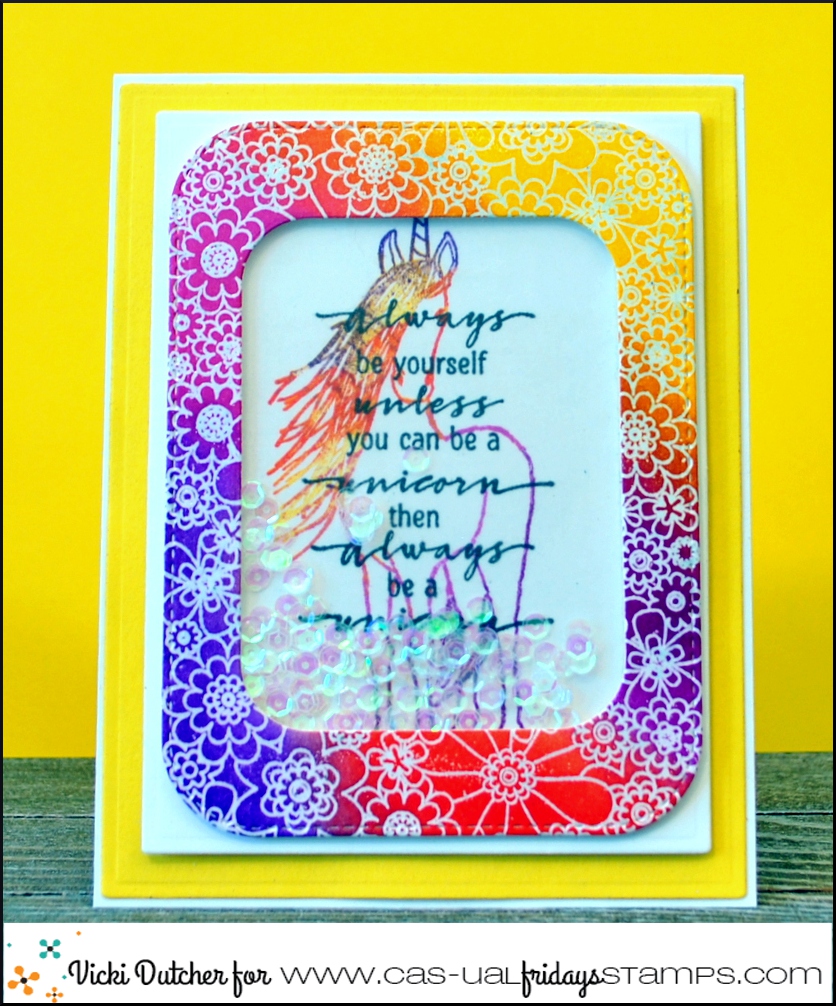
Be a Unicorn

Hi All - it's Vicki here today.

Today I used the fun stamp set, Be a Unicorn, along with the background stamp, Full on Floral.


I started by stamping the background image with Versamark, and embossed with clear embossing powder.  Once I heat set it, I sponged on some colors.


I cut out the panels, stamped the unicorn, and the sentiment on top of the rainbow inked unicorn.  I went ahead and made it a shaker card as well.  It's been a while since I made one of those.


I hope you enjoyed my card today.  Just a reminder, if you use my code, you can save 15% off your CAS-ual Fridays purchase.


Wednesday, May 22, 2019

Full On Floral Eclipse


Lisa here and today I'm sharing with you a card using an Eclipse technique.  If you're not familiar, the Hello in my card is what we're talking about.  It's a raised area that could be a Word like in today's card or a shape or anything really that almost seems to raise out of the background... visible, but you can sometimes almost miss it... almost ghost-like.

Here's how I made mine:


I started by stamping the Full On Floral background stamp onto some mixed media paper in Versamark and heat embossed it in gold.


Next I used Picked Raspberry and Spiced Marmalade Distress Oxides and blended them over the embossed image.  When I was done blending the inks, I wiped over the top of the image with a dry paper towel to remove the ink from the top of the gold to let the shine through again.


 I splattered some water and Gold Color Shine over the top and when it was dry, I die cut the Hello die from the Sweet Friend Dies from the center of the embossed panel (you would want to cut this from whatever area you wanted to add your eclipse to because the negative space will be where you place it.  (Note: Be sure to save those little pieces from the middle of your O's, E's, L's.. you get the idea... because you'll need to place those inside their negative spaces so you don't have white showing through your eclipsed word or shape).


I added all of the layers to my card including the embossed panel with the Hello cut out of the center.  Next I die cut three more of the Hello words from white cardstock.  I glued and stacked all of my Hello words together with the embossed piece on top.  Sometimes I like to offset the top piece just a bit so that there is a tiny bit of the color from the bottom layers that shows around the outside in some places to help the word stand out just a bit.  Then I glued the stacked word into the negative space and added the little center bits that I saved (center of the O, etc).  I also added a thin layer of Glossy Accents to the top of the word... again so that it would stand out just a little bit more.


I included a simple sentiment from the Bushy Tailed stamp set and a few sequins to finish it off.


And there you have it!  A simple Eclipse design with a big impact!  I think it's cool anyway!

I hope you enjoyed your stop!  If I've inspired you and there is something you need to have, you can head on over to the shop here and use this code for a discount on your order!