Translate

Showing posts with label To Go Cup Fri-Dies. Show all posts

Thursday, October 28, 2021

A Few Christmas Tags

It's time again for my CAS-ual Fridays day here on my blog [and over on the CFS Blog too].  I am starting to get ready for Christmas.  In a few of my to-be-sent Christmas cards, I include tags as a small gift.  Yeah, it costs more in postage, but like I said, a small gift.

I used the To Go Cup Die for the base of my tags.  Using the Snowflake Stencil, I sponged on red ink, and then sponged on green ink using one of the the snowflakes from the same stencil.

I used the sentiments from Snowy Sayings, and lastly, I used the smallest snowflake from Funky Flakes Dies, and die cut with red and green glitter paper.  Once everything was adhered, I punched a hole and put some twine for hanging.  These needed something, so I added some gems from my stash.

That's it for me today.  Do you use tags on your presents?  They are a small personalized addition that I believe recipients like. 😀


Thanks for stopping by~

ps - I have used affiliated links in this post at no additional cost to you. 


Friday, July 30, 2021

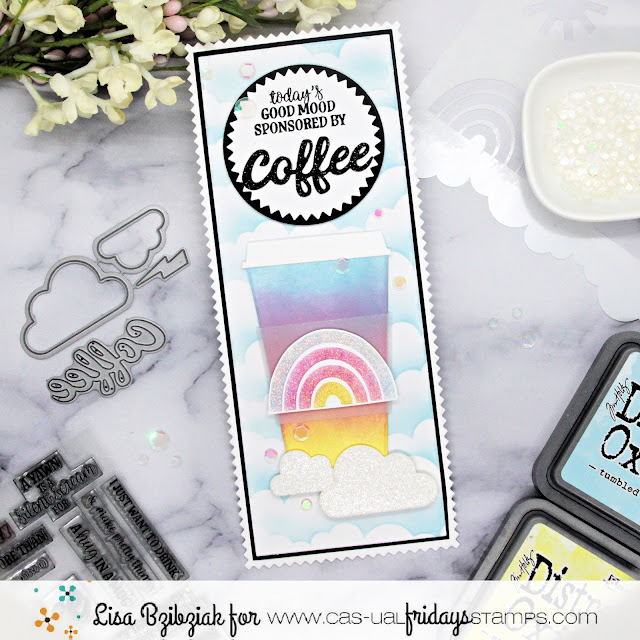
Today's Good Mood


Hello!  Hope you enjoyed all of the new Stencil Release inspiration!  I've got some more for you today!  I used the Partly Cloudy Stencil for this Pinked Slimline coffee card!


I started by cutting the To Go Cup from white cardstock (I did end up re-cutting the wrap from vellum and decided to use that instead of the white).  I blended three colors of ink on it to create a rainbow, overlapping them so the pink and yellow made orange and the pink and blue made purple.


I used the same colors and blended the rainbow from the Partly Cloudy Stencil onto some white cardstock using a small blending brush.  I did add a purple to this one.  After blending, I added some Glitz Glitter Gel to the entire stenciled area and set it aside to dry.


Next I cut a slimline base and used the Partly Cloudy stencil to add clouds to the slimline, moving the stencil to the left and right alternately so that the clouds were not uniform.


I fussy cut the rainbow when it was dry and cut the clouds from the Raindrops Duo stamp and die set from white glitter paper.


I assembled all of my pieces and added them to the front of the card using varying thicknesses of foam tape.

I cut the largest pinked circle from the Pinked Slimline die set and stamped the sentiment from the Coffee Talk stamp set onto the top half.  Then I cut the Coffee word die from the Coffee Cup dies in black glitter and twice more from black cardstock and adhered them together and added it to the sentiment.


And that's me for today!  Thanks for stopping and I hope you enjoyed it and come again soon!


Monday, May 24, 2021

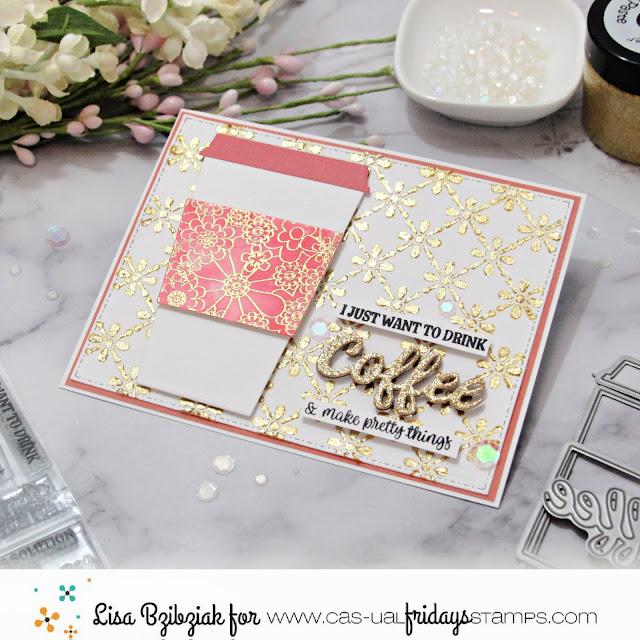
Make Pretty Things


Welcome back!  I felt the need to get my gold on for today and what's better than some coffee with that?


I started by applying some glitter embossing paste through the Tin Roof Stencil onto a die cut panel.  While it dried I assembled my cup and sentiment.


One of my favorite die sets from the shop is the To Go Cup Dies!  The wrap was cut from a previously blended and embossed piece (using the Full On Floral Stamp Set) that I saved because of course I would!  I used the colors in it to cut the cup lid and one of the base panels.  I cut the Coffee word die from the Coffee Cup die set from gold glitter paper and twice more from plain cardstock and stacked them together.  Then I stamped the sentiment pieces from the Coffee Talk stamp set and cut them in strips.


Once the paste was dry, the card was assembled and a few sequins added.

That's me for today!  thanks so much for stopping and hope you enjoyed your visit!


Sunday, March 21, 2021

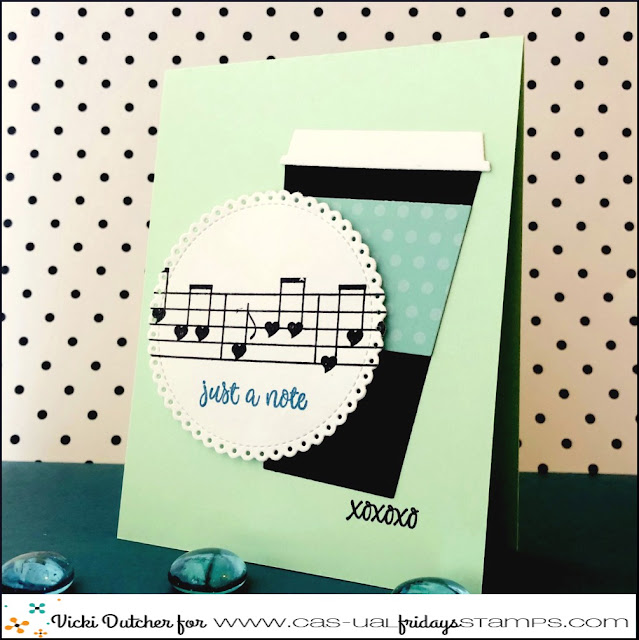
Just a Note

Hi all - Vicki here today.   I am playing in the Coffee Lovers Hop with todays card too.  Such a win win since CAS-ual Fridays is also a Super Sponsor! 

I went with a musical CAS coffee card, because I am also entering this into the CAS on Sunday Challenge #201 - Music.  For my card I used [the awesome] To Go Cup Die, and the musical notes and sentiment from the Love Note Stamp Set.

I like the colored card base.  I don't do that very often, but I think it works for this card :).

Day 3 is done for the Coffee Lovers Hop. Are you playing along? 
 
SIDE NOTE:  You can save 15% off any CAS-ual Friday purchase by using my code below;


Thanks for stopping by~


Tuesday, November 10, 2020

Better Latte than never!

Hello there!! Hope your all having a fantastic week and still celebrating after the amazing election results. I'm so excited for America and can't wait for Joe and Kamala to get in the White House!!
 

The 2020 Coffee Lovers Fall/Winter Blog Hop is happening right now and CAS-ual Fridays Stamps is one of the 'Super Sponsors'. So this week we have all 'coffee-themed' cards for the blog. For my card I wanted to use some Autumn colours:
 

I use pastel colours ALOT on my cards so it was really nice to use warmer, earthier tones for a change. And I even have a tutorial for you!!
 

I started off by blending Distress Ink over some white cardstock die-cut with the stitched edge die from the Pinked Slimline Dies, using the By the Beans Stencil.


I die-cut the cup from the To Go Cup Dies from Strathmore Watercolour CS and heat embossed the Full On Floral stamp over top with the WOW Metallic Gold Sparkle Embossing Glitter
 

I was then able to spend some time water colouring using Distress Inks, drying in-between layers to create more detail and darker colours.
 

Once the painting was dry I popped it up on a piece of black CS with some foam tape. I also heat embossed the sentiment from the Hot Coffee stamp set with the same embossing powder and put it on foam tape as well.
 

To finish off I adhered the stenciled panel to a white card base and put the black panel on some black foam. I also glued on some gold and Autumn colour sequins from Pretty Pink Posh.

I hope you enjoyed this tutorial and have a chance yourself to make a few cards for the blog hop. All of the 'coffee-themed' products in the store are on sale, no code needed. And if you use my special code you can save yourself another 15%!!


Thanks so much for stopping by and I'll be back here very soon with some more card ideas.

Take care
Shona


Sunday, November 8, 2020

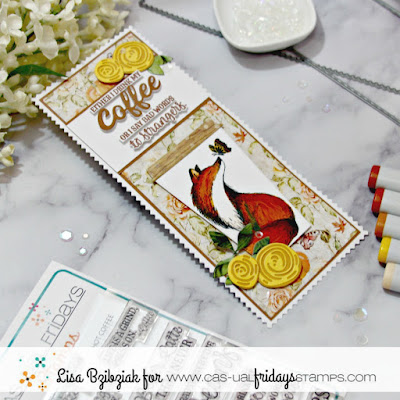
I Say Bad Words


Welcome back!  I've got some more Caffeine for you today using some of my favorite CAS-ual Fridays products (including some that are on sale!)  We are in the middle of the week long celebration of all things Coffee, Tea or Cocoa that is the Coffee Lovers Blog Hop!  And CAS-ual Fridays is a Super Sponsor once again.

Here's how I was inspired:


Have you seen the new Pinked Slimline Dies?  Love them!  That fun pinked edge on the largest die is so fun!


I started by cutting the To Go Cup base from Copic friendly paper and stamped that beautiful Fox from the Foxy Stamp Set directly onto it with Memento Ink and colored it in with Copic Markers.  I cut the lid from some design paper.

Next I stamped the sentiment from the Hot Coffee Stamp Set.in brown ink and then cut out some of the lines from it in strips and the last line was fussy cut.  Then I cut the Coffee word from the Coffee Cup Die Set twice from white and once from brown cardstock and stacked and adhered them together.

I cut the flowers and leaves from the Garden Die Set and layered the flowers with glue.


I used the dies from the Pinked Slimline dies to cut a white base and the design paper layer.  I cut a layer 1/8" larger than the design paper layer with a paper trimmer to create a small thin border between the other two layers.  I cut a strip in white large enough to layer my sentiment on top and a strip in brown 1/8" larger.  And finally I assembled all of my pieces and added a few sequins to finish it off!

Now!  There is a sale going on in the shop on all Coffee items as well as a special clearance section.  (You will find the Foxy stamp and Garden dies in the clearance section at half off!)  No code needed for the sale.  And should you decide you need something, you can also use the code LISASENTME for an additional 15% off of your order!


And don't forget to head on over to the Coffee Loving Cardmakers Blog and check out the Day 1 post of the Blog Hop for all the details including sponsors, prizes, inspiration and how you can link up a new Coffee, Tea or Cocoa themed creation to play along and have a chance or chances to win some great prizes!


Friday, July 3, 2020

All About the Beans

Hi all, Vicki here today from All I Do Is Stamp.  While I made one card, it just didn't pass muster [in my mind], so I went with my plan B, coffee.  I can never go wrong with a coffee card. 😀

For today's card, I used the [I-Love-It] To Go Cup Fri-Die, along with a sentiment from Stay Strong.


I also added a few of the super fun chipboard hearts from the Coffee Chips Chipboard.  Since they matched my color combo, I used them as is.

Oh yeah, I almost forgot!  For my background panel, I used the By the Beans Stencil with some white ink to make the beans pop out.  [I do rather like that result].


That's it for my card today.  Remember, if you use my code below, you can save 15% off your purchase, and yep, that also includes the Sale Category


Thanks for stopping by~


Tuesday, May 26, 2020

Love You A Latte - Coffee Chips Release and Coffee Lovers Blog Hop!


Lisa here!  Today I'm sharing a card for the Coffee Lovers Blog Hop and I've used the new Coffee Chips Chipboard along with a few other things!


I started by applying some Deco Foil Transfer Gel onto my base panel using the By The Beans stencil and a spatula.  When it was dry, I layed the rainbow foil over the top and ran it through my Minc.

 For this one, I added white glitter to the chipboard and thought I'd share with you how I like to glitter chipboard:


When I add glitter to brown chipboard I like to paint or color the chipboard first to make sure the glitter color is nice and solid without any spots that show through.  So for this one, I started by using some white acrylic paint and painted the pieces I wanted to use.


Once that was dry, I used my cleaned paint brush and painted on some glue... sometimes chipboard can bend or warp when you add glue so I like to apply it with a paintbrush so I can get nice even coverage, yet not over apply it.


While the glue was still wet, I poured the glitter over the top of the chipboard.  I find my fine tweezers from the shop really help with this whole process and to move the chipboard around without ruining anything with my fingers.  I do like to turn it over and press it into the glitter as well to be sure I get as much as possible to stick and then I tap it off and set it aside to dry.  Once it's dry, and before I add it to my project, I'll take a fine brush and brush off the excess onto a scrap piece of paper.


I love the sentiments on the Coffee'isms Stamp Set!  And they are perfect to use along with the Coffee Chips because you can easily substitute the chipboard version of the Coffee words instead of the stamp with some easy masking or with this sentiment, the Love You A is separate completely... so... easy peasy!  I just cut the pieces of the To Go Cup and heat embossed the Love You A onto the wrap and then once my Latte word was dry, I added that underneath it.  Then popped the whole thing onto the rainbow background!


Fun, right?

I'm linking this one up to the Coffee Lovers Blog Hop which has over 600 entries as I type.  There are close to 80 sponsors for the hops and CAS-ual Fridays is one of them.  You can check out the CAS-ual Fridays Day 1 post here for more information and lots of ideas for the new Coffee Chips Chip Board and the main Coffee Hop post here to link up!

And the Coffee/Tea section of the shop is on sale now!


And since there is no code needed, you can also use one of the DT codes... mine is below!  Each of the DT has one and be sure to use the code for who inspired you for an additional 15% off!


That's me for today!  I hope you enjoyed your stop and come again soon for more CAS-ual Fridays Inspiration!