Translate

Showing posts with label Foxy Stamp Set. Show all posts

Sunday, November 8, 2020

I Say Bad Words


Welcome back!  I've got some more Caffeine for you today using some of my favorite CAS-ual Fridays products (including some that are on sale!)  We are in the middle of the week long celebration of all things Coffee, Tea or Cocoa that is the Coffee Lovers Blog Hop!  And CAS-ual Fridays is a Super Sponsor once again.

Here's how I was inspired:


Have you seen the new Pinked Slimline Dies?  Love them!  That fun pinked edge on the largest die is so fun!


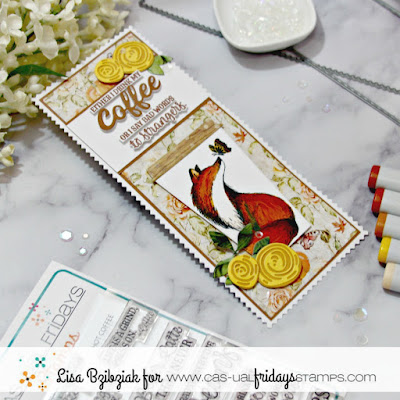
I started by cutting the To Go Cup base from Copic friendly paper and stamped that beautiful Fox from the Foxy Stamp Set directly onto it with Memento Ink and colored it in with Copic Markers.  I cut the lid from some design paper.

Next I stamped the sentiment from the Hot Coffee Stamp Set.in brown ink and then cut out some of the lines from it in strips and the last line was fussy cut.  Then I cut the Coffee word from the Coffee Cup Die Set twice from white and once from brown cardstock and stacked and adhered them together.

I cut the flowers and leaves from the Garden Die Set and layered the flowers with glue.


I used the dies from the Pinked Slimline dies to cut a white base and the design paper layer.  I cut a layer 1/8" larger than the design paper layer with a paper trimmer to create a small thin border between the other two layers.  I cut a strip in white large enough to layer my sentiment on top and a strip in brown 1/8" larger.  And finally I assembled all of my pieces and added a few sequins to finish it off!

Now!  There is a sale going on in the shop on all Coffee items as well as a special clearance section.  (You will find the Foxy stamp and Garden dies in the clearance section at half off!)  No code needed for the sale.  And should you decide you need something, you can also use the code LISASENTME for an additional 15% off of your order!


And don't forget to head on over to the Coffee Loving Cardmakers Blog and check out the Day 1 post of the Blog Hop for all the details including sponsors, prizes, inspiration and how you can link up a new Coffee, Tea or Cocoa themed creation to play along and have a chance or chances to win some great prizes!


Sunday, October 20, 2019

Hey There Foxy!


Lisa here!   Have you seen the beautiful Foxy stamp set in the CAS-ual Fridays shop?  I decided I needed to pull it out for today.  I stamped the images onto some watercolor paper using Ranger Archival Ink and then colored them in using Zig Clean Color Real Brush markers.  Once they were dry, I fussy cut them out.  I love to cut the floral out especially because I love the way it looks and how it curls just a bit!


I created the background using the Modern Petals Stencil and the Zig markers.  I taped down the stencil over some water color paper and holding down the stencil close to the paper I proceeded to color in the petals.  I didn't spend a lot of time to color the entire petal because I knew I wanted to mix these colors in the negative spaces so with quick brush strokes I went over with yellow, then green, and then orange.  Finally I splattered some glitter watercolors over the top.


Once I popped up and added all of my pieces, I heat embossed this sentiment from the Foxy stamp set onto black cardstock... my favorite way to add a sentiment these days.


Thank you so much for stopping by today!  I hope I've provided a little inspiration for your crafty day!

If you have seen something you must have, I have this for you:


Come back soon and often for more inspiration!


Wednesday, August 21, 2019

Peace, Love, Coffee, and a Colorburst Background


Lisa here!  I'm sharing with you today a card I made using some of my very favorite CAS-ual Fridays products!  I started with a background I created using some Ken Oliver Colorbursts and the Modern Petals stencil.  (I have a short photo tutorial here if you didn't catch it the first time around).  I love to get out my colorbursts and stencils and play and make a bunch at one time so when I'm ready to use them, they're ready for me!


Then of course... the coffee cup... I love the To Go Cup Fri-Dies available in the shop... the size is fantastic to be the star of the show on a card... and since coffee is the star of most of my mornings... it's perfect!  And that beautiful fox from the Foxy stamp set... perfect for my coffee wrap that I cut from Copic Friendly paper.


I love the 4 Petal Fri-Dies!!  Handy for all kinds of flowers... I cut these from red cardstock and covered them with some Wow Vintage Candy Cane embossing powder.  Added a few branches from the Casual Trees Fri-Dies and my favorite sentiment from Peace, Love and Coffee as well as the additional Peace sign... both stamped in Versamark on black cardstock and embossed with Wow Opaque Bright White powder.


I love how bold it is, yet somehow (to me anyway) it still evokes peaceful thoughts... I think it's that beautiful quiet fox....

I hope you enjoyed your stop!  And did you know now is a good time to get some of your favorite sets that you've been wanting but just haven't gotten yet?  There are some products in the shop that are retiring and are 25% off right now!  Once they're gone they are gone!  They're making room for some awesome new products so get what you've been wanting before it's too late and at a great price!

And here's this for you as well:


And you don't have to use mine!  Use the code for whichever Girl Friday inspires you!  

Come back again soon for more inspiration!


Friday, June 7, 2019

Negative Foiled Hello Friend Card!!

Hello Crafty Friends!! 
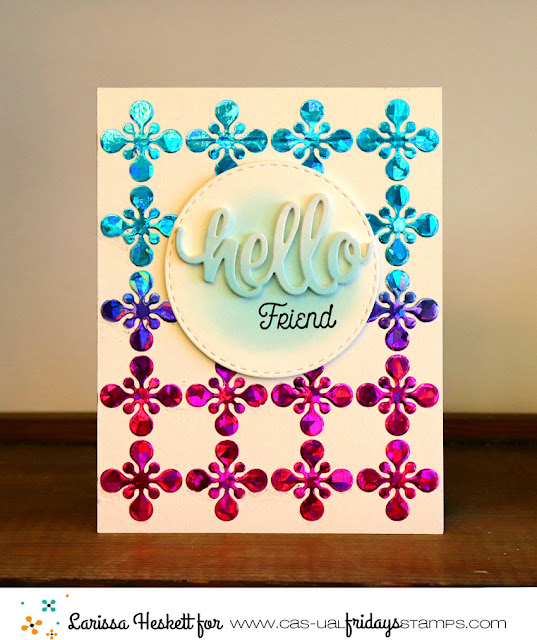
Larissa here today with a FUN Negative Foiled Hello Friend Card!! 

If you saw my last Card, (pictured below) you'll know I used some AWESOME Therm O Web Products to create a Stenciled and Deco Foiled Card!! 
Today I want to share how to use the Negative Foil piece to create another card design!! I LOVE being able to use my scraps/negatives, so let's get started!! 
First cut a piece of Deco Foil Toner Sheets and Foil the Negative Deco Foil onto the toner sheet by running it through the Laminating Machine!! 
Then I cut a piece of Iridescent Deco Foil and ran it through my Laminating Machine again!! 
SWOON!! It fills in the Negative Design BEAUTIFULLY!! The Shine is AMAZING!! Then you'll see I have another Negative Foil Piece so you guessed it SAVE that piece and repeat this same process to create another Card!! I call this the NEVER Ending Card Design, because you can honestly create as many cards as you'd like using this process as you'll ALWAYS end up with a Negative piece!! How AWESOME is that!!?? 
Hello Friend Negative Foiled Card for CAS-ual Fridays Stamps by Larissa Heskett  using Bold Trellis Stencil, Sweet Friend Fri-Dies, Foxy Stamp Set
I added some Black Soot Distress Paint Splatters and then I wanted to add some Sparkle and Dimension so I added several coordinating Jewels from the Lucy's Cards Opulence Collection!! 
I LOVE the way it finishes off the Foiled Images!! 

I finished my Card Design with the sentiment I Die Cut 5 of the Hello Die Cuts from the NEW "Sweet Friends" Fri-Die Set!! Then I adhered them together one on top of the other Inking the Top one with Tumbled Glass Distress Ink for an Ombre` look!! I Die Cut a Stitched Circle and Inked in the Center with Tumbled Glass Distress Ink and then Stamped and Embossed the Friend Sentiment from the "Foxy" Stamp Set!! I adhered the Circle to my card using Foam Tape!! 
THANKS SO MUCH for stopping by today and I hope you'll give Foiling a try with your Stencils!! I ASSURE you, you'll LOVE it too!! Have a FABULOUS WEEKEND!! 

LARISSA   =) 

 Use my discount code LARISSASENTME, to save 15% off on all of the goodies in the 
CFS Shop!!


Thursday, May 16, 2019

Pack a Punch with your Stencils and Deco Foil!!


HELLO CRAFTY FRIENDS!! 
Larissa here today to share a FUN Stenciled Background that I Foiled for a PUNCH of Shine!! I LOVE how VERSATILE Stencils are and I'm always trying to use them in other ways for my Projects!! Using Therm O Web Deco Foil Transfer Gel is one of those ways!! 

I started by placing the Bold Trellis Stencil over my Cardbase that I sprayed with Pixie Spray!! I also used alittle Purple Tape just to make sure it stayed in place!! Then I applied a thin coat of the Deco FOil Transfer Gel using my Stencil Pal!! Then I removed the Purple Tape and the Stencil and set it aside to Dry!! 
Once it was Dry I placed the Rainbow Shattered Deco Foil over the Transfer Gel and ran it through the Laminating Machine!! Remove the Foil backing Sheet and SWOON!! Not only is there dimension, but there is some BEAUTIFUL Shine!! 
I finished my Card Design with the sentiment I Die Cut 5 of the Hello Die Cuts from the NEW  "Sweet Friends" Fri-Die Set!! Then I adhered them together one on top of the other Inking the Top one with Tumbled Glass Distress Ink for an Ombre` look!! I Die Cut a Stitched Circle and Inked in the Center with Tumbled Glass Distress Ink and then Stamped and Embossed the Friend Sentiment from the Foxy Stamp Set!! I adhered the Circle to my card using Foam Tape!! 

THANKS SO MUCH for stopping by today and I hope you'll give Foiling a try with your Stencils!! I ASSURE you, you'll LOVE it too!! Have a FABULOUS WEEKEND!! 

LARISSA   =) 

 Use my discount code LARISSASENTME, to save 15% off on all of the goodies in the CFS Shop!!


Tuesday, April 30, 2019

Hello Friend with LOTS of Texture!!

HELLO CRAFTY FRIENDS!! 
Larissa here today to share a STUNNING and TEXTURE FULL Card!! 
I'm using the NEW Trellis Cover Fri-Die along with the NEW Therm O Web Deco Foil Flock Transfer Sheets in Blue Diamond!! If you've ever worked with Flock you know its FUZZY to the touch!! I LOVE the look that you get, and that it cuts SO BEAUTIFULLY!! Even with intricate Dies and getting the added bonus of the FUZZY Texture makes it even more EXCITING!! Lets get started!! 

It's HARD to see in the photos, but this Deco Foil Flock paper really makes this Die Design come to LIFE in person!! I adhered the Die Cut to my Patterned Paper Background using liquid adhesive and I only applied it to the main lines of the die so I could POP the other areas up!! 
I adhered some Buttons Galore & More Iridescent Stars in the middle of every Flower and I just LOVE the way it looks!! For my sentiment I Die Cut 5 of the Hello Die Cuts from the NEW  "Sweet Friends" Fri-Die Set!! Then I adhered them together one on top of the other Inking the Top one with Tumbled Glass Distress Ink for an Ombre` look!! I Die Cut a Stitched Circle and Inked in the Center with Tumbled Glass Distress Ink and then Stamped and Embossed the Friend Sentiment from the Foxy Stamp Set!! I adhered the Circle to my card using Foam Tape!! 

Here's a Short Video to share a Close Up Look at this Card!! 


For TONS of AMAZING Inspiration make sure to visit the CAS-ual Fridays Stamps Blog and shop the NEW Products in the CFS Shop!! You can also use my  discount code LARISSASENTME to SAVE 15%!! WHOOP WHOOP!! 

THANKS SO MUCH for stopping by today and I hope you'll come back tomorrow for a look at the NEW !! You're gonna LOVE them!! Have a FABULOUS WEEK!!