Translate

Showing posts with label Alcohol Ink. Show all posts

Monday, June 20, 2022

Happy Birthday-Foiled


Welcome back!  Today I'm sharing a card using the Mon Ami stamps and dies along with the Happy Birthday dies.  I created the background using some Yupo paper and alcohol inks and then used the Chunky Chevron stencil and some Deco Foil Transfer Gel Duo and Gold Deco Foil over the top.


The Transfer Gel Duo stays a little sticky so you can use it with foil without heat.  I like to let it sit for a whole day so it's only slightly sticky and the foil transfer isn't solid.

I cut the Happy Birthday dies from some foiled gel print and then cut it twice more from cardstock and stacked them for dimension.


Then I added the stamped images to the front with foam tape and just a few sequins.

Thanks so much for stopping!  Come again soon for more CAS-ual Fridays inspiration!


Friday, December 10, 2021

Alcohol Ink/Shaker Magic


Welcome back!  I've got some more pink and snowflakes for you today!  I just love pink for Christmas/Winter cards!  I've been playing with some alcohol inks and had some fun with a few different techniques for this one.


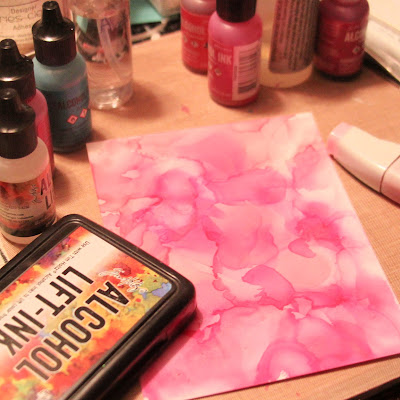
I wanted a lighter alcohol inked background so I combined some Ranger Pearl Alcohol Ink along with some Copic Refill in a light pink.  I applied them and moved them around with Blending Solution.


Did you know you can add a little sparkle to your alcohol inked panels with foil?  The trick is to get it while it's not too wet, but still a little sticky... I keep all of my foil scraps for just such occasions.  Just press the foil over your piece and it stays on the sticky parts.


Then I used alcohol life ink along with the snowflakes from the Snowy Sayings stamp set.  You just stamp on your alcohol inked panel with the alcohol lift and then buff it with a paper towel to make the flakes appear...


Love the light images along with the light inky background.  I finished it off by splattering some acrylic paint over the top.


I cut the Flakey A2 Panel Die from white glitter paper, added a piece of acetate to the back of it and popped it up over some sequins on the alcohol ink panel and added a sentiment from the Snowy Sayings set.

Thanks so much for stopping!  Hope you'll come again soon for more inspiration!


Wednesday, June 23, 2021

Get Your Happy On With Alcohol Inks and Foil


Hello!  Welcome back!  I've got another one like the Champagne Flutes from last time and I'm sharing with you how I created it using a panel that didn't turn out as I'd hoped, but I decided it was perfect for die cutting flowers!


I started by covering a panel of EVO synthetic paper with alcohol inks.


I used the Bold Flower stencil to add some Reactive Paint to the panel and let it dry for a few hours and then ran it through the Minc with some purple foil.


Well, I'm not sure if I didn't let them dry long enough or if it is something else, but the foil stuck to more than just the painted area.  Not one to give up, I decided it would make some pretty flowers.  So I took out my 4 Petal dies and cut a few.


Then I die cut a panel of white cardstock and created a dragonfly shaped window using the coordinating die from the Everyday Dragonfly set.


I added foam tape to the back of the windowed panel and popped it onto a purple background.  Then I added all of my 4 petal die cuts in the center along with some sequins to fill up the open areas.


I added some iridescent gems to the center of the flowers and finally, a sentiment from the Whole Shebang stamp set and done.


That's me for today!  Hope you enjoyed my mistake.  I'll keep working on the foil and alcohol ink/stencil/panel thing, but in the meantime, I'm enjoying playing with these "mistakes".

Hope you'll come again soon for more CAS-ual Fridays Stamps inspiration!


Sunday, June 13, 2021

Sip Sip Hooray-Die Cuts From An Alcohol Inked and Foiled Panel


Welcome back!  I've got a fun one for you!  I've been playing with foil all month and today I'm using an alcohol inked and foiled pane to cut some pretty flowers out of!

I created the panel by alcohol inking a panel and then spraying some Ranger Distress Spray over the top.  After it was dry, I ran it through the Minc with some Fancy Foils Gold Sequins foil.  For this card, I cut bunches of those Four Petals die cuts from the panel as well as a piece that would cover the inside of the glass stem.


I lined up the stitched slimline die from the Pinked Slimline Dies and the largest die from the Champagne Flute dies together, secured with washi tape and cut them both at once creating the window panel.  I also cut the pinked slimline die from white cardstock and cut a piece of gold cardstock 1/8" larger than the stitched.   I layered the pinked and gold together and then I figured where the stem would be and added the alcohol inked piece I cut for the stem to gold panel.  Next I added pop-up tape to the back of the stitched slimline panel with the window and adhered it to the gold panel (making sure that stem piece was where it should be before pressing it all firmly in place.  

I added the four petals flowers to the inside tucking the petals that would stick outside the flute frame underneath and using foam tape to keep the petals raised inside the glass.  Then I added cupped sequins to the center of the flowers and flatter gold sequins in the in between spaces with glue.

I think it looks yummy!  


Finally, I stamped the sentiment from the Pop, Fizz, Clink stamp set onto one of the pinked circles from the slimline set and layered it onto another circle.  I punched some dots from my leftover alcohol ink and foiled panel and had one Four Petals flowers left and arranged them above the flute and onto the sentiment piece.

That's me for today!  I hope you enjoyed it and will share my process for the alcohol inked panel next time!

And hey!  Did you know there is a huge sale going on over at CAS-ual Fridays Stamps??  And there's no code needed so you can still use the savings code below for additional discounts!  Have fun!  And please do come again soon!


Sunday, February 28, 2021

Hugs and Happy Thoughts!


Welcome back!  I've been playing with alcohol inks and alcohol lift ink again!  In case you missed it, I used the same technique for this post here!  This time I added a little shine here and there with some foil like I did in this post here!


I used the Full On Floral again with some lift ink and I thought this background was perfect for these beautiful Everyday Dragonflies!


I stamped the dragonflies with Catherine Pooler Mardi Gras and All That Jazz inks and then colored them in with some glittery gel pens.


To me it feels like the dragonflies are flying over water... I love it!  That's me for today!  And in case you see anything you must have, I have this for you:


Thank you so much for stopping!  I hope you'll come again soon!


Tuesday, February 16, 2021

Full On Floral With An Alcohol Lift


Welcome back!  I'm playing with some Alcohol Ink and Alcohol-Lift Ink!


I started with some EVO paper and splattered on Ranger Alcohol Inks in Raspberry, Eggplant and Aqua and then some Blending Solution.  I moved the inks around using the Hand Blower and added a little ink here and a little blender there until I was happy with the look.  I let it dry while cutting the other elements such as the heart window panel and flowers from the Four Petals dies.


When the panel was dry, I placed it in the Misti and used a freshly inked Alcohol Lift-Ink pad to link it up and stamp the Full On Floral stamp onto it.  I did leave the image down on the inked panel for about half a minute.  I inked the stamp up again and restamped one more time before I was finished.


When you first lift up the stamp you can very lightly see the image on the panel.  I took a paper towel and buffed the image lightly.


As you buff and the ink is moved away, the image starts to appear leaving a ghost of your image in the ink.


I cut the panel down to fit in the heart window I had cut previously.  The heart was adhered to the base so that it would fit in the window and the window panel was popped up over it.  The Breathe word die from the Just Breathe Dies was cut three times... once from some of the leftover inked panel and two more from some purple cardstock... and then stacked together.  It was adhered to the edge of the heart window.


I added the flowers made by layering the two sizes of Four Petals die cuts and added a gem to the center.  Finally I stamped a little "hang in there" sentiment from Somebunny onto the bottom corner (should have done that while it was flat, but it was a last minute decision to stamp it directly onto the panel and using the Misti it was easy peasy!


And that's me for today!  I hadn't played with the Alcohol Lift in a while, but this month I'm using lots of alcohol inks in my projects and thought it was time to pull it out.

Thanks for stopping and hope you'll come again soon for more CAS-ual Fridays Stamps inspiration!


Thursday, February 4, 2021

Alcohol Ink and Holographic Snowflake Die Cuts


Welcome back!  Today I'm playing with some new papers and alcohol inks!


I started by cutting some EVO Synthetic Paper using the Pinked Slimline Dies (they're on sale now!)  I picked out some of my favorite blue alcohol inks and some Snow Cap mixative.


I generously scattered drops of all colors onto the paper along with some blending solution and used the Ranger Air Blower to move them around.  If they stopped moving but still needed to cover an area, I would drop a little more blending solution and/or more ink until the panel was covered.


I let the panel dry until some of the thicker areas of alcohol ink were sticky.  I grabbed some scrap Deco Foil Silver Sequins paper and pressed it firmly onto the panel, unshiny side down and rubbed around and then when you pull it up....


Voila!  The silver sticks to the ink that is still tacky!  It's such a cool look!  And it was the perfect touch to tie into those pretty snowflakes from the Funky Flakes Dies!  I cut a bunch from Holographic Film paper.


I made this pic darker so you could see how these snowflakes sparkle!


I cut additional snowflakes from white cardstock and stacked them under the silver for a little bit of dimension.  Then I placed them randomly onto the inked panel and they were perfect.  I love to use the dots that are cut because of the ringlet snowflakes and they make great additional drops.  They go perfectly with the silver foil on the panel, don't they?


I cut the Big Hope word die from white cardstock three times and stacked them too and then popped it up onto the inked panel.  Finally I stamped a sentiment from Everyday Dragonflies, cut it and added it.


I just love that pinked panel from the Pinked Slimline die set!

So that's me for today!  I hope you enjoyed your visit and you'll come again soon!  And should you see something you need, I have this for you:


Thanks so much for stopping!