Translate

Showing posts with label Bubble Box Fri-Dies. Show all posts

Tuesday, October 27, 2020

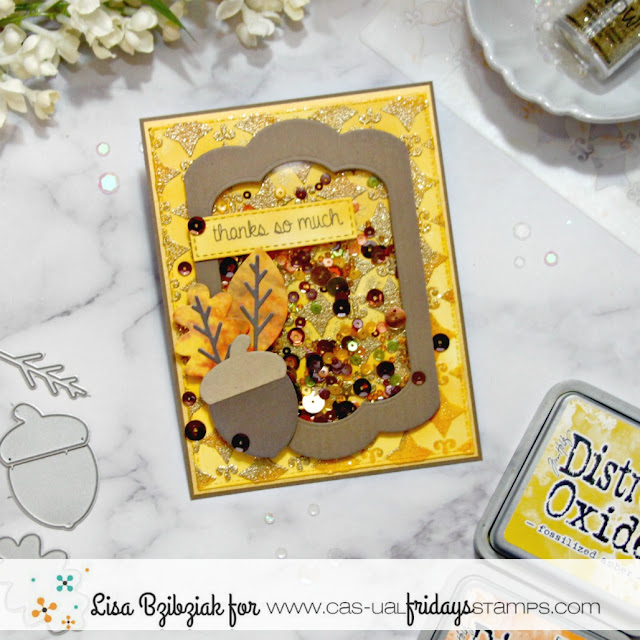
An Autumn Thank You Shaker and Some Great Deals!


Hello!  Lisa here and today I've got a shaker for you!   Have you checked out the clearance section in the shop lately??  Lots of great stuff at half off and at the end of my post I have a discount code for you!

Here's how I made it:


I started with a white panel of cardstock.  I ink blended some Distress Oxides over the entire panel in Fossilized Amber and Spiced Marmalade.  Then I placed the Starlequin stencil over the top and blended on some Rusty Hinge.  Leaving the stencil in place, I added some clear texture paste through the stencil as well.


While the clear texture paste was wet, I added some Metallic Gold Sparkle Embossing Glitter from Wow and set it with my heat gun.  It takes a little longer to heat up the embossing powder when applying it with the texture paste, but so fun to watch it change.  This one has both an opaque gold and glitter in it.  I prefer sometimes to not entirely cover the surface so you can see some areas are not as solid as others leaving a more "distressed" look.


I used the Bubble Box die to cut a frame for my shaker.  I just nest one size inside the other and tape them in place and run them through my Die Cutting Machine.  This die set is perfect for creating shakers with a nice big window or use the smaller size if you just want a little window!  This one is half off in the clearance section but stock is low so grab it while you can!


I measured my window and cut a piece of clear acetate just a bit larger than the window and adhered it to the back of the frame.


I added foam thick foam tape to the back of the frame, scattered sequins onto my base where I knew the window would be positioned and then popped the window over the top of it... careful to not let any sequins get stuck under the foam.


I cut out the leaves and acorn using the Acorn Dies (also half off in the clearance section!).  I cut the leaves from some previously colored cardstock where I used a shaving cream technique.  The tone wasn't quite right so I blended some more of the Fossilized Amber ink over the top and it was perfect!  I added them over the top of the shaker element using some thin foam tape.


Finally I added the sentiment from the Everyday Dragonflies Stamp Set and a few of the same sequins from the inside of the shaker!


Easy peasy!  Thanks so much for stopping by and hope you enjoyed your visit!

Now, I highly recommend you head on over to the Clearance section on the CAS-ual Fridays Stamps shop website and check it out!  Should you decide there is something there you just must have, you can also use the discount code LISASENTME to get an extra 15% off!


Have fun shopping!  Come again soon for more CAS-ual Fridays inspiration!


Friday, August 28, 2020

What would I do without you??

Hi there everybody and welcome to the CAS-ual Fridays Stamps blog! Its early Saturday morning for me here in New Zealand and I'm glad the week has finally finished, although I have lots to do over the next two days. The weather is looking fantastic, so hopefully when the weekend arrives for you, you too will have lots of sunshine!

I've got a card to share with you today using lots of cool blues and mint/turquoise colours. I find these the most calming and relaxing, and after the week I've had, working with these hues helped me to slow down a little. I totally admit that I find it very hard to stop, let alone sit down and its something I really need to work on before my body stops on its own....:


I just love that even though these dies and the floral stamp set are older, they still bring me so much joy and I can still find so many ways to use them. That shows what fantastic designs they are and are 'classics' in my stash.

I used the Casual Trees and Bubble Box Fri-Dies along with the Mon Ami and Terrific Flowers stamp sets. It makes me so excited when I can get so many different products on one card! To find out how I put this all together you can pop over to my blog HERE.


I used up lots of cardstock scraps when making this card and hopefully it gives you a few ideas on how to use your stock-pile, which we all seem to have.... Enjoy your weekend and I'll see you back here next month with some more card making ideas.

Take care
Shona


Thursday, July 16, 2020

Tranquili-tea and creativi-tea

Hi everyone!! I'm so happy to be back crafting again after nearly two weeks of having the flu. I kept looking at everyone's blogs etc and seeing such incredible projects but my body had other ideas. Very grateful it wasn't COVID too!!

I wanted to share with you a card I created today that had to be simple but still stylish:


With The Daily Marker 30 Day Colouring Challenge on right now I wanted to do a little colouring and work on using my pencils to colour white objects like this teapot and cup from the Serendipi-tea stamp set. I'm slowly getting there.... I also missed out on creating a card for a recent stencil blog hop, so created a soft background with the Tin Roof Stencil. To find out how I put this all together you can pop over to my blog HERE.

I don't actually drink tea or coffee but can imagine they would both go hand in hand with crafting. My husband drinks a million cups of tea a day and on cold days like today I wish I did to warm me up!!

Thanks so much for stopping by and I'll be back here again soon with some more card ideas.

Take care
Shona

Saturday, June 27, 2020

Thanks so much!!

Hi everyone and thanks for stopping by. I'm been flat out the past few weeks making loads of cards for upcoming New Releases, so it was nice to create a card to share with you today that could be whatever I liked!!

I wasn't able to participate in the last stencil release as my parcel hadn't arrived, so I'm slowly been going through them and trying out different ideas. I love how this card turned out but boy oh boy did I make a mess:

 
I keep forgetting that Distress Oxide inks take a bit longer than normal Distress Ink to dry, so got ink in places I didn't want it but it all worked out in the end.


I started off by gathering all my blue Distress Oxide inks (including the new 'Speckled Egg'). I wanted to create a frame with just the flowers from the Blossom Bubble Stencil, so using a piece of scrap paper, I covered up any stencil openings that were close by and blended around the outside of a white cardstock panel, alternating colours and flower sizes as I went. And of course I got it in the wrong place as you can see by the top of this panel.....


It wasn't bright enough so I found a way to fix that AND cover some of the ink splotches. I blended 'Mowed Lawn' over just the leaves, adding them here and there, making it up as I went along. Unfortunately as I moved my stencil around I put it on top of wet green ink and smudged it EVERYWHERE....


I had intended to make this a one-layer card but with so many smudges I decided to die-cut a window with one of the Bubble Box Fri-Dies.


I found a sentiment that fitted with the size of the window and my theme for the card. I also found a green CS that was similar to the ink I used, so die-cut a smaller Bubble Box piece and white heat embossed the sentiment from the Hearty Horse set.


All I had to do then was glue the panel to the card front with Gina K Connect glue and pop the sentiment on some foam tape. I then finished off with some co-ordinating Neat and Tangled sequins.

I hope this has given you some new ideas for your stencils. If you find you just have to have some of the products I used today you can use my special code on the website and save yourself 15%, even on top of marked down prices!!

Enjoy the rest of the your weekend,  hope you fit in some sort of crafting and I'll see you back here again soon with some more card ideas.

Take care
Shona


Saturday, June 13, 2020

A Multi-Medium Birthday Card


Hello there!  Lisa here!  If you like to play with different mediums this is the card for you! I I came across the Bubble Box layer with green and gold Alcohol Inks on it in my stash.  I had made it for a different project, but it wasn't right for that one.  Turns out it was perfect for this one and it set the tone for the rest of the card!


I used the Jacks stencil to blended some greens through it onto a white cardstock layer and then because my alcohol ink layer had gold in it I decided to add some Inka Gold randomly before removing the stencil.  Mine was dried up so when I use it I just add a little water to it and apply it with a sponge.  After that dried, I layered that onto my white base, then a vellum Bubble Box and then popped up the Alcohol Ink layer.


Finally I stamped the Happy Birthday in the same greens I used on the background and then without moving the stamped image in my Misti, I dabbed on some Ranger embossing ink that comes in a bottle with a dauber tip to the stamp set, stamped it over the ink stamped image and then used clear embossing powder over the top.  I got a kind of textured embossed look which I decided I liked because it kind of makes the  sentiment sparkle!  And then I cut it out and popped it up over the top.  I just added a few sequins and I was done!

That's me for today!  I hope you enjoyed your visit and you'll come back again soon for some more CAS-ual Fridays Stamps inspiration!


Saturday, May 16, 2020

Think I might need glasses.......

Hi there everyone and thanks for stopping by!! Hopefully you'll have a chance to do some crafting this weekend and maybe my card will give you a few ideas...

Unfortunately I STILL haven't received my parcel of the New Release products but I do have one of the birthday stamp sets that came out in April and one of the sentiments inspired this card:

 
I really hope you can see these are eyes and not lots of little pairs of slippers!! I just love this sentiment from the 'Happy Birthday' stamp set and used that as the theme for this card.


I started off by gathering a rainbow of cardstock and die-cutting the 'eyes' using this die from the Huggable Critters Set. I also die-cut some eyelashes using black cardstock.

 
 I used the largest Bubble-Box Fri-Dies with some white cardstock and used my MISTI to stamp the sentiment in the middle with Versafine Onyx ink.

 
Next came the time-consuming part (which you know I love...) where I glued all the pairs of eyes around the sentiment, having some of them hanging off the side and giving some of them some fabulous eyelashes. I then cut off any excess over the edges.


I cut a panel of black cardstock and adhered it to the card front. The 'eyes' panel was popped up on a piece of black foam and I finished off by gluing on a few coloured pearls from Studio Katia.

I just love finding ways to stretch out my dies and so happy to find another use for the Huggable Critters set!! This might give you some ideas on how to use your own dies in different ways and if your thinking you might have to get your hands on the products I used today, don't forget to use my special code to save yourself some money.

Here's to a fabulous weekend for you all and I'll see you back here again soon with some more card ideas.

Take care and stay safe
Shona


Thursday, March 26, 2020

Hi There Hop Stuff!


Hi there!  Lisa here and I'm sharing another shaker similar to one I made for the Crafting of Hue Sponsorship Weekend so I could show you how I made this shaker using the paw die from the Huggable Critters die set!


I started by cutting the Bubble Box layer using the 2nd largest die in the set.  I taped it in place and then took the paw die from the Huggable Critters set and taped it in the bottom left corner so I could run them through together and avoid an extra run through the Gemini.  Then I took that piece and taped the paw die in place again and ran it through.  Then one more time so the paws were hopping across the bubblebox.  Once all three paws were cut out, I ran the entire thing through with a floral embossing folder.


Next I adhered acetate over the back of the die cut paws and added foam tape to create a well around the area I wanted to place my sequins and then additional tape to provide support for the Bubble Box layer.  I filled the well with sequins... using my fine tweezers to flip them over so when the shaker was right side up, most of the sequins would be too!


And finally I placed the design paper that I wanted to show through the shaker windows over the back.  I added adhesive to that and flipped the whole shaker element over onto my card front.


To finish it off, I used this cutie pie bunny from the Little Huggables set that I colored with my Copics.


And I added this cute sentiment also from the Little Huggables set... love all of the punny sentiments on this set!


A few sequins and done!

Thanks so much for stopping today!  Hope you enjoyed your visit and that you'll come back for more inspiration soon!  And should you need anything from the shop, I have this for you:


Monday, February 10, 2020

To The Moon & Back With A Distress Oxide Lift


Lisa here!  I'm sharing another cloudy background I created using some distress oxides and the Bubble Box die cut that I used on my card from my last post which you can see here if you'd like!  I'm using the adorable Somebunny stamp set again and this is the night time version....


I used some blues and purple distress oxides this time for my night time sky.  I realized after I finished my background that I forgot to leave some space for my moon glow so I decided to try the oxide lift technique.


I figured out about where my moon would be and used a paintbrush to apply water where I wanted to add a yellow glow and then "lifted" color off of the paper using a paper towel.  I repeated this process a couple times and then dried the area with a heat gun.  Then I added in some yellow.


I also added some tiny gold "stars" using a Uniball Gold Gel Pen.  I used the Stars Fri-Dies (still attached to each other) to create these glitter paper star frames.  I'm thinking I may not cut them apart because I love these frames!  I popped them up onto my background and then popped the rabbit hanging from the moon with a slightly thicker foam tape.


And finally a couple of the adorable sentiments from the Somebunny stamp set and a few sequins!


So there we are!  I can't tell you enough how I love these bunnies!

Did you know there is a special Valentines Special going on right now??  There are 7 sets in the shop marked $3 or less!  You can check those out right here!  Prices are good While Supplies Last until February 14th!

Thanks so much for stopping and I hope you enjoyed your visit!  If you have seen something that you must have from the shop I have this for you:


Come again soon for more CAS-ual Fridays inspiration!  Or why not get it in your inbox!  Sign up in the sidebar to the right so you never miss a post and be sure to sign up for the Newsletter so you get all of the latest information about sales and new products!