Translate

Showing posts with label Somebunny. Show all posts

Tuesday, March 24, 2020

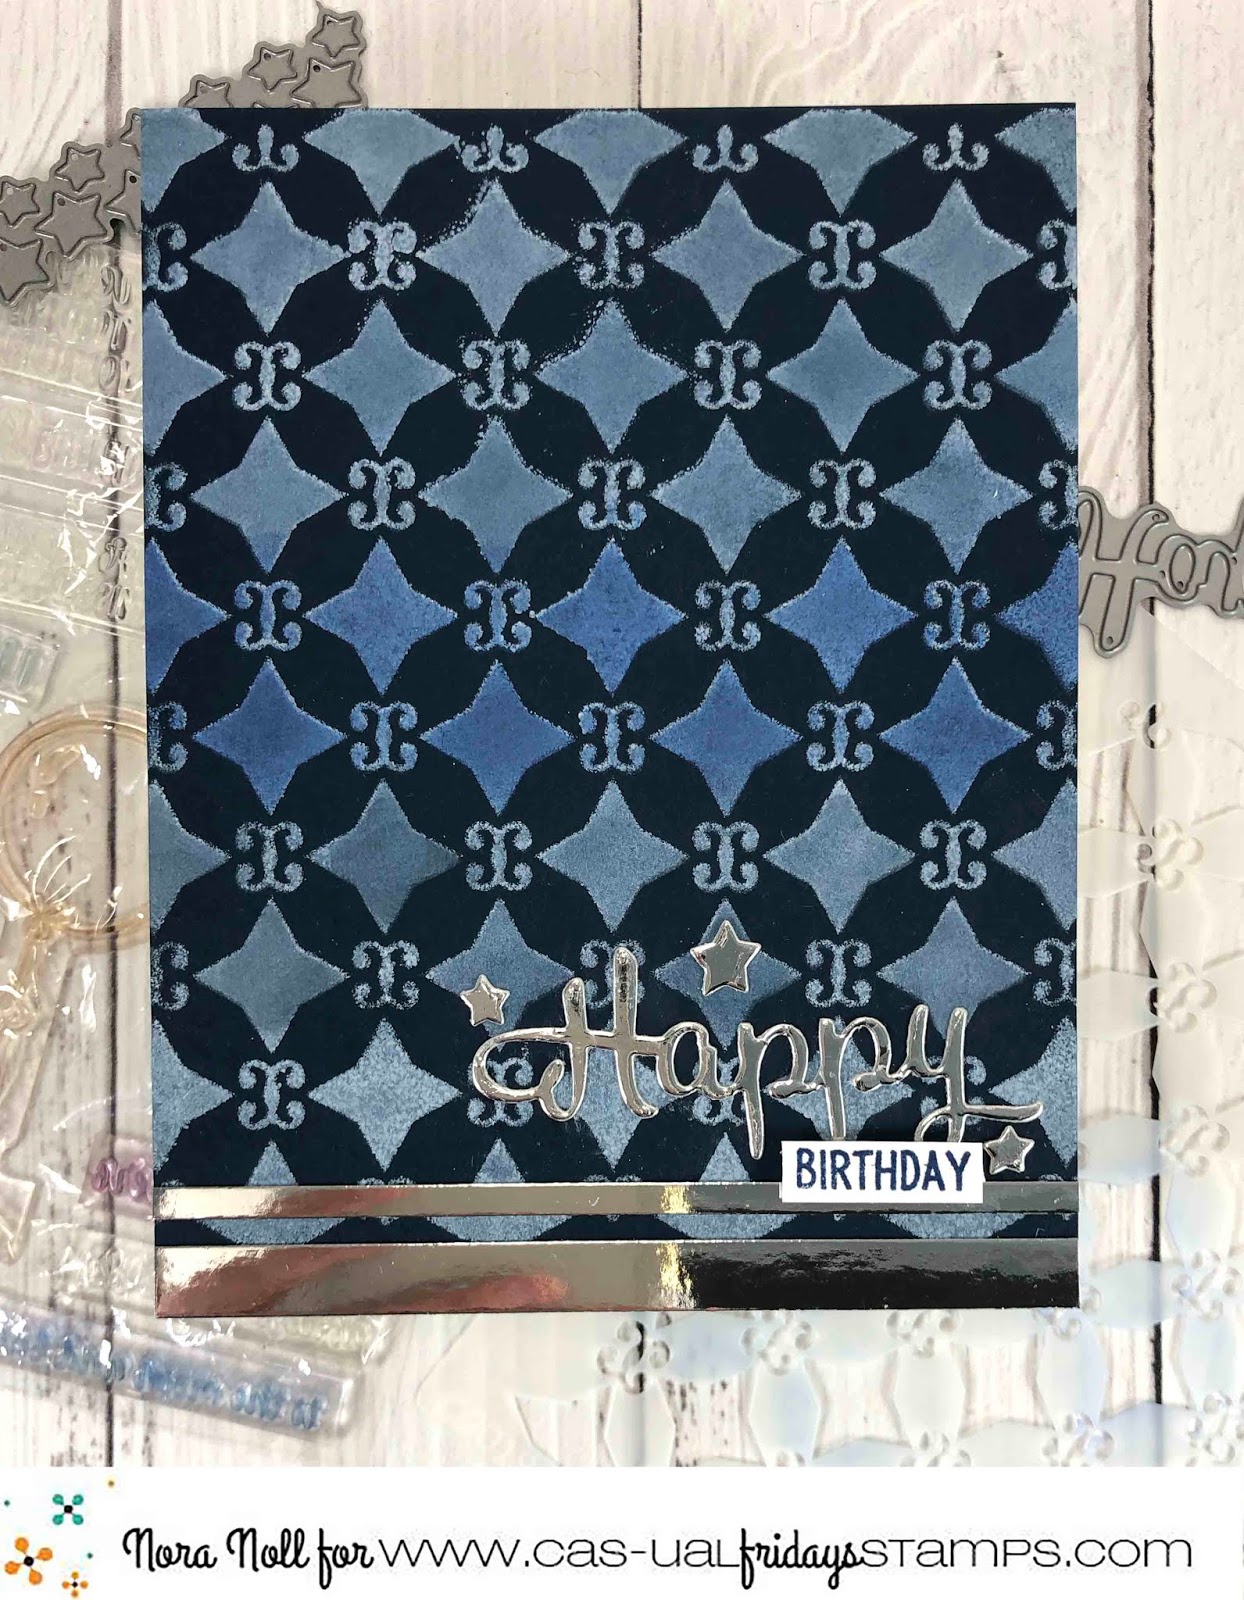
Happy Birthday using a Stencil Technique on Dark Cardstock

Hi everyone!! Nora here from A Creative Touch with a masculine birthday card using stencils on dark cardstock.

Stamps: Somebunny
Stencils: Starlequin


I started off this card by daubing white pigment ink through the Starlequin stencil onto navy blue cardstock. I tried to cover the blue paper with as much white as I could get onto it. Next I heat set the ink with a heat gun.


I then used blue dye ink and foam daubers to blend three different colors of blue over the white, creating an ombre look. Just make sure that the pigment ink is dry because you do not want to contaminate your ink pads.


I left the bottom white as I knew that I was going to cover most of it up with the sentiment. 


Using the Happy Hanukkah Fri-die, I die cut "happy" out of silver cardstock and used a trimmer to cut two different width strips.


I adhered both strips of cardstock to the bottom of the card, and added the sentiment above.


I masked off sentiment from Somebunny and used blue dye ink to stamp"birthday" onto a white strip. I used foam adhesive to adhere it to the card.


The card still needed a little something so I die cut some stars out of silver using the Fun-Fetti Fri-dies and adhered them around the sentiment. 


This was a really fun card to create and I urge you to give this technique a try.

I hope that I inspired you today and don't forget to use my code NORASENTME for 15% off in the CAS-ual Fridays Store.


 I thank you for stopping by today. I hope you have a FABULOUS day!!


Wednesday, December 18, 2019

Guest Star Sue

Sue is back for her last guest gig day with us. I have loved having her here this month and I hope you have enjoyed getting to know her through her wonderful work. She has created so many great cards, I hope you've felt inspired.

Please welcome back Sue!


Hey there. Well this is my last post for the CAS-ual Fridays Stamp company. I have had such a good time doing some design work for this great company this month. I used the Somebunny stamp set and Bunny dies today to create this card and 3 more on my blog.


For my card I wanted a dreamy watercolor sky for our bunny to be hanging from so I wet a water color panel and played with soft pink, yellow and navy watercolors to create a sky. When it was dry I stamped the bunny, stars and greeting in navy ink. Trimmed the panel to 4 by 5.25" and added to an top-folding, A2 navy card base. Whenever I create a card with a dark colored card base I add a white panel inside the card to write on.
I huge thank you to Michele for this opportunity to create some fun cards with her fabulous stamps. Now is your chance to go check out the other three cards I made on my blog and get the special code for 15% off your order!


Monday, March 11, 2019

A Pastel Rainbow Alcohol Ink Background


Lisa here and today I'm sharing with you an alcohol Ink pastel rainbow background made using Copic marker refills!!  I knew I wanted a little softer look for this background and I turned to my copic refills because I knew I had some really light colors I could use.


I started by picking out my colors first and laid them in the order I wanted to use them.  You have to work quickly with this technique so if you have separate applicators set up for each color, that's easiest, however, I only had one applicator and then took out as many pads as I had colors.   Then I cut a panel from some Yupo Paper.


I quickly worked my way down the paper.  I dropped a few drops of blending solution and then a few drops of the ink refill across the paper...maybe 4 light drops.  Then I took my applicator and dragged it across the paper.  I moved to the next color and did the same all the way down the paper.  Remember that your colors are going to move together so choose colors next to each other that blend well... the fun thing is it's easy enough to play with the colors because you can always start over!  I did go over a couple areas more than once to make the color a little darker, but in the end I got the exact look I was hoping for!


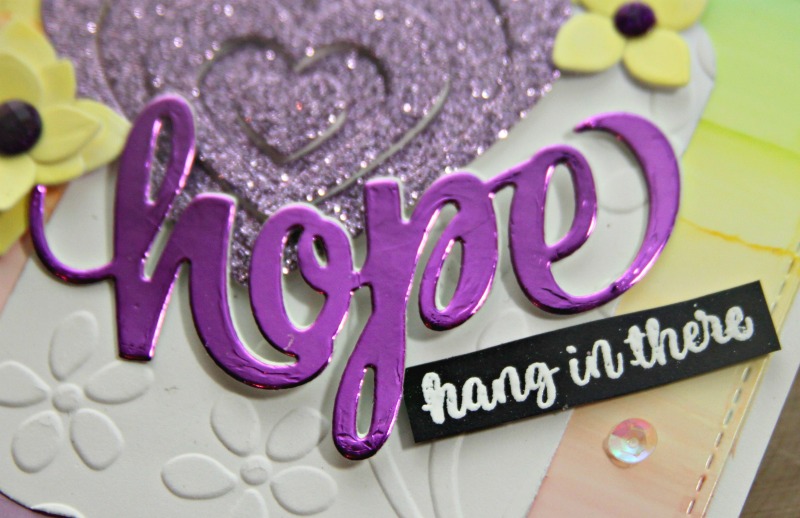
While I waited for the panel to dry which really doesn't take very long at all, I cut all of my pieces... that beautiful heart from the Heart Board Fri-Dies from some purple glitter paper; the beautiful Big Hope Fri Die from some purple foiled paper; the Bubble Box Fri Die from white cardstock (embossed this with a folder);  and I used the same yellow from my background to color the little bit of Yupo scrap that was left from cutting my background panel and then used the 4 Petals Fri Dies for my flowers.


I layered it all together and added some purple gems to the centers of my sweet yellow flowers.  And it was fun to alternate thicknesses of foam tape to every other heart cut out to accentuate each individual piece.


I absolutely love this Big Hope die... I cut it a couple more times from plain old cardstock so I could stack them.  I love the dimension it gives to your word die cuts.  And then I completed my sentiment using the small "hang in there" from the Somebunny Stamp Set... a cute little pick me up for a friend that's having a rough time.  I love to mix and match my sentiments from various stamp sets... you never know what will make a great combo!

And there you have it.. a pastel alcohol ink rainbow!  

Thanks so much for stopping and hope you've enjoyed your stay!  Be sure to come back often for more Cas-ual Fridays Inspiration!

And if you find there is something you must have from the shop I've got this for you:


Monday, July 23, 2018

Colored Cardstock for Setting a Scene

Hello everyone! Ashlea here, and I'm sharing a super simple tip for setting a scene for your card. Colored card stock is not a new supply by any stretch of the imagination, but for someone like me, it doesn't get a whole lot of love. I tend to make very simple white base cards, so colored card stock is something I collect and love but not something I use very often. That changes today! ;)


As I was staring at my rainbow of pretty colored card stock, I had an urge to use this deep navy blue color and I knew exactly what I could do with it to fit my clean and simple style. Check out the video below to see how simple creating this night sky scene was with just card stock and the Somebunny Stamp and Bunny Fri-die set! 

PSST! There are also some tips for lining up closed dies (the ones you can't see through)


Now that I've opened this door for myself, I have so many ideas! I would love to see your favorite ways of using colored card stock. 


I hope that you have enjoyed my post and video and maybe gotten an idea of how you can use your colored card stock if you don't always tend to use it like me!

  
                                          SomeBunny Stamp Set               Bunny Fri-Dies

Thank you so much for joining me. Create some happiness every day!

Ashlea


Wednesday, April 4, 2018

Hang in there

***Cuteness Alert***
Jeanne has outdone herself...again! She had created a really darling encouragement card using our Somebunny stamp set.


Loving how she popped the bunny and the balloons up on the card. 
She got creative with the balloons! The stamp image is a single balloon but she cut a few balloons and added real string too! Super cute!

Somebunny is on reorder but you can find it online at www.simonsaysstamp.com  


Sunday, March 25, 2018

I Love you to the Moon and Back!

I love you to the moon and back.
A line so many of us have read to our children, grandchildren and more.
It's a line that has always made my own children giggle with comfort and delight. 
It's a line that in infinite.

Nora has created a wonderful card using our newest Somebunny stamp set and Bunnies Fri-Die


Oh gosh! The little Fun-Fetti  Fri-Dies stars with her sweetly colored bunny against that night sky...breathtaking!


Monday, March 12, 2018

March Release Day 1!!

Hey everybody!!
Guess what???
I designed a whole bunch of new stamps and dies, and this month I'm releasing some of them. Woot!!! 
Each day this week, we'll debut a new stamp set with its coordinating Fri-Die. You are going to love them so much! But here is the best part...you don't have to wait until the end of the week to get the new goodies! That's right!!


Shona paired it with Bubble Box Fri-Dies


From Vicki


From Lisa


From Kimberly


From Jeanne


From Nora


So what do you think?? Is your mind swirling with fun ideas to use this darling new stamp and die sets? I think this is one you'll use again and again :)
The best part is you Don't Have to Wait!!
You can get these new goodies right NOW! Wooot!!
Head on over to the shop to grab your new goodies and then join us again tomorrow when we'll showcase amazing projects featuring the next debut!

Be sure to join our newsletter on the sidebar to get advance notice of special events and offers.

Then follow us to see more projects using these sets and more!