Translate

Showing posts with label handmade. Show all posts

Sunday, January 6, 2019

2 Cards Same Style with Somebunny Stamp Set by Maria


Hello CAS-ual Fridays fans!  Maria here on the blog with you today and I am so excited to be sharing two cards with you for my first post in 2019.  

For today's project, I am showcasing the Somebunny stamp set and dies.  Here's what they look like:
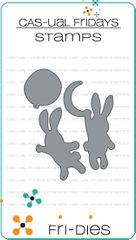


I wanted to create a shaker card for my first project.  I inked up Some Bristol smooth white card stock with my distress oxide inks.  I used a stencil from my stash to add the stars on the background.  I then used a double-stitched heart die to cut out the middle piece.  I adhered some acetate sheet onto the window and created my well using foam adhesive.  I added some gold confetti sequins and adhered this piece onto my card base.

I stamped the two bunnies from the Somebunny stamp set with memento ink and I did some simple Copic coloring.  I die-cut the images with the coordinating dies.  I adhered the bunny on my foreground and added the little stars.


To finish my design, I stamped the sentiment on my card and added some white dots using my Sakura gel pen.  Here's a closer look:


For my second card, I wanted to create the same design but use a different stencil.  I used my Tumbling hearts stencil and inked up the background with my distress oxide inks.  I used the double-stitched heart die again to die-cut the middle piece.  I adde some foam adhesive onto the back of my colored background and adhered this piece on my card base.  I also adhered the bunny with foam adhesive.


To finish the design, I added some white dots with my Sakura gel pen and stamped the sentiment.  Here's a closer look:


I used the same designs on both cards but they look completely different.  Which one is your favorite?  Here's anotehr look:


I hope you like my cards today.  Please don't forget to check out the sales going on right now at the shop.  Don't forget to use my coupon code below to get an additional discount off your pruchase.  Have an amazing day and happy crafting!


Sunday, September 23, 2018

Put On a Tutu & Twirl

Hello CAS-ual Fridays fans! Maria here on the blog today, with a simple inspirational card, showcasing the Tutu stamp set.

Tutu Stamp Set
I started out with some Bristol smooth white card stock and inked in up with Squeezed Lemonade and Wild Honey distress oxide inks.  I blended the colors together and sprayed it with water using my distress spray bottle.  I dabbed it dry with paper towel.

I used a snowflake stencil from my stash and applied my Nuvo Glimmer paste using my palette knife.  I let it dry for about half an hour.  

I stamped my little ballerina with my Jet Black ink and colored the image with my Copic markers.  I fussy-cut the image with my scissors and adhered this piece with some foam adhesive.


I just LOVE the sparkly effect of the glimmer paste taking on the color underneath.  I finished my design my stamping my sentiment with versafine Onyx black ink.  Here's a little close-up:


I added some sparkling clear jewels on my little ballerina too.  I am giving this card to a friend of mine.  Her granddaughter is now taking ballet lessons and I think she's going to love this card.


I hope you like my card today.  Don't forget to use my coupon code below for 15% off your order.  Also check out the retiring stamps sale because once they are gone, it will not be restocked anymore.


Thank you for stopping by and happy crafting!


Sunday, September 9, 2018

Missing You Sooo Much


Hello CAS-ual Fridays fans!  Are you getting excited for the fall season to start?  I just can't wait for the cooler weather, pumpkin spice lattes, and fall scented candles!

For my card today, I'm showcasing the Bushy Tailed stamp set.


I started out by stamping my image on some Neenah solar white card stock and colored it in with my Copic markers.  I cut an A2 size piece of some Bristol smooth white card stock and inked up my background using some hills stencil from my stash, with some distress oxide inks.  I also used a clouds border stencil to create the sky.


To create my fall scene for my cute critter, I stepped out of my comfort zone and drew some tress and leaves in the background, using my Copic markers.  This is the first time I've ever drawn a scene from scratch.  I got so nervous I thought I was going to hurl, haha! (just kidding)  I think it turned out okay, I just need more practice.  After all this is "handmade" not Hallmark, right?


I added more depth by using different colors of Copic markers to create the leaves.  


I used my cool gray Copic markers to add shadows and make it look more realistic.  I adhered my little critter and finished the design by stamping the sentiment.


Even though my drawing wasn't perfect, I still love how this card turned out.  


I think using different distress inks for my background added more depth and dimension to my card.


I hope you like my project today and got inspired.  Please don't forget to use my coupon code (below) for 15% off your order at the shop.  Happy crafting!


Tuesday, July 24, 2018

Coffee or Middle Fingers For Today


Howdy CAS-ual Fridays fans! Maria here with you today!  Who is getting ready to travel this summer?  Are you looking forward to having some time off?  Those family get-togethers are fun, but can sometimes be really stressful.  

For my project below, I am showcasing the Cup of Coffee stamp set, Coffee Cup Fri-Dies and the Hot Coffee stamp set.  I have been meaning to make this card to give to a family friend who drinks a lot of coffee (and vodka), especially when she's upset.  I figured this card will cheer her up and make her laugh.

Cup of Coffee Stamp set


Coffee Cup Fri-Dies


Hot Coffee Stamp Set


I started out by die-cutting my coffee cup on a watercolor background paper .  I also die-cut out the middle piece of the coffee die on some Neenah solar white card stock and used my E35 and E37 copic markers to color it.  I adhered this piece to the coffee cup.

On another A2 size solar white card stock, I used a border die from my stash.  I stamped the sentiment from the Hot Coffee stamp set all over my white card stock to make it look like watermark.  I think the sentiment "possibly VODKA" is hilarious!

I die-cut the coffee script sentiment using the die that is included in the Coffee Cup Fri-Dies with some black card stock.  I adhered this piece on the coffee cup.  To finish my design, I positioned the sentiment onto my stamping tool and masked some of it so that it can fit on the coffee cup.  I also used my Sakura Gelli-roll white pen to add some details to my card.


I specifically stamped the sentiment "possibly VODKA" with a light gray ink so that it wouldn't overwhelm the whole card design.  Here's a little close-up:


I absolutely adore these stamp sets! 


I hope you like my project today.  Please don't forget to use my coupon code below when you place an order at the shop to get 15% off.  Have a nice day and happy crafting!