Translate

Showing posts with label Calm and Loving. Show all posts

Tuesday, October 8, 2019

Thinking of You


Happy Tuesday everyone!! Nora here from A Creative Touch

Fall is in full swing here in New England and the trees are turning such pretty shades of oranges, reds and yellows. In honor of fall, I decided to create a fall card using the oak trees in my yard as inspiration. I pulled out the Calm and Loving stamp set that is retiring and the Acorn Fri-dies to make my card.


I started off by stamping the "branch" on my card in brown ink using the Calm and Loving tree. I made this into a branch by curving the end


Next I used brown dye ink, "Carved Pumpkin" and "Mustard Seed" Distress Ink to do a toothbrush technique. I dabbed ink on an acrylic block, sprayed it with water and then dragged my tooth brush threw the watered down ink. I used my finger over the toothbrush to get the splatter effect.


While the card front was drying, I blended Distress Inks in green, yellow and orange onto a scrap of white cardstock. I then used the oak leaf from the Acorn Fri-dies to die cut two leaves from the ink blended paper.


My next step was to use the vein die from the set to emboss some veins into the yellow leaves.


I trimmed two scrap pieces of paper, one in orange and one and brown, into strips. I then stamped the sentiment from the Calm and Loving stamp set onto the orange strip.


My pieces were complete and then I assembled my card.


The sentiment strip was adhered using foam adhesive and I added the jute bow to "tie" the leaves together.


My last step was to adhere some sequins randomly around the edges of everything. 

That is all from me today. If you want to do some shopping, use my code NORASENTME in the CAS-ual Fridays Stamp Store to get an additional 15% off, even sale prices!!


I thank you for stopping by. Have a FABULOUS day!!


Supplies I used:


Tuesday, August 27, 2019

Hello everyone!! Nora here from A Creative Touch with a simple card with using the Calm and Loving Stamp set on the retirement list.


I always like to use the stamp sets in a different way and thought the hearts from the tree would look good inside a die cut heart.


I started the card by die cutting a heart out of a strip of striped pattern paper.


Using the die cut paper as a guide, I traced a heart onto an A2, white card base and then stamped the hearts inside the heart with pink ink.


I used foam adhesive under the pattern paper to give the card a bit of dimension and then adhered two sentiment strips that I had stamped using sentiments from the stamp set. I also colored in some of the hearts with a clear glitter pen and used Glossy Accents to give them some shine.


My last step was to adhere some pink sequins around the sentiment strips and add some Nuvo Jewel Drops in the center.


This stamp set is being retired so when it is sold out, it will be gone! Use my code NORASENTME to get an extra 15% off the sale price. 


Don't forget to check out the "Sale Category" in the store. There are some GREAT stamp and die sets still available!!

That is all from me today. I hope you all have a FABULOUS day!!!


Wednesday, February 27, 2019

A Trio of Cards using Pretty Posies


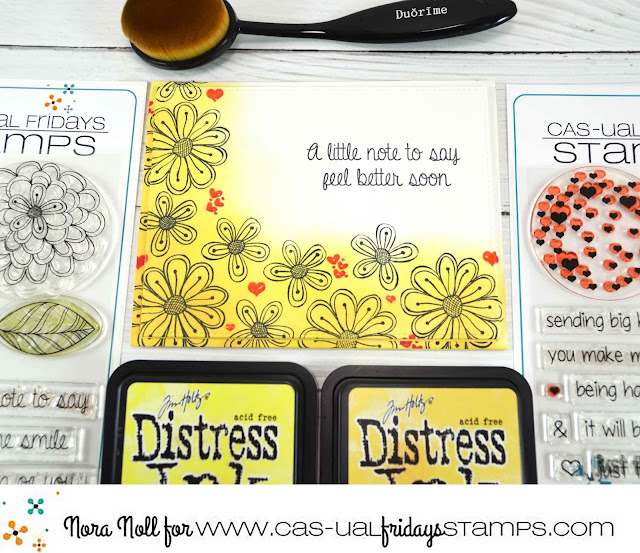
Happy Wednesday!! Nora here with a trio of cards using a simple design.


I needed a bunch of get well cards but I am not great at making cards EXACTLY the same. I get bored very easily so I decided to use the same supplies but vary the stamping a bit along with playing with some colors.

For each card, I started off by using Distress Inks to blend color onto a piece of white cardstock using a blending brush.


I then stamped the flowers from Pretty Posies, in black, along the left and bottom of the white cardstock.

Next I added hearts, purple on the purple card, and red for the yellow and green, using the Calm and Loving stamp set.


On the green card front, I added another step by coloring in the flowers with colored pencils.


On this particular card front, I stamped each flower, colored it in, and then stamped over it again with the black ink. Using Pretty Posies, I stamped each sentiment block separately in inks that coordinated with the colors of each card.


To finish each card, I die cut the front and then adhered it to matching cardstock. I used a clear sparkle pen on the hearts of each card and covered them with Glossy accents. On the green card, I added some confetti sequins as well.

Below are more views of the purple card and the yellow card.


This was an easy way to create a few cards that I needed but each are just a little different to keep my interest in creating. I hope that this has given you a few ideas on making similar cards.

If you decide to purchase any of the products used today, please use my code NORASENTME to get an extra 15% off your total order!


I thank you for taking the time to stop by and be sure to check back this week for another fabulous post from another Girl Friday!! Have a FABULOUS day!!


Stamps Used on this Post:


Wednesday, February 13, 2019

I Love You


Hello everyone!! Nora here today with a card just in time for Valentine's Day. In fact, this will be my husbands card!!

Fri-Dies: Fun-Fetti and Fox Banner 


I started off by scoring 1/4" around a 4 1/4" by 5 1/2" piece of red cardstock. I then cut a heart out of it on the right side. I used this red panel as a guide to trace the heart, in pencil, onto the front of an A2, white, top folding card.


Next I stamped the "i love you" from Calm and Loving in red dye ink inside the traced heart. After, I stamped "you make me happy," from the same stamp set, in gray.


When I was finished stamping, I erased the pencil lines and adhered the red panel that I had created earlier. I added a raccoon using foam adhesive from the Bushy Tailed stamp set that I had painted with watercolor. 


My last step was to adhere a red heart that I had die cut using the Fun-Fetti Fri-dies and some sequins. I added some clear sparkle marker and Glossy Accents to finish the card off.

That is all for me today!! 
Thank you for stopping by!!


Want to go on a shopping spree? Use my code NORASENTME to get an extra 15% your total order!


Thursday, January 24, 2019

You Have My Heart

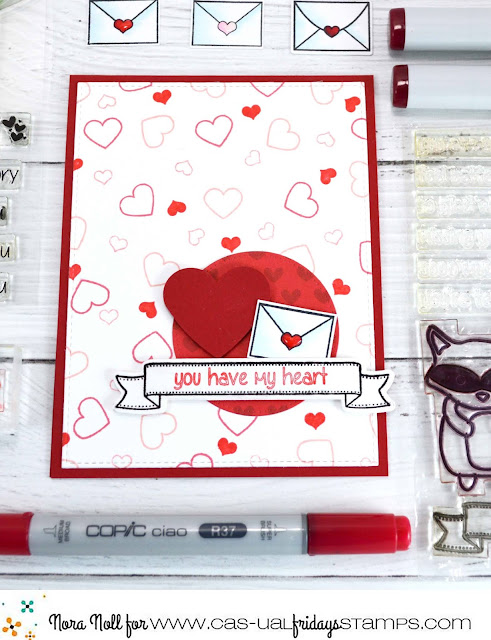
Hello everyone!! Nora here from My Creative Touch with a Valentine card using the smaller images in some of the stamp sets. Smaller images often get ignored but are really fun to create patterned papers.


I started off by creating a sketch for this card as a start off point. 


I knew I wanted to use the little envelope stamp from the Special Delivery stamp as an accent and this was the starting off point for creating the whole sketch.

I stamped the background using the small heart stamps from Bushy Tailed and Calm and Loving stamp sets. I stamped the outline hearts with three different pinks and the solid hearts with red.


The banner and sentiment are also from Bushy Tailed. The heart, the banner and the envelope are all popped up over the die cut circle with foam adhesive. 

This is a great template to make a bunch of other cards and I will be using the rest of the tiny envelopes to create some more this week. I hope I inspired you to take a different look at your tiny stamps in the stamp sets you have.

I hope you have a FABULOUS day. I thank you for taking the time to stop by.