Translate

Saturday, June 20, 2015

June 20

Happy Saturday!

Today we have a great tutorial from Deepti that 
shows a great way to use our Tic Tac Toe Fri-Die 
in a unique way.

Look at this beautiful card she created using that die 
and our Mon Ami stamp set...


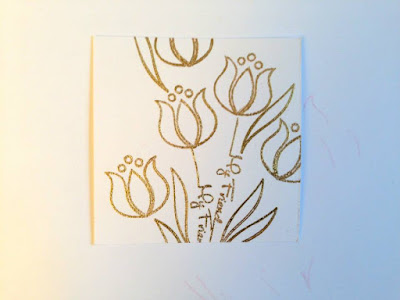
Step 1 - Mark along the die, to cut the water color cardstock to the size


Step 2 - Heat emboss the flowers, and leaves with gold embossing powder


Step 3 - watercolor this piece with a watercolor wash technique using distress inks. In the wash technique water is added first to enable a free flowing effect of pigments.

Step - 4 Die cut the piece with the Tic-tac-toe Fri-die


Step 5 - Use the scissor to separate the connected pieces. This step can be avoided if the watercolor panel is cut slightly smaller than the diecut.


Step 6 - Lay the positive of the die cut on card stock as a guide to arrange and adhered the pieces on card base.

Step 7 - After adhereing all the pieces on card base, remove the positive of the die to reveal the canvas collage look.


I love that she finished it off with a pretty sentiment from our Calm and Loving.

Awesome card, awesome tutorial, let's leave her some love!


Thursday, June 18, 2015

June 18

Happy Thursday!

Angie has created a fabulous tutorial for you today! 
I'm really excited about it, because it's a technique I totally want to learn how to do.

Check it out!


Here is a quick tutorial to explain how I achieved the “messy embossing aka happy accident” technique on my card from May 30:


Gather your materials, including some embossing powder and ink (I used Champagne Mist All Purpose Ink by Tsukineko). FYI, some of my pictures show gray cardstock and some show khaki cardstock, so you’re not losing your mind, it was me.


I painted the ink onto my cardstock base, starting in the middle and moving the brush outward, to give the feel of rays shooting outward from the star. (That sounds corny!)  


Next, I heated it with an embossing gun, originally because I was too impatient to wait for it to dry. That’s where the “happy accident” comes in. I didn’t heat it long enough (impatient, remember?), so the embossing powder stuck to it in some places, creating the “messy embossing” look. So, remember, don’t overheat! J


Next, the embossing, yay! After I die cut the Stars Fri-Dies piece out of my top layer, I laid it over the painted cardstock and stamped the star in the opening. Love how the stamps and dies work together so perfectly! I shook on the embossing powder, then used a dry paint brush to kind of feather it out and remove some to get the look I wanted. Now you’re ready to emboss it with the heat gun.


I did the same process with the smaller star in the center of the card as well as the
“banner streak”” on the front of the card.


Again, I used a dry paint brush to remove some of the embossing powder and create some streaks before I used the heat gun on it.


And that’s “messy embossing”…or maybe you can think of a better name for it! I hope you try it and link up here so I can check out your creations! J


I'm thinking this is pretty super cool!
I'm loving Angie's messy embossing technique 
and I don't know about you, but I'm running to my studio now to try this out! 

Let's leave Angie some love for this!


Tuesday, June 16, 2015

June 16

Happy Tuesday!

Virginia is going to knock your socks off with her 50 cent altered weekly journal!
 She found this cool little planner at Michael's and yes, it was only 50 cents. 

She liked all the cool pockets and thought she could dress this up into something pretty special. 
Check out her step by step process...

1. Make die cut with Lovely Link Fri-Dies
2. Create the template with Bubble Box Fri-Die
3. Cut out a few Mon-Ami Fri-Dies


4. Emboss the title with CAS-ual Elegance 
5. Stamp flowers with Lovely 
6. Plan out the design and create a large flower with Mon Ami Fleur Fri-Die


7. Glue the finished stamped design with Glossy Accent
8. Sew the small flower for extra accent
9. Add Liquid Pearl and sequins for final touches


Lastly, the Bubble Fri-Die was added to personalize the planner.
(Before and after transformation)


Who knew that this planner only costs $0.50?

I think my favorite part is how she made the little Mon Ami Fleurs fan around like a pinwheel. 
This is awesome! 
Such a great reminder of how we can turn something ordinary into something extraordinary with a little bit of imagination, and a whole lot of fun!


Sunday, June 14, 2015

June 14

Happy Sunday!!

Do you remember when Jingle made that cool gold foil card 
and we all started chanting Tu-Tor-i-al???

well....*grin*...here it is!!!

Today I am sharing the Distressed Gold Foil technique I recently used on another card. A few of you asked for a tutorial, so I will be walking through the steps on how to achieve this look.

Supplies:

Stamps: CAS-ual Fridays Stamps Twinkle Stamp Set, CAS-ual Fridays Stamps Wait for it Stamp Set
Dies: CAS-ual Fridays Stamps Stars
Ink: Versamark (clear)
Gold Foil: WOW Fab Foil (gold) (trim a piece to size ahead of time)
Sticky Embossing Powder: WOW Bonding Powder
Burnisher: Teflon Bone Folder (or something similar)
Heat gun
Cardstock: red, black, white, gold


1. Stamp and heat emboss the stars on white cardstock. Working quickly, lay a sheet of gold foil, gold side up, over the warm embossing powder. Use a bone folder to burnish the foil over the embossing powder. As the foil sticks, you will see it the shape while you are working.


2. Keep in mind that this is a distressed foil method. Your foil will look DISTRESSED, not smooth like it does if you use the laminator or a foiling machine. Gently lift the foil sheet off of the image to reveal your foiled image. If needed, you can reheat an area and apply more foil. Die cut your stars.


3. Trim a black panel and die cut one star for the negative cut image (as seen in the completed project photo. Using the same foil technique, stamp, emboss, and foil the sentiment. Because this is a more solid image, you can really see the distressed look on it. I love it!


4. Assemble your card, adding a gold die cut star to the mix, as well. Use foam tape to pop up your stars. Mount the black panel on a red card base for a dramatic look.

Feel free to leave questions in the comments, but please be sure to provide an email address for a response. Thank you

Ok, that was fabulous!
I think we owe her a round of applause! 
*insert applause here*


Saturday, June 13, 2015

June 13

Happy Saturday!

I love today's card sooo much!
Check out what Marcie created using our
Stalk Up Fri-Dies and
Whole Shebang stamps...


ohmygawsh, it's so colorful and fun!!!
I think the black cardbase with a whitewash really makes the colors pop. 
This is just a whole lotta fun!!


Thursday, June 11, 2015

June 11

Happy Thursday!!

Today I have a really pretty card from Zoey.
It's got layers, and doodles, and oodles of coolness!


She used our Stalk Up Fri-Dies and added some hand drawn doodles. 
I really like the way they frame the Bold Wishes sentiment stamped on the Funky Square Tag center. 
She doodled on the square, she doodled around the edge of the cardfront, she doodled everywhere!
It's a really fun and graphic look, and I kinda feel like doodling now :)


Tuesday, June 9, 2015

June 9

Happy Tuesday!

Prepare to have your socks knocked off by Kelly!!
Seriously!!

Today she is sharing a couple of very special scrapbook layouts.
She has this amazing family tradition that she does for each of her cousins, 
She has her family members send in their favorite recipes along with photos of themselves, 
and then she makes them into a scrapbook! 

Here are a couple of pages she did for her cousin's wedding shower...


Isn't it gorgeous?!  
She created a beautiful embellishment between the photo and recipe 
using Stalk Up, and few flowers from her stash. 
If you look closely, you'll see that she also used the fun element 
from our Funky Round Tags as a hot pink layer between her flowers. 
I'm liking that fussy cut Mwah and thinking that might have to become a die to coordinate with the stamp. *wink*


I love how she laced the binding tape through the Linked Fri-Dies cuts. 
Such a wonderful idea for this die!!


I love how she tucked the Heart Note and Double Notes die cuts 
all around the photo, and the stamped music from Love Notes 
with the sentiment tab makes a great border between for the recipe.


Aren't these fabulous?
And isn't it such a neat idea??
It kind of makes me want to scrapbook some of our family recipes for my kids 
and include photos from holidays. 

Thanks Kelly for sharing these awesome layouts, 
and thanks to your family for a couple of yummy recipes!


Saturday, June 6, 2015

June 7

Happy Sunday!

Last week we showed you the top pins from the Girl Fridays. 
It certainly was a lot of fun to see which of their projects 
were getting pinned the most from their blogs.

Today, I'm going to show you some of the awesome projects 
designed by YOU 
that I found on Pinterest with #casfridays! 

These projects knocked my socks off!!

CAS-ual Fridays Love Notes stamp set and coordinating die - available at i {heart} papers! Designed by Judy Rozema~
This card from Judy  using our Heart Note Fri-Die and Love Notes makes my heart super happy!

CAS-ual Fridays Stamps loves this white on white card from Sindhu using our 4 Petals Fri-Dies. #casfridays

I adore the fun way Sindhura arranged our 4 Petal Fri-Dies

handmade birthday card ... bright nine patch pattern stamped with design blocks ... luv the squared up birthday sentiment of the same size as one of the nine patches ... black line from layering is great way to finish off the design ...
Oh gosh! This Bold Wishes beauty from Michelle at Pretty Periwinkles is awesome!!

Lydia's Houndstooth card is awesome! The Loving Thoughts sentiment looks cool stamped at an angle, and I love her Shuffle Fri-Die cut hearts which she backed with a red metallic sheet. www.cas-ualfridaysstamps.com #casfridays #sh

and I simply adore this one from Lydia!
She used Houndstooth, Loving Thoughts and our Shuffle Fri-Dies.

As an added fun bonus to cap off our week o' fun, 
ALL of the stamps and Fri-Dies from today's post